Lab Manual: Refraction Through Prism | Lab Manuals for Class 10 PDF Download
Objective
To trace the path of the rays of light through a glass prism.
Materials Required
A glass prism, some drawing pins, white paper, a drawing board, adhesive tape, a protractor, a sharp pencil and a measuring scale.
Theory/Principle
Refraction of Light Through a Prism
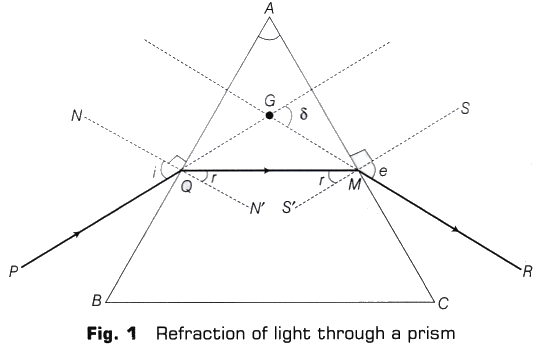
Prism is a transparent refracting medium bounded by atleast two lateral surfaces, inclined to each other at certain angle. It has two triangular bases and three rectangular lateral surfaces. The angle between two lateral surfaces is called angle of prism (∠A).

Fig. 1 shows refraction of light through a prism, where,
PQ = incident ray,
QM = refracted ray,
MR = emergent ray,
∠A = angle of prism,
∠i = angle of incidence,
∠r = angle of refraction,
∠e = angle of emergence,
∠δ = angle of deviation.
Note: When a ray of light passes through a prism, it bends towards the thicker part of the prism.
Angle of Deviation (∠δ)
It is the angle which the emergent ray (produced backward) makes with the incident ray (produced forward). It depends upon angle of prism (∠A), angle of incidence (∠i) and angle of emergence (∠e) and is given by ∠δ = ∠i + ∠e – ∠A.
Procedure
- Fix a white sheet of paper on a drawing board. Draw a thin line XY at the middle of the paper.
- Draw a thin line NEN’ perpendicular to the line XY at point of incidence E as given in the figure below. Also, draw a line DE making any angle, preferably between 30° and 60°.

- Place the prism with one of its refracting surfaces AB along the line XY.
- Mark the boundary ABC of the glass prism holding it firmly with your hand.
- Fix two pins P1 and P2 vertically by gently pressing their heads with thumb, on line DE at a distance of about 5 cm from each other. View the images of pins P1 and P2 from the opposite face AC of the prism.
- Fix two more pins P3 and P4 vertically such that the feet of pins P3 and P4 appear to be on the same straight line as the feet of the images of the pins P1 and P2 as viewed through the face AC of the prism.
- Remove the pins and prism. Mark the positions of feet of pins P3 and P4 on the sheet of paper.
- Draw a straight line joining the points that mark the positions of pins P3 and P4. Extend this line so that it meets the face AC of the prism at point F. The line FG represents the path of the emergent ray.
- Extend the direction of incident ray DE till it meets the face AFC. Also extend backwards the emergent ray FG as given in the figure. These two extended lines meet at point FI (as shown in Fig. 2).
- Repeat this experiment for more angles of incidence.
Observations and Calculations
 Mean value of angle of incidence,
⇒ ∠i = ……………
Mean value of angle of deviation,
⇒ ∠δ = ………….
Result
- The path of a ray of light incident on one face of glass prism is shown by the ray DEFG in Fig.2.
- The value of angle of deviation is ………… for the angle of incidence ………………
Precautions
- While viewing the collinearity of pins and images, the eye should be kept at a distance from the pins so that all of them can be seen simultaneously.
- The pins P1, P2, P3 and P4 fixed on the paper may not be exactly perpendicular to the plane of paper. It is therefore desirable to look at the feet of the pins or their images while establishing their collinearity. Thus, the position of each pin is marked with pointed tip of the pins on the paper.
- In order to locate the direction of incident ray and refracted ray with a greater accuracy, the distance between the pins P1 and P2 and that between P3 and P4 should not be too short or too large. A separation of nearly 5 cm between the pins would be sufficient.
The angle of incidence should preferably be taken between 30° and 60°.
Sources of Error
- Pins may not be exactly perpendicular to the paper.
- The feet of the pins may not be in same straight line.
- In observing images of P1 and P2, eye may be very close to the pins.
- Prism may not be fixed properly.

|
Explore Courses for Class 10 exam
|

|


