Detailed Notes: MS Powerpoint | Computer Science - Class 5 PDF Download
| Table of contents |

|
| Introduction |

|
| Design Menu |

|
| Animation Menu |

|
| Viewing Presentation in Different ways |

|
| Previewing and Printing a Presentation |

|
| Showing presentation using Projector |

|
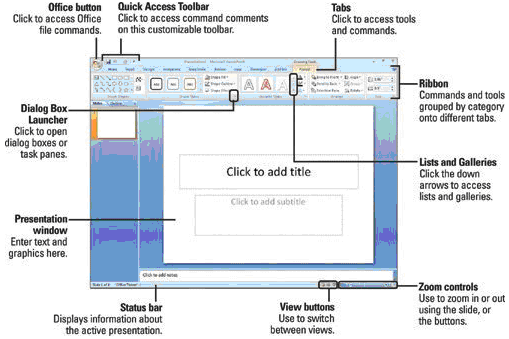
Introduction
A PowerPoint presentation is made up of a series of slides that can contain charts, diagrams, pictures, SmartArt diagrams, bulleted lists, eye-catching text, multimedia video and sound clips, and more.
PowerPoint 2007 provides a variety of professionally designed templates, themes, and style galleries to help you create great-looking presentations.
To start PowerPoint 2007 from the Start Menu
- Click on the Start button, point to All Programs then Microsoft Office and click on Microsoft Office PowerPoint 2007.
- The first screen that you will see a new blank presentation begins automatically with one slide.
Design Menu
Sometimes we need to design your presentation slides and make them look nice. You may present slides’ theme, such as change its color, font, and effect. Sometimes you may need to changes slides’ background, page setup, and more. So you need to find out those slide designing features before your modifying.
1. Slide Designs
Design tab is set and groups all slide design features. In Design tab, you can easily modify and customize your slides’ theme, background, and more: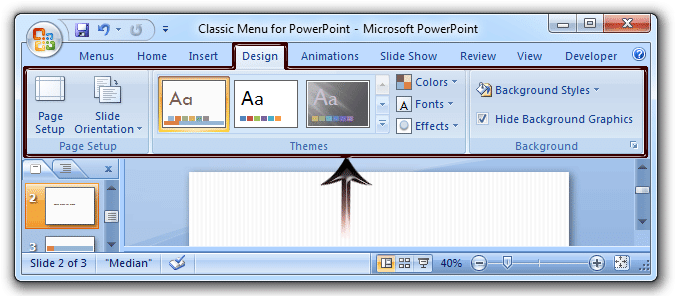
2 Transition Menu
The Transitions allow you to get creative with your slides. Adding transitions allows you to add a little flair between the slides. Transitions are visual effects when moving from one slide to the next slide. For example, you can make one slide dissolve slowly away as the next slide appears. You can get more creative and make one slide push the old slide out or even use an effect that looks like doors opening to your next slide.
Different Effects on Slides
If you click on the Animation tab, on the top of the ribbon, you will see that there are many different transitions you can apply to one slide or to all slides at the same time. Just select the slide for your transition and click on the transition effect. You even get a preview of what it will look like. Click on Apply to All to add the transition to all slides at once.
Animation Menu
Animations will allow you to add visual effects and movement to text, Objects and graphics.
1.Different Effects on Object
To apply a built-in animation effect in Office PowerPoint 2007, do the following:
1. Select the text or object that you want to animate.
2. On the Animations tab, in the Animations group, select the animation effect that you want from the Animate list.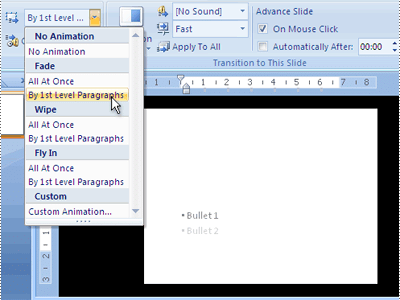
Create and apply a custom animation effect to text or objects
You create custom animations in the Custom Animation task pane. The Custom Animation task pane shows important information about an animation effect, including the type of effect, the order of multiple effects in relation to each other, and a portion of the text of the effect.
Viewing Presentation in Different ways
1. Managing Slides in the Slide Sorter View
In the Slide Sorter view, you see a miniature of each slide. The Slide Sorter view not only gives you a great view of your presentation as a whole, but it also lets you rearrange and hide your slides. If you wish to increase or decrease the size of the slides you are reviewing, you can adjust the view by zooming in and out as necessary.
2. Running a Presentation in the Slide Show View
After making your complete presentation, you need to present it/run it.it can be easily done by Slide show Menu.
You can click on “From Beginning” for running the slide show from first slide or you can click on “From Current Slide” if you want to run the slide show from current slide.
Previewing and Printing a Presentation
The Print Preview feature lets you see how your PowerPoint slides will appear before you print them. To use the PowerPoint Print Preview feature, choose Office— Print — Print Preview.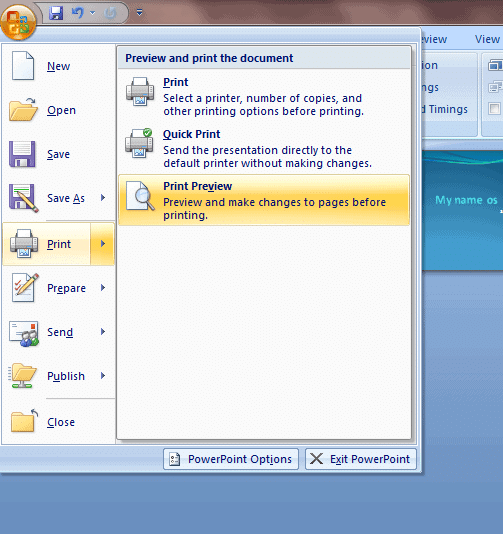 From the Print Preview screen, you can zoom in to examine the preview more closely by clicking anywhere in the preview area.
1.Selecting Page Setup Options
The PowerPoint 2007 Page Setup group consists of a Slide Orientation control so you can display your PowerPoint presentation in Landscape mode (the default) or Portrait mode. You should use Portrait mode only if you intend to print the slides on transparency masters and project them with an overhead projector, or present the slide show on a computer screen with a portrait orientation.
Click the Page Setup button in the Page Setup group to display the Page Setup dialog box. This dialog box gives you extra control over your presentation’s page setup.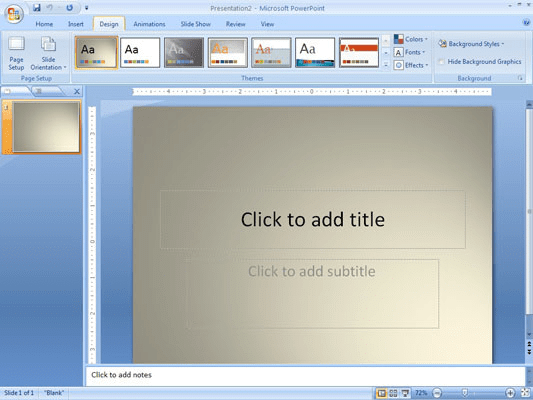 Click the Page Setup button to open the Page Setup dialog box
The following list describes the controls in this dialog box:
• Slides Sized For: This drop-down list lets you set the size of your slides based on how you plan to present them. The most common is to present the slides on a standard computer screen, which has an aspect ratio of 4:3. Other options on this drop-down list include different screen ratios, suitable for wide-screen displays, standard sized paper, and even 35-mm slides. A Custom option lets you set any width and height.
• Width: Set a custom width for your slides.
• Height: Set a custom height for your slides.
• Number Slides From: If your slides include numbers, this option lets you set the number for the first slide. The default is 1.
• Orientation: Set the orientation to portrait (tall and skinny) or landscape (short and fat). You can set the setting separately for your slides, handouts, and notes. The most common setting is for the slides to use landscape orientation and the notes and handouts to use portrait.
2. Printing a Presentation
Printing a Presentation: - The simplest way to print your presentation is to print your slides on regular paper.
Click on the OFFICE BUTTON then on PRINT to open the Print dialog.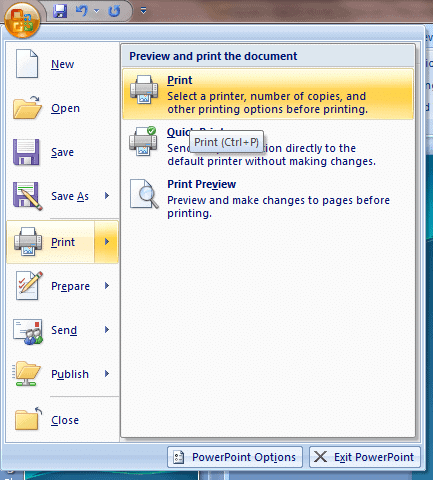
Showing presentation using Projector
To configure Microsoft PowerPoint to work with a projector in presentation mode, follow these steps:
- Open PowerPoint and select Slide Show from the menu at the top, then select the Set Up Show option.
- If you are on a laptop, press the Fn key and F8 key simultaneously to enable your laptop's secondary video output.
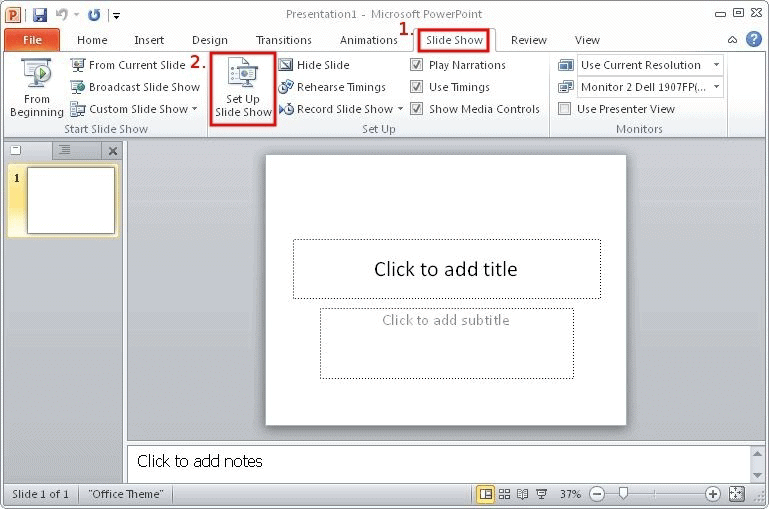
- If you are on a laptop, press the Fn key and F8 key simultaneously to enable your laptop's secondary video output.
2. In the Set Up Show options, select the second monitor choice under Display slide show on, i.e. anything besides Primary Monitor.
3. Now select the check box for Show Presenter View. This will enable the presenter mode on the monitor that is selected.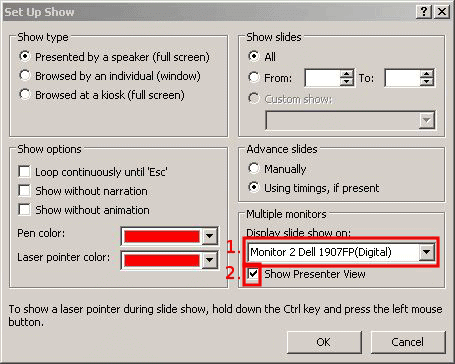 Run the presentation, your laptop screen should display an image with your slideshow and an area for your presenter notes at the bottom; while the projector should display only the slideshow.
|
36 videos|39 docs|27 tests
|
FAQs on Detailed Notes: MS Powerpoint - Computer Science - Class 5
| 1. How do I create a new PowerPoint presentation? |  |
| 2. How can I add a picture to my PowerPoint slide? |  |
| 3. How do I apply a theme to my PowerPoint presentation? |  |
| 4. Can I add animations to my PowerPoint slides? |  |
| 5. How do I save my PowerPoint presentation as a PDF file? |  |


