Class 1 Exam > Class 1 Notes > Hands on Art & Craft > Craft Ideas: Winter Landscape Art
Craft Ideas: Winter Landscape Art | Hands on Art & Craft - Class 1 PDF Download

Material Required
- Newspaper
- Green watercolors (We love liquid watercolors!)
- Paintbrush
- Sponge paintbrush
- Light blue and white cardstock
- Bubble wrap
- White paint
- Paper plate
- Metallic markers
- Scissors
- Glue stick
Directions to be followed
- Start by painting a section of newspaper with green liquid watercolors. The newsprint will be saturated at first but let it dry completely for several hours or overnight and it will harden back up.
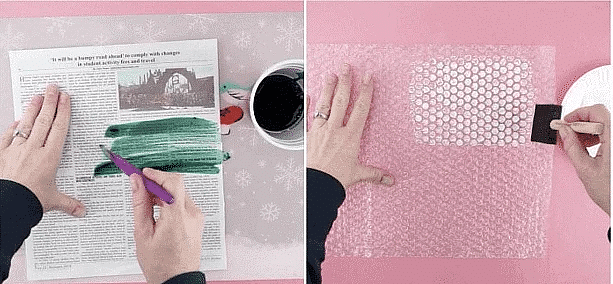
- Cut off a section of bubble wrap a little bigger than your light blue cardstock. Pour some white paint onto your paper plate and use a sponge paintbrush to paint the raised bubbles of the bubble wrap with the white paint.
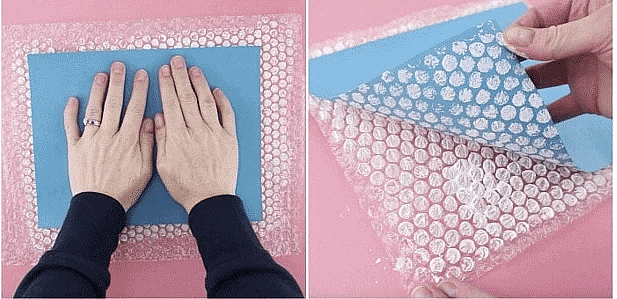
- Carefully place your blue cardstock down onto the painted bubble wrap. Rub your hands all over the paper to transfer the white paint from the bubbles onto your paper.
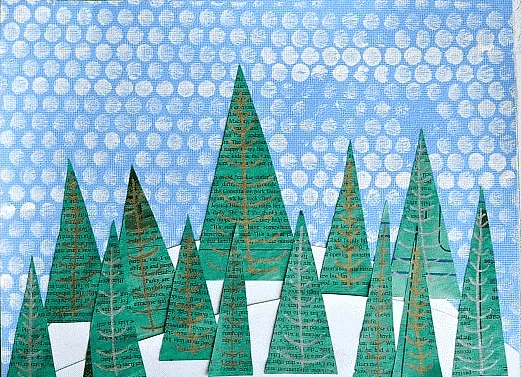
Slowly peel off your blue cardstock from the bubble wrap to reveal the falling snow. Set your paper aside to dry completely. - Once your painted newspaper has finished drying, cut out about 12-15 triangles in in varying sizes. Each of the triangles will become a winter tree for your art project.
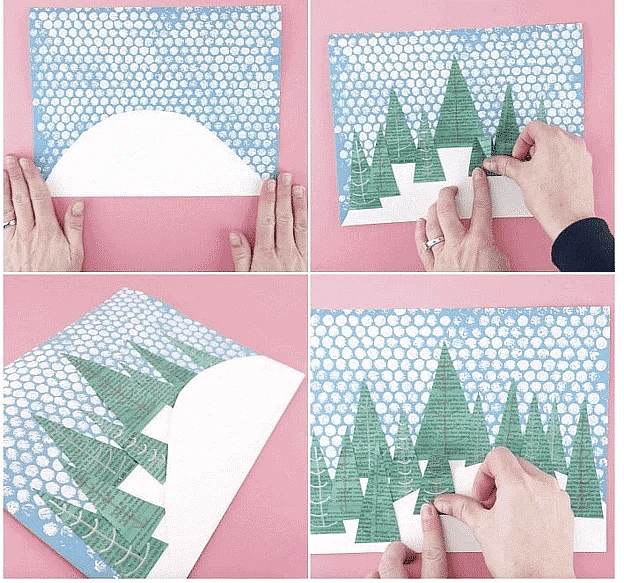
- Use metallic markers to draw a trunk and limbs on each of your newspaper winter trees. We used silver, gold and copper to add extra color to our artwork.
- Cut out two snowy hills from a sheet of white cardstock paper with the paper lengthwise. We used both the top and bottom flat edge of the paper as the bottoms of each of the hills. Ideally, you want one hill to be larger than the other to help add dimension to your winter landscape.
- Glue your larger snowy hill at the bottom of your snowy blue cardstock.
- Arrange several of your newspaper winter trees around the white hill. When you are satisfied with their placement, use a glue stick to glue each of the trees in place.
- Glue your second snowy hill at the bottom of your artwork, on top of the other hill and trees. Glue the remainder of your newspaper trees on the snowy hill.
The document Craft Ideas: Winter Landscape Art | Hands on Art & Craft - Class 1 is a part of the Class 1 Course Hands on Art & Craft.
All you need of Class 1 at this link: Class 1
|
46 videos|161 docs
|
FAQs on Craft Ideas: Winter Landscape Art - Hands on Art & Craft - Class 1
| 1. What are some materials needed for a winter landscape art class? |  |
Ans. Some materials needed for a winter landscape art class include canvas or paper, acrylic or oil paints in various colors, paintbrushes of different sizes, palette knives, a palette or mixing tray, water or paint thinner for cleaning brushes, and a reference image or photograph of a winter landscape.
| 2. How can I create depth and perspective in my winter landscape art? | |
Ans. To create depth and perspective in your winter landscape art, you can use techniques such as overlapping objects, diminishing size, atmospheric perspective (where objects in the distance appear lighter and less detailed), and using warm colors for objects in the foreground and cool colors for those in the background.
| 3. What are some tips for capturing the textures of snow in my winter landscape art? | |
Ans. To capture the textures of snow in your winter landscape art, you can use techniques such as dry brushing (using a small amount of paint on a dry brush to create a textured effect), stippling (creating texture by dabbing the brush or palette knife onto the canvas), and using a palette knife to create rough, textured areas.
| 4. How can I make my winter landscape art more realistic? | |
Ans. To make your winter landscape art more realistic, consider paying attention to details such as the direction and quality of light, the shadows cast by objects, the texture and color of different elements (such as trees, rocks, or buildings), and the overall composition of the scene. Study reference images or photographs to understand how these elements interact in a winter landscape.
| 5. Are there any specific techniques for painting trees in a winter landscape? | |
Ans. Yes, there are specific techniques for painting trees in a winter landscape. Some techniques include using a dry brush to create the appearance of bare branches, using a palette knife to create the texture of tree trunks, and using a combination of warm and cool colors to depict the bark and foliage of evergreen trees. Experimenting with different brush strokes and layering techniques can also add depth and realism to your tree paintings.
About this Document

4.95/5
Rating

Oct 10, 2025
Last updated
Document Description: Craft Ideas: Winter Landscape Art for Class 1 2025 is part of Hands on Art & Craft preparation.
The notes and questions for Craft Ideas: Winter Landscape Art have been prepared according to the Class 1 exam syllabus. Information about Craft Ideas: Winter Landscape Art covers topics
like and Craft Ideas: Winter Landscape Art Example, for Class 1 2025 Exam. Find important definitions, questions, notes, meanings, examples, exercises and tests below for Craft Ideas: Winter Landscape Art.
Introduction of Craft Ideas: Winter Landscape Art in English is available as part of our Hands on Art & Craft
for Class 1 & Craft Ideas: Winter Landscape Art in Hindi for Hands on Art & Craft course.
Download more important topics related with notes, lectures and mock test series for Class 1
Exam by signing up for free. Class 1: Craft Ideas: Winter Landscape Art | Hands on Art & Craft - Class 1
Description
Full syllabus notes, lecture & questions for Craft Ideas: Winter Landscape Art | Hands on Art & Craft - Class 1 - Class 1 | Plus excerises question with solution to help you revise complete syllabus for Hands on Art & Craft | Best notes, free PDF download
Information about Craft Ideas: Winter Landscape Art
In this doc you can find the meaning of Craft Ideas: Winter Landscape Art defined & explained in the simplest way possible. Besides explaining types of
Craft Ideas: Winter Landscape Art theory, EduRev gives you an ample number of questions to practice Craft Ideas: Winter Landscape Art tests, examples and also practice Class 1
tests

Related Searches
Important questions
,Craft Ideas: Winter Landscape Art | Hands on Art & Craft - Class 1
,mock tests for examination
,Objective type Questions
,Summary
,Extra Questions
,Craft Ideas: Winter Landscape Art | Hands on Art & Craft - Class 1
,Semester Notes
,Free
,Previous Year Questions with Solutions
,video lectures
,shortcuts and tricks
,Viva Questions
,ppt
,practice quizzes
,MCQs
,Craft Ideas: Winter Landscape Art | Hands on Art & Craft - Class 1
,Sample Paper
,Exam
,study material
,past year papers
;


Additional Information about Craft Ideas: Winter Landscape Art for Class 1 Preparation
Craft Ideas: Winter Landscape Art Free PDF Download
The Craft Ideas: Winter Landscape Art is an invaluable resource that delves deep into the core of the Class 1 exam.
These study notes are curated by experts and cover all the essential topics and concepts, making your preparation more efficient and effective.
With the help of these notes, you can grasp complex subjects quickly, revise important points easily,
and reinforce your understanding of key concepts. The study notes are presented in a concise and easy-to-understand manner,
allowing you to optimize your learning process. Whether you're looking for best-recommended books, sample papers, study material,
or toppers' notes, this PDF has got you covered. Download the Craft Ideas: Winter Landscape Art now and kickstart your journey towards success in the Class 1 exam.
Importance of Craft Ideas: Winter Landscape Art
The importance of Craft Ideas: Winter Landscape Art cannot be overstated, especially for Class 1 aspirants.
This document holds the key to success in the Class 1 exam.
It offers a detailed understanding of the concept, providing invaluable insights into the topic.
By knowing the concepts well in advance, students can plan their preparation effectively.
Utilize this indispensable guide for a well-rounded preparation and achieve your desired results.
Craft Ideas: Winter Landscape Art Notes
Craft Ideas: Winter Landscape Art Notes offer in-depth insights into the specific topic to help you master it with ease.
This comprehensive document covers all aspects related to Craft Ideas: Winter Landscape Art.
It includes detailed information about the exam syllabus, recommended books, and study materials for a well-rounded preparation.
Practice papers and question papers enable you to assess your progress effectively.
Additionally, the paper analysis provides valuable tips for tackling the exam strategically.
Access to Toppers' notes gives you an edge in understanding complex concepts.
Whether you're a beginner or aiming for advanced proficiency, Craft Ideas: Winter Landscape Art Notes on EduRev are your ultimate resource for success.
Craft Ideas: Winter Landscape Art Class 1 Questions
The "Craft Ideas: Winter Landscape Art Class 1 Questions" guide is a valuable resource for all aspiring students preparing for the
Class 1 exam. It focuses on providing a wide range of practice questions to help students gauge
their understanding of the exam topics. These questions cover the entire syllabus, ensuring comprehensive preparation.
The guide includes previous years' question papers for students to familiarize themselves with the exam's format and difficulty level.
Additionally, it offers subject-specific question banks, allowing students to focus on weak areas and improve their performance.
Study Craft Ideas: Winter Landscape Art on the App
Students of Class 1 can study Craft Ideas: Winter Landscape Art alongwith tests & analysis from the EduRev app,
which will help them while preparing for their exam. Apart from the Craft Ideas: Winter Landscape Art,
students can also utilize the EduRev App for other study materials such as previous year question papers, syllabus, important questions, etc.
The EduRev App will make your learning easier as you can access it from anywhere you want.
The content of Craft Ideas: Winter Landscape Art is prepared as per the latest Class 1 syllabus.
|
© EduRev
|
Education Revolution
|


|


Signup on EduRev and stay on top of your study goals
10M+ students crushing their study goals daily