


All Exams >
Class 6 >
How to become an Expert of MS Word >
All Questions
All questions of Word Tips for Class 6 Exam
Portrait and Landscape are- a)Page Orientation
- b)Paper Size
- c)Page Layout
- d)All of above
Correct answer is option 'A'. Can you explain this answer?
Portrait and Landscape are
a)
Page Orientation
b)
Paper Size
c)
Page Layout
d)
All of above
|
|
Priya Pillai answered |
Page Orientation:
The page orientation refers to the direction in which the content of a document is displayed. It can be either portrait or landscape.
- Portrait Orientation: In portrait orientation, the height of the page is greater than the width. It is commonly used for documents such as letters, essays, and reports, where the content is primarily text-based and flows from top to bottom.
- Landscape Orientation: In landscape orientation, the width of the page is greater than the height. It is often used for documents that contain images, charts, or tables, as it allows for a wider viewing area and better presentation of visual content.
Paper Size:
Paper size refers to the dimensions of the paper on which the document is printed or displayed. Different paper sizes are used for different purposes and can vary across countries and regions. The most commonly used paper sizes are A4, Letter, and Legal.
- A4: A4 is the standard paper size used in many countries, including most of Europe. It measures 210 mm by 297 mm (8.27 inches by 11.69 inches) and is widely used for printing documents, such as letters, resumes, and academic papers.
- Letter: Letter size is the standard paper size used in the United States and Canada. It measures 8.5 inches by 11 inches (216 mm by 279 mm) and is commonly used for various purposes, including printing business documents, reports, and forms.
- Legal: Legal size is slightly longer than the letter size and measures 8.5 inches by 14 inches (216 mm by 356 mm). It is primarily used for legal documents, contracts, and certificates that require a larger paper size.
Page Layout:
Page layout refers to the arrangement and organization of elements on a page, including text, images, headings, and margins. It involves determining the placement of content to create an aesthetically pleasing and readable document.
- Page Margins: Margins define the empty space around the edges of a page. They help to frame the content and provide space for binding, annotations, or notes.
- Headers and Footers: Headers appear at the top of each page and often contain the document title, chapter or section headings, and page numbers. Footers appear at the bottom of each page and can include additional information such as the author's name, date, or copyright notice.
- Columns: Columns divide the page into multiple vertical sections, allowing for a more efficient use of space and improved readability, especially in newspapers, magazines, or newsletters.
- Text Alignment: Text alignment refers to the horizontal positioning of text on a page. It can be aligned to the left, right, center, or justified (aligned to both the left and right margins).
- Paragraph Indentation: Paragraph indentation is the space left at the beginning of a paragraph to visually separate it from the rest of the text.
All of the Above:
The correct answer is option 'A' - All of the above because all the mentioned options (page orientation, paper size, and page layout) are related to the formatting and arrangement of a document's content. These factors play a crucial role in determining how the document looks and how it is presented to the reader.

Which operation you will perform if you need to move a block of text?- a)Copy and Paste
- b)Cut and Paste
- c)Paste and Delete
- d)Paste and Cut
Correct answer is option 'B'. Can you explain this answer?
Which operation you will perform if you need to move a block of text?
a)
Copy and Paste
b)
Cut and Paste
c)
Paste and Delete
d)
Paste and Cut
|
|
Pranjal Gupta answered |
Cut and Paste is the correct operation to perform if you need to move a block of text.
Explanation:
Cut and Paste is a common operation used to move text from one location to another within a document or between different documents. This operation involves two steps: cutting the text from its original location and pasting it to the desired location.
1. Selecting the text:
To perform the cut operation, you first need to select the block of text you want to move. You can do this by clicking and dragging the cursor over the text, or by using keyboard shortcuts such as Ctrl + A (to select all) or Shift + arrow keys (to select a specific portion of text).
2. Cutting the text:
After selecting the text, you can cut it by using the Cut command. This command is usually found in the Edit menu of most word processing or text editing software, or it can be accessed through the keyboard shortcut Ctrl + X. Cutting the text removes it from its original location and stores it in a temporary storage area called the clipboard.
3. Pasting the text:
Once the text is cut and stored in the clipboard, you can navigate to the desired location where you want to move the text. Then, use the Paste command to insert the text at the new location. The Paste command is typically found in the Edit menu or can be accessed through the keyboard shortcut Ctrl + V. Pasting the text inserts it at the cursor position or replaces any selected text at the new location.
Key Points:
- Cut and Paste is used to move a block of text from one location to another.
- The selected text is first cut using the Cut command (Ctrl + X).
- The cut text is stored in the clipboard temporarily.
- The text is then pasted at the desired location using the Paste command (Ctrl + V).
- Cutting removes the text from its original location, while pasting inserts it at the new location.
- This operation can be performed using menu options or keyboard shortcuts in most word processing or text editing software.
Which of these toolbars allows changing of Fonts and their sizes?- a)Standard
- b)Formatting
- c)Print Preview
- d)None of these
Correct answer is option 'B'. Can you explain this answer?
Which of these toolbars allows changing of Fonts and their sizes?
a)
Standard
b)
Formatting
c)
Print Preview
d)
None of these
|
|
Utkarsh Joshi answered |
In Word 2003 and earlier versions Formatting toolbars allows changing of Fonts and their sizes.
In Word 2007 and higher versions - Home > Font allows changing of Fonts and their sizes.
In Word 2007 and higher versions - Home > Font allows changing of Fonts and their sizes.
The ________, or typeface, defines the appearance and shape of letters, numbers, and special characters.- a)Font
- b)Font size
- c)Point
- d)Paragraph formatting
Correct answer is option 'A'. Can you explain this answer?
The ________, or typeface, defines the appearance and shape of letters, numbers, and special characters.
a)
Font
b)
Font size
c)
Point
d)
Paragraph formatting
|
|
Muskaan Choudhury answered |
The Font, or typeface, defines the appearance and shape of letters, numbers, and special characters. It is an essential element in design and communication, as it contributes to the overall aesthetic and readability of text. Choosing the right font is crucial for conveying the intended message and creating a visually appealing presentation.
Explanation:
Font is a term used to describe a set of characters that share a consistent and distinctive design. It includes not only the shape of individual letters, but also various styles such as bold, italic, and underline. Fonts can be categorized into different types, such as serif, sans-serif, script, and decorative, each with its own unique characteristics.
1. Importance of Fonts:
- Fonts play a vital role in communication, as they can evoke different emotions or convey a specific tone.
- They can enhance the readability and legibility of text, making it easier for the audience to comprehend.
- Fonts also contribute to the overall design and visual appeal of a document or presentation.
2. Types of Fonts:
- Serif Fonts: These fonts have small "feet" or lines at the ends of characters, which give them a more traditional and formal appearance. Examples include Times New Roman and Georgia.
- Sans-serif Fonts: These fonts do not have the small lines at the ends of characters, resulting in a more modern and clean look. Examples include Arial and Helvetica.
- Script Fonts: These fonts mimic handwriting or calligraphy and are often used for decorative purposes. Examples include Brush Script and Lucida Handwriting.
- Decorative Fonts: These fonts are highly stylized and are used for special occasions or to create a specific visual impact. Examples include Impact and Comic Sans.
3. Considerations when Choosing Fonts:
- Readability: Select a font that is easy to read, especially for longer pieces of text. Avoid overly decorative or complex fonts that may hinder legibility.
- Suitability: The font should be appropriate for the context and purpose of the text. For example, a formal document may require a serif font, while a modern website may benefit from a sans-serif font.
- Consistency: Maintain consistency in font usage throughout a document or presentation to create a cohesive and professional look.
- Contrast: Use contrasting fonts to create emphasis or hierarchy within the text. For example, titles and headings may be in a bolder or larger font compared to body text.
In conclusion, the font, or typeface, is a fundamental element in design and communication. It defines the appearance and shape of characters, contributing to the overall aesthetic and readability of text. Choosing the right font is crucial for effectively conveying the intended message and creating a visually appealing presentation.

Ctrl + V is used to- a)Paste Texts in the beginning of Document
- b)Paste Images in the beginning of Document
- c)Paste Tables at the middle of Document
- d)None of the above
Correct answer is option 'D'. Can you explain this answer?
Ctrl + V is used to
a)
Paste Texts in the beginning of Document
b)
Paste Images in the beginning of Document
c)
Paste Tables at the middle of Document
d)
None of the above
|
|
Utkarsh Joshi answered |
Ctrl + V is used to paste a copy data in windows operating system.
Background color or effects applied on a document is not visible in- a)Web layout view
- b)Print Layout view
- c)Reading View
- d)Print Preview
Correct answer is option 'D'. Can you explain this answer?
Background color or effects applied on a document is not visible in
a)
Web layout view
b)
Print Layout view
c)
Reading View
d)
Print Preview
|
|
Bijoy Goyal answered |
Answer:
In the given options, the correct answer is option 'D', which states that the background color or effects applied on a document are not visible in Print Preview. Let's understand why this is the case.
Explanation:
When creating a document, users often apply various formatting options to enhance its appearance. One such option is to apply a background color or effects to the document. This can be done using tools available in word processing software like Microsoft Word.
However, the visibility of background color or effects depends on the view mode in which the document is being displayed. Let's discuss the different view modes mentioned in the options:
1. Web layout view:
- In this view, the document is displayed as it would appear on a web page.
- Background color or effects are visible in this view, allowing users to see how the document will look on the web.
2. Print Layout view:
- This view displays the document as it would appear when printed.
- Background color or effects are visible in this view, allowing users to see how the document will look when printed on paper.
3. Reading View:
- Reading View is a simplified full-screen view that optimizes the document for reading and removes distractions.
- Background color or effects are not visible in this view to provide a clean reading experience.
4. Print Preview:
- Print Preview shows a preview of how the document will look when printed.
- Background color or effects are not visible in Print Preview because it aims to provide an accurate representation of the printed document on the screen, and background color or effects do not typically show up when printing on paper.
Hence, option 'D' is the correct answer as background color or effects applied on a document are not visible in Print Preview.
Short cut Ctrl + F is used to- a)Open Find and Replace Dialog box with activating Find Tab
- b)Open Page Setup Dialog box with activating Layout Tab
- c)Open Font Dialog Box with activating Font tab
- d)Open File Save as Dialog box
Correct answer is option 'A'. Can you explain this answer?
Short cut Ctrl + F is used to
a)
Open Find and Replace Dialog box with activating Find Tab
b)
Open Page Setup Dialog box with activating Layout Tab
c)
Open Font Dialog Box with activating Font tab
d)
Open File Save as Dialog box
|
|
Utkarsh Joshi answered |
Short cut Ctrl + F is used to open Find and Replace Dialog box with activating Find Tab.
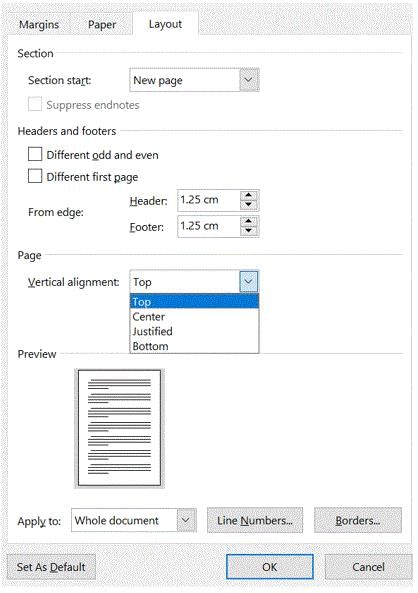
Switching between portrait and landscape modes involves the:- a)Header and footer toolbar
- b)Print layout view
- c)Page setup dialog box
- d)None of the above
Correct answer is option 'C'. Can you explain this answer?
Switching between portrait and landscape modes involves the:
a)
Header and footer toolbar
b)
Print layout view
c)
Page setup dialog box
d)
None of the above
|
|
Priya Pillai answered |
Switching between portrait and landscape modes involves the Page Setup dialog box (option C).
The Page Setup dialog box is a feature in many software programs, including word processors and graphic design applications. It allows users to customize various aspects of the page, such as margins, orientation, paper size, and more. In the context of switching between portrait and landscape modes, the Page Setup dialog box is used to change the page orientation.
Here is a detailed explanation of the answer:
1. Introduction:
- Switching between portrait and landscape modes involves the Page Setup dialog box.
2. Page Setup dialog box:
- The Page Setup dialog box is a feature in software programs that allows users to customize various aspects of the page.
- It can typically be accessed through the File menu or a toolbar in the program.
- The dialog box provides options for adjusting page settings such as margins, orientation, paper size, and more.
3. Portrait and landscape modes:
- Portrait mode is the default orientation for most documents, where the page is taller than it is wide.
- Landscape mode, on the other hand, is when the page is wider than it is tall.
- Switching between portrait and landscape modes can be useful when creating documents with different layouts, such as brochures, posters, or tables.
4. Changing page orientation:
- To switch between portrait and landscape modes, the user needs to access the Page Setup dialog box.
- In the dialog box, there is typically an option to select the desired page orientation.
- By choosing "Portrait," the page will be set to the default vertical layout.
- By choosing "Landscape," the page will be set to a horizontal layout.
5. Other options in the Page Setup dialog box:
- In addition to changing the page orientation, the Page Setup dialog box may offer other customization options.
- These may include adjusting margins, setting paper size, selecting paper source, adding headers and footers, and more.
- However, for the specific task of switching between portrait and landscape modes, the focus is on the page orientation setting.
In conclusion, switching between portrait and landscape modes involves using the Page Setup dialog box. This feature allows users to customize various page settings, including the page orientation. By accessing the Page Setup dialog box, users can easily switch between portrait and landscape modes to suit their document layout needs.
Short cut Ctrl + P used to- a)Open Paragraph Dialog Box
- b)Open Page Format Dialog Box
- c)Open Save Dialog Box
- d)Open Print Dialog box
Correct answer is option 'D'. Can you explain this answer?
Short cut Ctrl + P used to
a)
Open Paragraph Dialog Box
b)
Open Page Format Dialog Box
c)
Open Save Dialog Box
d)
Open Print Dialog box
|
|
Rajat Chatterjee answered |
Explanation:
The shortcut Ctrl + P is used to open the Print dialog box.
Print Dialog Box:
The Print dialog box is a feature in computer applications that allows users to select a printer, specify the number of copies to be printed, choose the print range, and customize other printing options before sending the document to the printer.
Usage:
When you want to print a document or file, you can use the Ctrl + P shortcut to quickly open the Print dialog box. This shortcut is commonly used across various software applications, including word processors, image editors, web browsers, and more.
Steps:
To use the Ctrl + P shortcut, follow these steps:
1. Open the document or file you want to print.
2. Press and hold the Ctrl key on your keyboard.
3. While holding the Ctrl key, press the letter P.
4. The Print dialog box will open, displaying various options related to printing.
5. From the Print dialog box, you can select the printer you want to use, choose the number of copies, specify the print range, adjust print settings, and more.
6. Once you have customized the printing options, click on the "Print" button to start the printing process.
Advantages:
Using the Ctrl + P shortcut to open the Print dialog box offers several advantages:
1. Saves time: Instead of navigating through menus or using the mouse to access the print options, the shortcut provides a quick and convenient way to open the Print dialog box.
2. Consistency: The Ctrl + P shortcut is standardized across many software applications, making it easy to remember and use regardless of the program you are working with.
3. Efficiency: The Print dialog box allows you to customize various printing options, ensuring that your document is printed according to your preferences.
Conclusion:
In summary, the shortcut Ctrl + P is used to open the Print dialog box, which provides options for selecting a printer, specifying the number of copies, choosing the print range, and customizing other printing settings. This shortcut is widely used and offers a convenient way to initiate the printing process in various software applications.
How can you disable extended selection mode?- a)Press F8 again to disable
- b)Press Del to disable
- c)Press Esc to disable
- d)Press Enter to disable
Correct answer is option 'C'. Can you explain this answer?
How can you disable extended selection mode?
a)
Press F8 again to disable
b)
Press Del to disable
c)
Press Esc to disable
d)
Press Enter to disable
|
|
Utkarsh Joshi answered |
Extend Selection Mode ends when you cut, copy or format the selection or press Esc.
Columns dialog box can be opened from- a)Format menu Columns submenu
- b)Double click on column space in ruler
- c)Press Alt + O + C
- d)All of above
Correct answer is option 'D'. Can you explain this answer?
Columns dialog box can be opened from
a)
Format menu Columns submenu
b)
Double click on column space in ruler
c)
Press Alt + O + C
d)
All of above
|
|
Utkarsh Joshi answered |
Columns dialog box can be opened from any of the above option in Word 2003 and earlier versions.
In Word 2007 and higher versions - Page Layout or Layout tab, click Columns. At the bottom of the list, choose More Columns.
In Word 2007 and higher versions - Page Layout or Layout tab, click Columns. At the bottom of the list, choose More Columns.
Short cut Ctrl + T is used to- a)Hanging Indent
- b)Left Indent
- c)Open Tabs Dialog box
- d)Terminate all opened Dialog box
Correct answer is option 'A'. Can you explain this answer?
Short cut Ctrl + T is used to
a)
Hanging Indent
b)
Left Indent
c)
Open Tabs Dialog box
d)
Terminate all opened Dialog box

|
Let's Tute answered |
If you like to use the keyboard to do your formatting, you may be interested in knowing how to format a paragraph to use a hanging indent just by using a keyboard shortcut. You do this in Word by pressing Ctrl+T.
Which of the following is true regarding page Orientation of a Document?- a)Page Orientation can be changed at any time
- b)Page Orientation of document determines by printer
- c)Page Orientation must be set before start typing
- d)Page Orientation of a document cannot be changed.
Correct answer is option 'A'. Can you explain this answer?
Which of the following is true regarding page Orientation of a Document?
a)
Page Orientation can be changed at any time
b)
Page Orientation of document determines by printer
c)
Page Orientation must be set before start typing
d)
Page Orientation of a document cannot be changed.
|
|
Utkarsh Joshi answered |
Word allows us to create documents with pages that are in landscape or portrait view. We can change the orientation any time you want but it applies to every single page in a document. There is no option to change the page orientation for a single page in MS Word.
How can you break the current column?- a)Press Ctrl + Shift + Enter
- b)Press Alt + Enter
- c)Press Ctrl + Enter
- d)Press Alt + Shift + Enter
Correct answer is option 'A'. Can you explain this answer?
How can you break the current column?
a)
Press Ctrl + Shift + Enter
b)
Press Alt + Enter
c)
Press Ctrl + Enter
d)
Press Alt + Shift + Enter
|
|
Saikat Rane answered |
Breaking a current column in a document can be done by pressing Ctrl + Shift + Enter. Let's break down the answer and explain it in detail:
- Pressing Ctrl + Shift + Enter:
- This keyboard shortcut combination is used to break the current column in a document.
- By pressing these keys simultaneously, you can force the text to move to the next column or the next available space in the document layout.
Let's now analyze the other options and explain why they are not the correct answers:
- Press Alt + Enter:
- This keyboard shortcut is typically used in software applications like Microsoft Excel to create a line break within a cell or to edit the contents of a cell.
- However, it does not specifically address breaking a column in a document.
- Press Ctrl + Enter:
- This keyboard shortcut is commonly used to insert a page break in a document, forcing the content after the cursor to start on a new page.
- While it can help with organizing content, it does not specifically address breaking a column.
- Press Alt + Shift + Enter:
- This keyboard shortcut is often used in software applications like Microsoft Excel to enter a formula as an array formula.
- It does not relate directly to breaking a column in a document.
Therefore, the correct answer is option 'A' - Press Ctrl + Shift + Enter. This combination of keys is specifically designed to break the current column and move the text to the next available space in the document layout.
________ formatting is the process of changing the way letters, numbers, punctuation marks, and symbols appear on the screen and in print.- a)Document
- b)Character
- c)Paragraph
- d)Object
Correct answer is option 'B'. Can you explain this answer?
________ formatting is the process of changing the way letters, numbers, punctuation marks, and symbols appear on the screen and in print.
a)
Document
b)
Character
c)
Paragraph
d)
Object
|
|
Saptarshi Das answered |
Character formatting is the process of changing the way letters, numbers, punctuation marks, and symbols appear on the screen and in print. It allows you to modify the font, size, color, and style of individual characters or groups of characters within a document. Character formatting is an essential feature in word processing software that allows you to customize the appearance of your text to make it more visually appealing and easier to read.
Character formatting options typically include:
1. Font: You can choose from a variety of fonts to change the style of your text. Fonts can range from simple and traditional to decorative and creative.
2. Size: You can adjust the size of your text to make it larger or smaller. This helps in emphasizing important information or fitting more content within a limited space.
3. Color: You can change the color of your text to make it stand out or coordinate with the overall design of your document. This can be useful for highlighting headings or important points.
4. Style: You can apply various styles to your text, such as bold, italic, underline, or strikethrough. These styles can help to emphasize certain words or phrases or indicate different types of information.
5. Effects: Some word processing software also allows you to apply special effects to your text, such as shadow, outline, or glow. These effects can add visual interest to your document.
By using character formatting effectively, you can enhance the readability and visual appeal of your document. It helps to create a consistent and professional appearance throughout your text. Character formatting is particularly useful when creating documents such as reports, essays, presentations, or any other written materials where the look and feel of the text are important.
In conclusion, character formatting is the process of changing the appearance of individual characters or groups of characters within a document. It allows you to customize the font, size, color, style, and effects of your text to make it more visually appealing and easier to read.
Short cut Ctrl + H is used to- a)Open Find and Replace Dialog box with activating Replace Tab
- b)Open Format Dialog box activating Insert Hyper Link tab
- c)Open Insert Dialog box activating Insert Hyper Link Tab
- d)Open Insert Hyper Link Dialog box
Correct answer is option 'A'. Can you explain this answer?
Short cut Ctrl + H is used to
a)
Open Find and Replace Dialog box with activating Replace Tab
b)
Open Format Dialog box activating Insert Hyper Link tab
c)
Open Insert Dialog box activating Insert Hyper Link Tab
d)
Open Insert Hyper Link Dialog box
|
|
Puja Chopra answered |
Answer:
To explain the answer in detail, let's break it down into the following sections:
1. Shortcut Description:
The shortcut Ctrl + H is used to open the Find and Replace dialog box with the Replace tab activated.
2. Shortcut Execution:
To execute the shortcut, press and hold the Ctrl key on your keyboard and while holding it, press the letter 'H'.
3. Find and Replace Dialog Box:
The Find and Replace dialog box is a tool used in computer applications, such as text editors and word processors, to search for specific text within a document and replace it with new text. It provides a convenient way to find and replace multiple occurrences of a word, phrase, or set of characters.
4. Activating the Replace Tab:
When the Ctrl + H shortcut is used to open the Find and Replace dialog box, it automatically activates the Replace tab within the dialog box. The Replace tab is where you can specify the text you want to find and the text you want to replace it with.
5. Purpose of the Shortcut:
The purpose of using the Ctrl + H shortcut is to quickly access the Find and Replace functionality, specifically the Replace tab. This allows users to easily search for specific text and replace it with new text without having to navigate through menus or use the mouse.
6. Advantages of Using the Shortcut:
- Saves time: Using the shortcut eliminates the need to manually search for the Find and Replace option in the application's menus.
- Efficiency: By directly opening the Replace tab, users can quickly enter the text they want to find and replace, making the process more efficient.
- Accessibility: The shortcut provides an accessible way to access the Find and Replace functionality, as it can be executed with a simple keystroke combination.
In summary, the Ctrl + H shortcut is used to open the Find and Replace dialog box with the Replace tab activated. This shortcut provides a quick and efficient way to search for specific text and replace it within a document, saving time and improving productivity.
Ctrl + Q is used to- a)Remove Paragraph formatting (Line Space and Paragraph Space)
- b)Close Word Application without saving Document
- c)Print Whole Document without confirmation
- d)Does nothing
Correct answer is option 'A'. Can you explain this answer?
Ctrl + Q is used to
a)
Remove Paragraph formatting (Line Space and Paragraph Space)
b)
Close Word Application without saving Document
c)
Print Whole Document without confirmation
d)
Does nothing
|
|
Rutuja Bose answered |
Ctrl Q is used to remove paragraph formatting (Line Space and Paragraph Space).
Removing paragraph formatting is an important feature in word processing as it allows users to adjust the spacing between paragraphs and lines to enhance the overall appearance and readability of the document. The Ctrl Q keyboard shortcut specifically targets the paragraph formatting and is commonly used in Microsoft Word.
Explanation:
When you press Ctrl Q, it removes the paragraph formatting applied to the selected text or the entire paragraph where the cursor is positioned. This includes the removal of any extra space between paragraphs, such as line spacing and paragraph spacing.
Benefits of using Ctrl Q:
By using Ctrl Q, you can achieve the following benefits:
1. Consistent formatting: Removing paragraph spacing ensures that the document maintains a consistent look throughout, without unnecessary gaps between paragraphs.
2. Improved readability: Sometimes, excessive paragraph spacing can make the document look cluttered or disjointed. By removing paragraph formatting, the text becomes easier to read and understand.
3. Aesthetics: Removing paragraph spacing can enhance the overall visual appeal of the document, especially when dealing with large blocks of text.
4. Space optimization: In certain cases, reducing paragraph spacing can help optimize space, allowing more content to fit within a page or document.
5. Time-saving: Instead of manually adjusting paragraph formatting for each paragraph, using the Ctrl Q shortcut enables quick and efficient removal of paragraph formatting.
Conclusion:
Ctrl Q is a useful keyboard shortcut in Microsoft Word that removes paragraph formatting, including line spacing and paragraph spacing. This feature offers several benefits, such as consistent formatting, improved readability, enhanced aesthetics, space optimization, and time-saving. By utilizing Ctrl Q, users can easily modify the appearance of their documents to meet their specific requirements.
The Word Count command on the Tools menu displays the number of words as well as the number of _______ in the current document.- a)Lines
- b)Characters
- c)Paragraphs
- d)All of the above
Correct answer is option 'D'. Can you explain this answer?
The Word Count command on the Tools menu displays the number of words as well as the number of _______ in the current document.
a)
Lines
b)
Characters
c)
Paragraphs
d)
All of the above
|
|
Utkarsh Joshi answered |
Click on Word Count. Select Word Count from the Tools menu dropdown. A box displaying the number of words, characters, lines, pages and paragraphs will appear on the screen. The word count for a selected portion of text will usually be displayed in the bottom bar of your document.
To instruct Word to stop bulleting paragraphs, do any of the following except ________.- a)Press the enter key twice
- b)Click the Undo button on the Standard toolbar
- c)Press the backspace key to remove the bullet
- d)Click the Bullets button on the Formatting toolbar
Correct answer is option 'B'. Can you explain this answer?
To instruct Word to stop bulleting paragraphs, do any of the following except ________.
a)
Press the enter key twice
b)
Click the Undo button on the Standard toolbar
c)
Press the backspace key to remove the bullet
d)
Click the Bullets button on the Formatting toolbar
|
|
Bibek Verma answered |
Explanation:
To instruct Word to stop bulleting paragraphs, you can use various methods. However, one of the methods listed in the options (B) is incorrect.
Here is a detailed explanation of each option:
a) Press the enter key twice:
Pressing the enter key twice will create a new paragraph without bullet points. This method is effective in stopping bulleting paragraphs. When you press the enter key twice, Word will automatically remove the bullet point formatting and start a new paragraph.
b) Click the Undo button on the Standard toolbar:
This option is incorrect because clicking the Undo button will undo the previous action, which may not necessarily be related to bulleting paragraphs. The Undo button is used to revert the most recent action, regardless of whether it is bulleting or any other formatting change.
c) Press the backspace key to remove the bullet:
Pressing the backspace key is an effective method to remove the bullet point from a paragraph. When you place the cursor before the bullet and press the backspace key, the bullet point will be deleted, and the paragraph will no longer be bulleted.
d) Click the Bullets button on the Formatting toolbar:
Clicking the Bullets button on the Formatting toolbar will apply bullet points to the selected paragraph(s). It does not stop bulleting paragraphs but rather initiates or toggles the bullet point formatting.
Therefore, the correct answer is option B.
Which feature helps you to inserts the contents of the Clipboard as text without any formatting- a)Paste Special
- b)Format Painter
- c)Page Setup
- d)Styles
Correct answer is option 'A'. Can you explain this answer?
Which feature helps you to inserts the contents of the Clipboard as text without any formatting
a)
Paste Special
b)
Format Painter
c)
Page Setup
d)
Styles
|
|
Utkarsh Joshi answered |
Paste Special feature helps US to inserts the contents of the Clipboard as text without any formatting.
To invoke Paste Special - Home > Paste > Paste Special or CTRL+ALT+V.
To invoke Paste Special - Home > Paste > Paste Special or CTRL+ALT+V.
Ctrl + C is used to- a)Copy the selected text
- b)Cut the selected text
- c)Print the selected text
- d)Paste the selected text
Correct answer is option 'A'. Can you explain this answer?
Ctrl + C is used to
a)
Copy the selected text
b)
Cut the selected text
c)
Print the selected text
d)
Paste the selected text
|
|
Utkarsh Joshi answered |
Ctrl + C is used to copy the text or image we have selected and stores is on your virtual clipboard, until it is overwritten by the next "cut" or "copy" command.
When sharing data in Office, the ________ document is the document in which the data was first entered.- a)Source
- b)Destination
- c)Original
- d)Primary
Correct answer is option 'A'. Can you explain this answer?
When sharing data in Office, the ________ document is the document in which the data was first entered.
a)
Source
b)
Destination
c)
Original
d)
Primary
|
|
Utkarsh Joshi answered |
A source document is a document in which data collected for a clinical trial is first recorded.
Short cut Ctrl + R is used to- a)Re-Open the last closed document
- b)Re-Print the last printed page
- c)Re-Apply the last paragraph formatting
- d)Right align the selected Paragraph
Correct answer is option 'D'. Can you explain this answer?
Short cut Ctrl + R is used to
a)
Re-Open the last closed document
b)
Re-Print the last printed page
c)
Re-Apply the last paragraph formatting
d)
Right align the selected Paragraph
|
|
Utkarsh Joshi answered |
Ctrl + R is used to right align the selected Paragraph.
To view headers and footers, you must switch to- a)Normal view
- b)Print layout view
- c)Print preview mode
- d)Both B and C
Correct answer is option 'D'. Can you explain this answer?
To view headers and footers, you must switch to
a)
Normal view
b)
Print layout view
c)
Print preview mode
d)
Both B and C
|
|
Utkarsh Joshi answered |
Headers and footers appear only in print layout view, print preview, and in printed documents.
A ________ is a collection of predefined design elements and color schemes.- a)Feature
- b)Hyperlink
- c)Palette
- d)Theme
Correct answer is option 'D'. Can you explain this answer?
A ________ is a collection of predefined design elements and color schemes.
a)
Feature
b)
Hyperlink
c)
Palette
d)
Theme
|
|
Utkarsh Joshi answered |
Themes provide a complete design for our document, including background designs, font styles, colors, and layouts.
With which view can you see how text and graphics will appear on the printed page?- a)Normal
- b)Print Layout
- c)Outline
- d)Web Layout
Correct answer is option 'B'. Can you explain this answer?
With which view can you see how text and graphics will appear on the printed page?
a)
Normal
b)
Print Layout
c)
Outline
d)
Web Layout
|
|
Utkarsh Joshi answered |
In Print Layout view we can see how text and graphics will appear on the printed page.
To verify that the note text is positioned correctly on the page, switch to _____ view or display the document in print preview.- a)Normal
- b)Print layout
- c)Page layout
- d)Page edit
Correct answer is option 'B'. Can you explain this answer?
To verify that the note text is positioned correctly on the page, switch to _____ view or display the document in print preview.
a)
Normal
b)
Print layout
c)
Page layout
d)
Page edit
|
|
Utkarsh Joshi answered |
Print layout provides us with a view of the document where we can see page breaks and other features, as well as the basic character and paragraph formatting. This is helpful when we want to see where text ends on a page or where paragraphs break over two pages.
You can detect spelling and grammar errors by- a)Press Shift + F7
- b)Press Ctrl + F7
- c)Press Alt+ F7
- d)Press F7
Correct answer is option 'D'. Can you explain this answer?
You can detect spelling and grammar errors by
a)
Press Shift + F7
b)
Press Ctrl + F7
c)
Press Alt+ F7
d)
Press F7
|
|
Utkarsh Joshi answered |
F7 commonly used to spell check and grammar check a document in Microsoft programs such as Microsoft Word, Outlook, etc.
Change the ________ to create a document in wide format- a)Page Orientation
- b)Page margins
- c)Paper Style
- d)Paper Source
Correct answer is option 'A'. Can you explain this answer?
Change the ________ to create a document in wide format
a)
Page Orientation
b)
Page margins
c)
Paper Style
d)
Paper Source
|
|
Utkarsh Joshi answered |
Page orientation is the direction in which a document is displayed or printed. The two basic types of page orientation are portrait (vertical) and landscape (horizontal).
Chapter doubts & questions for Word Tips - How to become an Expert of MS Word 2025 is part of Class 6 exam preparation. The chapters have been prepared according to the Class 6 exam syllabus. The Chapter doubts & questions, notes, tests & MCQs are made for Class 6 2025 Exam. Find important definitions, questions, notes, meanings, examples, exercises, MCQs and online tests here.
Chapter doubts & questions of Word Tips - How to become an Expert of MS Word in English & Hindi are available as part of Class 6 exam.
Download more important topics, notes, lectures and mock test series for Class 6 Exam by signing up for free.
How to become an Expert of MS Word
30 videos|49 docs|8 tests
|
|
© EduRev
|
Education Revolution
|


|


Signup to see your scores
go up
within 7 days!
within 7 days!
Takes less than 10 seconds to signup