Railways Exam > Railways Questions > In isometric drawings:a)Two axes are perpendi...
Start Learning for Free
In isometric drawings:
- a)Two axes are perpendicular
- b)True measurements can be made only along or parallel to the isometric axes
- c)All faces are unequally distorted
- d)None of the above
Correct answer is option 'B'. Can you explain this answer?
| FREE This question is part of | Download PDF Attempt this Test |
Verified Answer
In isometric drawings:a)Two axes are perpendicularb)True measurements ...
Some important points about Isometric Drawing:
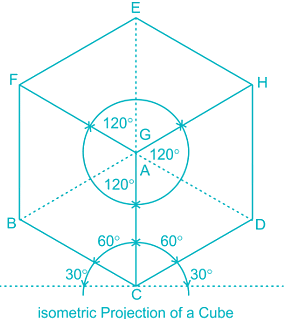
- It is a type of pictorial projection in which all three dimensions of an object are shown in one view and if required, the actual sizes can be measured directly from it.
- The perpendicular edges of an object are drawn on 3 axes at 120° to each other.
- All lines parallel to the isometric axes in an isometric drawing are called isometric lines. Non-isometric lines are not parallel to any of the isometric axes. Measurement can be made only on the isometric lines and axes.
There are three types of axonometric projections:
Trimetric projection: All the three axes of space appear unequally foreshortened. None of the angles are equal.
Dimetric projection: Two of the three axes of space appear equally shortened. Two angles are equal.
Isometric projection: All the three axes of space appear equally foreshortened. All three angles are equal.

Most Upvoted Answer
In isometric drawings:a)Two axes are perpendicularb)True measurements ...
Isometric Drawings
Isometric drawings are a type of pictorial drawing used to represent three-dimensional objects. They are drawn using a set of three axes that are mutually perpendicular to each other. Isometric drawings are widely used in engineering, architecture, and other fields to represent objects and structures.
Axes Perpendicular
The three axes used in isometric drawings are mutually perpendicular to each other. This means that they form a 90-degree angle where they intersect. The axes are designated as X, Y, and Z, with X and Y being horizontal and Z being vertical. The X and Y axes are drawn at a 30-degree angle to the horizontal plane, while the Z axis is drawn vertically.
True Measurements Along or Parallel
True measurements can be made only along or parallel to the isometric axes. This means that any measurement made perpendicular to the isometric axes will be distorted. To obtain accurate measurements, it is necessary to measure along or parallel to the isometric axes. This is because isometric drawings are a type of oblique projection, which means that the object is projected onto a plane at an angle. This causes distortion in the object's dimensions.
Unequally Distorted
All faces are unequally distorted in isometric drawings. This is because isometric drawings are a type of oblique projection, which causes distortion in the object's dimensions. The amount of distortion varies depending on the angle at which the object is viewed. However, the distortion is consistent throughout the drawing, which means that the relative proportions of the object are maintained.
Conclusion
In conclusion, the correct answer is option 'B', which states that true measurements can be made only along or parallel to the isometric axes. Isometric drawings are a type of pictorial drawing used to represent three-dimensional objects. They are drawn using a set of three axes that are mutually perpendicular to each other. Isometric drawings are widely used in engineering, architecture, and other fields to represent objects and structures.
Attention Railways Students!
To make sure you are not studying endlessly, EduRev has designed Railways study material, with Structured Courses, Videos, & Test Series. Plus get personalized analysis, doubt solving and improvement plans to achieve a great score in Railways.

|
Explore Courses for Railways exam
|

|
In isometric drawings:a)Two axes are perpendicularb)True measurements can be made only along or parallel to the isometric axesc)All faces are unequally distortedd)None of the aboveCorrect answer is option 'B'. Can you explain this answer?
Question Description
In isometric drawings:a)Two axes are perpendicularb)True measurements can be made only along or parallel to the isometric axesc)All faces are unequally distortedd)None of the aboveCorrect answer is option 'B'. Can you explain this answer? for Railways 2024 is part of Railways preparation. The Question and answers have been prepared according to the Railways exam syllabus. Information about In isometric drawings:a)Two axes are perpendicularb)True measurements can be made only along or parallel to the isometric axesc)All faces are unequally distortedd)None of the aboveCorrect answer is option 'B'. Can you explain this answer? covers all topics & solutions for Railways 2024 Exam. Find important definitions, questions, meanings, examples, exercises and tests below for In isometric drawings:a)Two axes are perpendicularb)True measurements can be made only along or parallel to the isometric axesc)All faces are unequally distortedd)None of the aboveCorrect answer is option 'B'. Can you explain this answer?.
In isometric drawings:a)Two axes are perpendicularb)True measurements can be made only along or parallel to the isometric axesc)All faces are unequally distortedd)None of the aboveCorrect answer is option 'B'. Can you explain this answer? for Railways 2024 is part of Railways preparation. The Question and answers have been prepared according to the Railways exam syllabus. Information about In isometric drawings:a)Two axes are perpendicularb)True measurements can be made only along or parallel to the isometric axesc)All faces are unequally distortedd)None of the aboveCorrect answer is option 'B'. Can you explain this answer? covers all topics & solutions for Railways 2024 Exam. Find important definitions, questions, meanings, examples, exercises and tests below for In isometric drawings:a)Two axes are perpendicularb)True measurements can be made only along or parallel to the isometric axesc)All faces are unequally distortedd)None of the aboveCorrect answer is option 'B'. Can you explain this answer?.
Solutions for In isometric drawings:a)Two axes are perpendicularb)True measurements can be made only along or parallel to the isometric axesc)All faces are unequally distortedd)None of the aboveCorrect answer is option 'B'. Can you explain this answer? in English & in Hindi are available as part of our courses for Railways.
Download more important topics, notes, lectures and mock test series for Railways Exam by signing up for free.
Here you can find the meaning of In isometric drawings:a)Two axes are perpendicularb)True measurements can be made only along or parallel to the isometric axesc)All faces are unequally distortedd)None of the aboveCorrect answer is option 'B'. Can you explain this answer? defined & explained in the simplest way possible. Besides giving the explanation of
In isometric drawings:a)Two axes are perpendicularb)True measurements can be made only along or parallel to the isometric axesc)All faces are unequally distortedd)None of the aboveCorrect answer is option 'B'. Can you explain this answer?, a detailed solution for In isometric drawings:a)Two axes are perpendicularb)True measurements can be made only along or parallel to the isometric axesc)All faces are unequally distortedd)None of the aboveCorrect answer is option 'B'. Can you explain this answer? has been provided alongside types of In isometric drawings:a)Two axes are perpendicularb)True measurements can be made only along or parallel to the isometric axesc)All faces are unequally distortedd)None of the aboveCorrect answer is option 'B'. Can you explain this answer? theory, EduRev gives you an
ample number of questions to practice In isometric drawings:a)Two axes are perpendicularb)True measurements can be made only along or parallel to the isometric axesc)All faces are unequally distortedd)None of the aboveCorrect answer is option 'B'. Can you explain this answer? tests, examples and also practice Railways tests.

|
Explore Courses for Railways exam
|

|
Suggested Free Tests
Signup for Free!
Signup to see your scores go up within 7 days! Learn & Practice with 1000+ FREE Notes, Videos & Tests.


