Grade 2 Exam > Grade 2 Notes > Drawing (Art & Craft) > Craft Ideas: TP Roll Flowers
Craft Ideas: TP Roll Flowers | Drawing (Art & Craft) - Grade 2 PDF Download
Material Required
- Toilet paper rolls or paper towel rolls
- Acrylic paint or tempera paint
- Paint brush
- White glue or glue gun
- Scissors
- Pencil
- Ruler
- String (optional)
- Button, brad, or scraps of craft foam, felt or fabric
Directions to be followed
- Collect some toilet paper rolls or paper towel rolls.

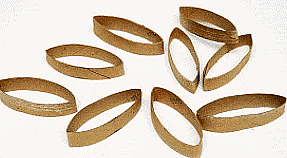
- To create the flower's petals, you need to divide the TP roll into equal cross sections. A TP roll is typically around 4½" long—you can divide it into nine ½" sections. Mark out each ½"-wide section with a pencil.
A paper towel roll, on the other hand, is typically about 11". You can divide it into twenty two ½" sections. - Carefully flatten the TP roll or paper towel roll.

- With the width of the sections already marked, cut the flattened TP roll into equal sections.
- The resulting sections will be the flower's petals.
- Priming the TP roll petals with white paint is recommended if you want to paint the petals with a light color like pink, yellow or light blue. If you're planning on red flowers or any other dark shade, you won't need to prime the petals.
Paint the entire surface of each petal with white acrylic paint or tempera paint. Paint the inside of the petals as well. - Once you've painted all the petals white, set them aside to dry.
- After the white paint dries, you can paint the petals with whatever color you want your flower to be. You can use either acrylic paint or tempera paint.
- Paint all the petals and let them dry completely.
- Once the paint dries, you can start gluing the petals together to form a flower.
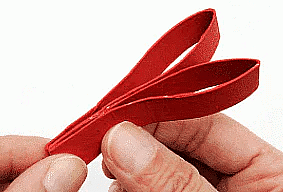
To start, take one petal. Apply white glue or hot glue on one side of the petal—anywhere from ⅓ to ½ of the entire side.
- Take a second petal and glue it onto the first, aligning both petals at the sides and bottom. Press on the section with glue for several seconds to glue the two petals well.
- After releasing the petals, you may notice they are somewhat flattened. To bring them back to their original shape, simply press on both ends of each petal.
- Add the other petals one at a time—glue the third petal, the fourth, the fifth, and so forth. Your flower can have anywhere from five to as many as sixteen petals. It really depends on what you want your flower to look like.
An important thing to remember when putting glue is to apply it on more or less the same section on each petal. If you applied it on the bottom ⅓ section on your first petal, then try to apply it on the bottom ⅓ section on all your petals. This ensures the flower will look symmetric. - Apply glue on the last petal. Glue the last petal to the first petal. Press on the section with glue for several seconds.
- To make the petals look uniform and symmetric, you can adjust the shape of the petals. If a petal looks too wide or round, hold the petal and gently press inwards to make the shape a bit more narrow. If a petal looks too flat or squished, place your thumb and index finger inside the petal and gently push outwards.
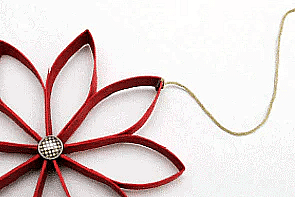
- Find a small button, a brad, or a plastic gem to put at the center of the flower. You can also cut a circle from felt, craft foam or fabric.
Glue the circle at the center of the flower. You can decorate just one side of the flower or glue another one on the flip side.
- If you want to hang the flower as an ornament, cut a length of string and tie it around the tip of one petal.
The document Craft Ideas: TP Roll Flowers | Drawing (Art & Craft) - Grade 2 is a part of the Grade 2 Course Drawing (Art & Craft).
All you need of Grade 2 at this link: Grade 2
|
10 videos|30 docs
|
FAQs on Craft Ideas: TP Roll Flowers - Drawing (Art & Craft) - Grade 2
| 1. How do I make TP roll flowers? |  |
Ans. To make TP roll flowers, you will need empty toilet paper rolls, paint or colored paper, scissors, and glue. Start by flattening the toilet paper roll and cutting it into strips. Then, curl each strip to create the petals of the flower. Paint or cover the petals with colored paper, and glue them together to form a flower shape. Add a stem using another cardboard roll or a wooden stick, and your TP roll flower is ready!
| 2. Can I use other materials instead of toilet paper rolls? |  |
Ans. Yes, you can definitely use other materials instead of toilet paper rolls. If you don't have any toilet paper rolls, you can use paper towel rolls or even cut cardboard into the desired size and shape. The important thing is to have a cylindrical base that can be cut into strips and shaped into petals for the flower.
| 3. What are some creative ways to decorate TP roll flowers? |  |
Ans. There are several creative ways to decorate TP roll flowers. You can paint the petals with vibrant colors using acrylic or watercolor paints. Another option is to cover the petals with colored paper or patterned washi tape. To add a touch of sparkle, you can use glitter or sequins. Additionally, you can experiment with different techniques like decoupage or adding small embellishments like buttons or beads.
| 4. Can I make different types of flowers using TP rolls? |  |
Ans. Yes, you can make different types of flowers using TP rolls. While the basic technique remains the same, you can vary the shape and size of the petals to create various flower designs. For example, you can make roses by cutting the strips into a wavy pattern and rolling them tightly. You can also make sunflowers by cutting larger and wider strips, and adding a circular center made of yellow paper. Explore different flower shapes and designs to unleash your creativity!
| 5. What can I do with TP roll flowers once they are made? |  |
Ans. Once you have made TP roll flowers, there are several things you can do with them. You can use them as decorative elements by placing them in a vase or arranging them on a wreath. They can also be used as party decorations or as embellishments for gift wrapping. Additionally, you can attach them to a headband or hair clip to create unique accessories. TP roll flowers can be a fun and versatile craft that adds a touch of creativity to various projects.

|
Explore Courses for Grade 2 exam
|

|
Signup for Free!
Signup to see your scores go up within 7 days! Learn & Practice with 1000+ FREE Notes, Videos & Tests.
Related Searches


