Create & Customize table of contents - Class 10 PDF Download
Introduction
You may have come across an index and table of contents in different books. The table of contents organises the document's contents systematically based on the topics covered, much like chapters in a book. It usually includes information such as chapter numbers, chapter names, and page numbers. Typically found in the early pages of a book, the table of contents divides lengthy documents into various topics, making it easier to navigate through large volumes of information.
Before diving into creating and personalising a table of contents, it's crucial to understand the hierarchy of headings.
Hierarchy of headings
To create a table of contents and index your document should be maintained properly with headings and appropriate character styles. All the contents must be organized in a good manner with the proper level of headings. So let us discuss headings.
Headings
Headings are built-in styles available in digital documentation software. These headings are useful for preparing a table of contents and indexes. These headings have their different level with numbers starting from 1. The main heading is always heading 1. Then its subheading will come accordingly. Top-level headings are bigger compared to lower-level headings.
In the next section of Create and Customize Table of Contents I will give you a brief introduction for default heading levels in MS word.
Default Heading Levels in MS Word
MS Word provides 3 levels of headings by default. The style gallery will add the subsequent heading level as you use the upper-level heading.
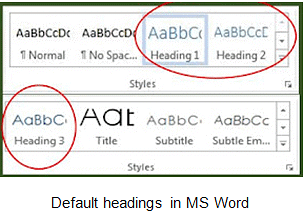
For example, if you want to use heading level 4 which is not available in MS Word. So when you create heading 3, heading 4 will automatically generate into a style gallery. It looks like this:
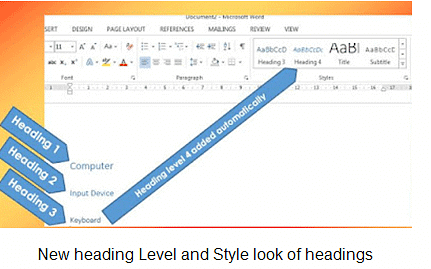
To create Headings follow these steps in MS Word:
- Type required text.
- Click the Home tab.
- Find styles group.
- Find relevant heading levels in a specific order.
- Click on the relevant heading style.
Note: The shortcut key to apply different headings are as following in MS Word. You can create 3 levels of headings using the shortcut keys.
- Heading 1: Ctrl + Alt + 1
- Heading 2: Ctrl + Alt + 2
- Heading 3: Ctrl + Alt + 3
Now lets have look at default heading levels in OO writer for Create and Customize Table of Contents.
Default heading Levels in OO Writer
OO Write provides 10 heading styles in styles and formatting gallery.
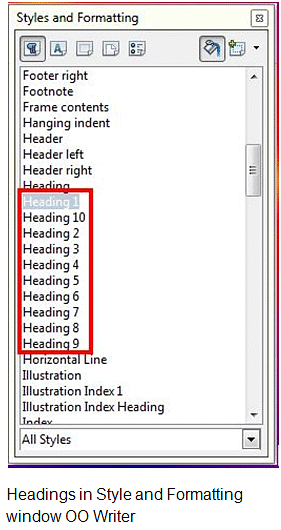
Creating heading in OO Writer
- Type the required text in the document.
- Open styles and formatting dialog box window. Click on Format → Styles and Formatting or press F11.
- Select the appropriate heading from the dialog box window.
- Click on the Fill format button.
- Drag over the text written for headings.
Now learn how to create table contents in MS word with built-in format for Create and Customize Table of Contents.
Creating a table of contents in MS Word (Built-in format)
Steps:
- Apply proper heading as explained above.
- Place your cursor on the first page. (The first page should be blank)
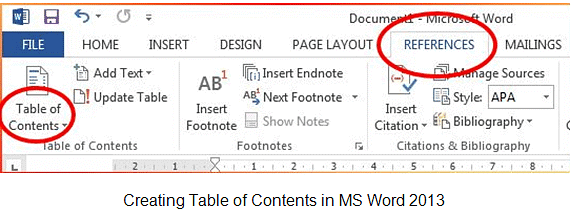
- Click on References → Table of Contents from Table of Contents group. A drop-down list will appear.
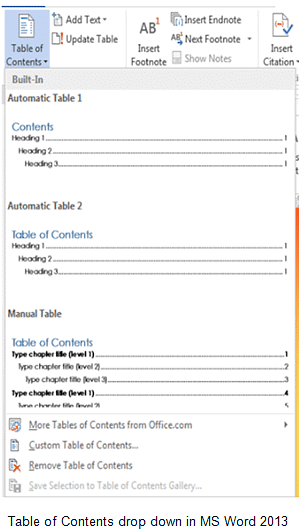
- Select any desired built-in format for the table of contents.
After learning this now focus on how to create table of contents in a customized format for Create and Customize Table of Contents.
Creating/Updating table of contents in MS Word (Customized format)
Steps:
- Repeat the same steps as written above.
- Select Custom Table of Contents…. option from the drop-down menu.
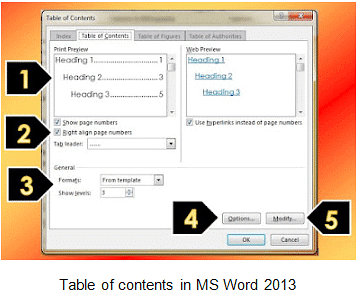
The table of contents window has the following options:
- Preview & Web Preview: Display the exact preview of TOC. WebPreview displays how the contents will look like on a web page.
- Show page numbers: It is used to show/hide page numbers. Check or uncheck the checkbox to show/hide.
- Right align page numbers: This option sets the page number’s alignment into the right side. If this option is unchecked then, the page number will come to very close with contents.
- Tab Leader: It will display the line between text and the page number. There are different tab leaders in this combo box such as dashed, dotted, none, etc.
- Show Levels: It shows how many levels of heading user want to use in the document. The user can set levels as to how many headings and subheadings used in the document.
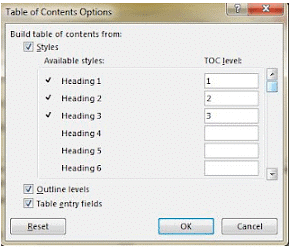
- Options: It will display heading and style options.
- Modify: Modify option allows us to change the formatting style for the heading styles. Select content and click on the modify button to change the formatting.
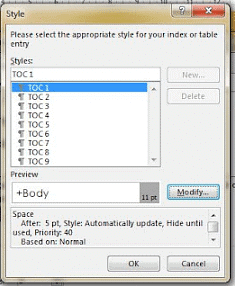
- When everything is finished click on the OK button.
Now learn how to Create and Customize Table of Contents in OO writer.
Creating/Maintaining table of contents in OO Writer(Built-in format):
- Apply proper heading or styles for contents as explained above.
- Place your cursor on the first page. (The first page should be blank)
- Click on Insert→Indexes and Tables→Indexes and Tables. An Insert Index/Table dialog box will appear.
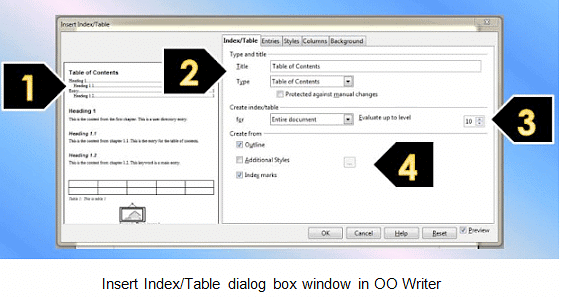
The Create and Customize Table of Contents window has the following tabs
- Index/Table: This tab contains options for setting table’s properties.
- Preview: Displays preview of TOC.
- Title: User can give a title for TOC. Type desired title in the box, the default is Table of contents.
- Type: To create TOC select Table of Contents option. Other options are Alphabetical Index, Illustration Index, Index of Tables etc.
- Protect against manual changes: It applies lock on the table of contents. Users cannot modify it manually after inserting it on-page.
- For: Select for which content table or index is generated.
- Evaluate up to level: It shows heading levels. Users can select the number of headings levels used in the document. By default, it is 10.
- Entries: This tab allows to set structure of headings and set styles of headings.
- Styles: This tab allows us to change the heading styles and formattings.
- Columns: This tab is used to increase or decrease columns in the table of contents as well as allows to change the width and space between columns.
- Background: User can set a background colour or change the background colour of the table of contents. This option also allows you to select a graphic as background, Select graphic in as combo box. Select the appropriate image through the browse button and check the preview. You can set the layout of the image by selecting position, tile, or area option.
FAQs on Create & Customize table of contents - Class 10
| 1. What is the importance of a table of contents in a Class 10 project or assignment? |  |
| 2. How can I effectively customize the table of contents for my Class 10 project? |  |
| 3. What are some common mistakes to avoid when creating a table of contents for Class 10 assignments? |  |
| 4. Can I create a table of contents without using a word processor? |  |
| 5. How often should I update the table of contents during the project writing process? |  |


