Insert & Use images in document - Class 10 PDF Download
| Table of contents |

|
| Insert and Use images in document |

|
| Inserting Image from Internet (MS Word) |

|
| Inserting Drawing by Autoshapes (MS Word 2013) |

|
| Modify Image in OO Writer document |

|
Insert and Use images in document
Images are an important part of graphics in document. They allows to make document an attractive and live. It adds more functionality and makes documents like professional pages.
Images can be created/inserted in document by following ways:
- Inserting Image from Computer: This option is used to insert an image or picture into document from saved pictures in computer.
- Inserting image from internet: It allows to insert picture from internet.
- Inserting image from Clipart gallery: A clipart gallery is an inbuilt picture gallery of Office software. User can pick a picture from gallery and insert into document.
- Creating new Drawing by Autoshapes: User can make drawing by autoshapes and use them as a picture.
Insert images from various sources
When you are going to learn Insert and Use images in document topic you should think about from which sources you can insert images in the document.
How to insert image from computer in MS Word?
Follow these steps to insert image from computer in MS Word:
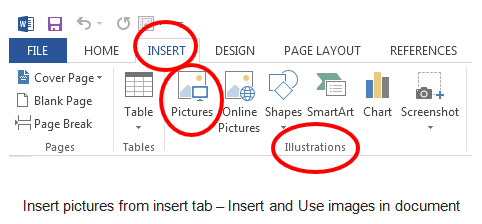
Step 1. Place the cursor where picture is required and Click on Insert tab.
Step 2. Choose pictures option from illustration group.
Step 3. An insert picture dialog box appears.
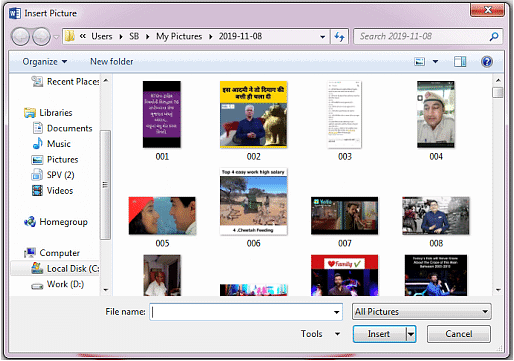
Step 4. Select any picture from desired location.
Step 5. Click on Insert button. A picture will be inserted.
In the next section, we will see how to insert pictures from the computer in Open Office write suggested by CBSE study material for Insert and Use images in document.
How to insert image from Computer in OO Writer
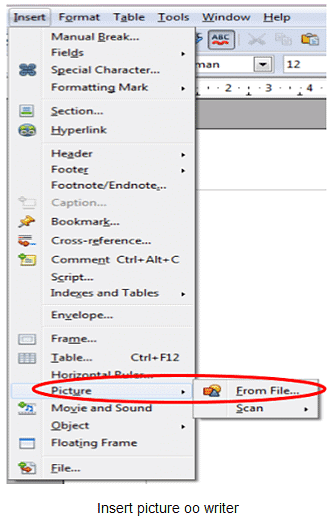
Step 1. Place a cursor where picture is required and Click on insert menu.
Step 2. Select Picture option.
Step 3. Click on From File option.
Step 4. An insert picture dialog box appears.
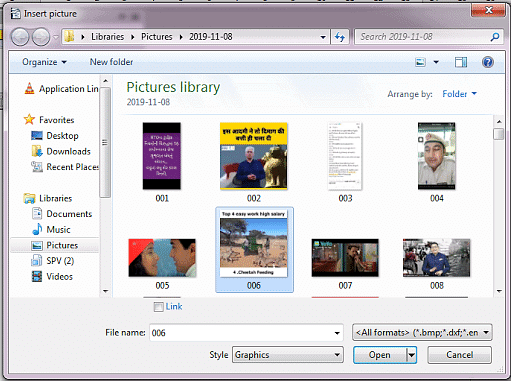
Step 5. Select any picture from desired location.
Step 6. Click on open button to insert. A picture will be placed into document.
The internet is one of the large source of insert and use images in document.
Inserting Image from Internet (MS Word)
Step 1. Place the cursor where image is required. Click on insert ribbon.
Step 2. Click on online pictures option.
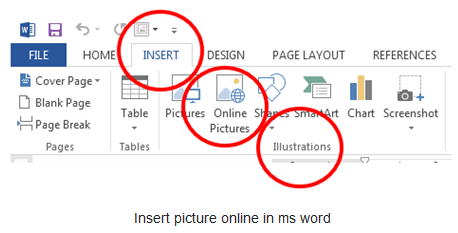
Step 3. Now browser docked browser window appear on the screen. Type desired picture names in search box. It will show a list of pictures.
Step 4. Select desired picture and click on insert.
Inserting images from internet option is not available in OO Writer. Users can download pictures manually, then insert them from insert picture from file option.
MS word 2013 does not support clip art option directly. Users can download cliparts from the clipart websites or choose online clipart gallery.
The software like open office writer has its own clipart gallery to insert and use images in document.
Insert image from ClipArt (OO Writer)
Step 1. Click on Gallery icon on standard toolbar.

Step 2. The clip art gallery will open with different pictures library like arrows, backgrounds, Bullets, Computers, Diagrams etc.

Step 3. Select the clip art picture and drag it on desired location in the document. Picture will be inserted.
Note: To deactivate or hide clip art gallery click on gallery icon once again from standard toolbar.
Autoshapes are also used to insert and use images in document.
Inserting Drawing by Autoshapes (MS Word 2013)
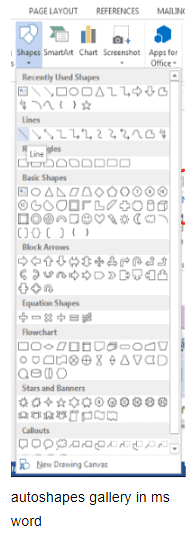
Autoshapes are basic shapes library that allows to draw different shapes like squares, rectangle, lines, arrows etc. To do this follow these steps:
Step 1. Click on insert tab.
Step 2. Choose shapes option from illustrations group.
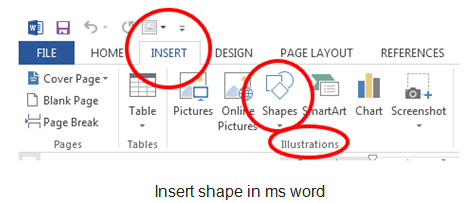
Step 3. Shapes drop down list appears. Select desired shape and draw the shape in document.
Open Office writer also provides an option to draw pictures and allows insert and use images in document.
Inserting shapes in OO Writer
Step 1. Click on Show draw functions icon on standard toolbar.
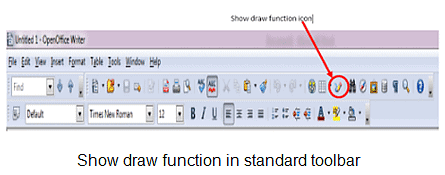
Step 2. Now drawing toolbar will appear the screen with some basic shapes.

Step 3. Select desired drawing object and draw at desired location in the document.
Note: User can use number of shapes to make a complete drawing.
Options to modify, resize, crop and delete image
When picture is inserted into MS word document, an additional tab named picture tools appear on the ribbon. This tab contains format option with different commands which are used to modify the inserted image in the document.

- Remove Background: It is used to remove the background from the picture. One more additional tab opens up while applying this option. User can pick appropriate option as per the need.
- Corrections: This option allows to the improvement of brightness, contrast, or sharpness of the picture.
- Color: It is used to recolor the image inserted in the document.
- Artistic Effects: It adds some effects that picture looks like a sketch or painting.
- Compress Picture: It reduces the size of picture in document.
- Change Picture: Replace the inserted picture in the document.
- Reset Picture: Removes all the options/effects applied or modified.
- Picture Styles: This option allows us to change the entire picture with different borders, shapes, and formatting like frames. It has three sub-options like picture border, picture effects, and picture layout.
- Position: It displays the pictures at a specified or selected position in the document.
- Wrap Text: This option is used make a proper adjustment of picture with the text. User can adjust picture linline with text, square, tight, through, behind text, in front of text etc.
- Bring Forward: This option is used with multiple objects inserted in document. When multiple documents are inserted in document they are overlapped with each other. To show the hidden overlapped picture this option brings the selected picture forward by step 1.
- Send to Back: Reverse of bring forward, it send the image backward by 1 step.
- Selection Pane: Displays all the objects in the documents with a selection pane on window’s right side.
- Align: It is used to align the objects at specific place such as left, right, center etc.
- Group: Making a group of objects or images.
- Rotate: Rotate or flip a picture. It can rotate a picture by 90 degree or flip the picture horizontal or vertical.
- Crop: It is used to remove unwanted part from the image.
User need to select the image before modifying it. User can directly resize an image by using resize handle from any corner or side.
Modify Image in OO Writer document
OO Writer provides following two tools to modify image in document.
Picture Toolbar: When user select an image in OO writer document, picture toolbar appears with below given options:

- From File: It replaces the existing picture from the computer.
- Filter: This option allows us to filter pictures with effects such as invert, smooth, sharpen, remove noise, polarization, etc.
- Graphics Mode: It changes the graphics mode into Grayscale, Watermark, Black/White and defaults colors.
- Color: Recolor the image or picture with specified values from the toolbar. Users can change color in RGB pattern as well as Brightness, Contrast, and Gamma options to recolor the image.
- Transparency: Make the image transparent as per the specified value in percentage, More percentage more image will transparent. 100% makes the image white.
- Flip Horizontally: Flip the image left in the right direction.
- Flip Vertically: Flip the image from upward to the downward direction.
- Frame Properties: Allows to work with the picture frame
OO writer also supports properties window to modify the images for insert and use images in document.
Properties Window: Properties window almost provides similar options as the picture toolbar under the graphic property. Moreover, it allows for changing the height and width by Position and Size attribute.
Wrap property adjusts the image along with text in a paragraph such as None(Default), Before (Text Before Image), After (Text after image), Parallel (Inline with text), Through (In front of text), Optimal (Adjust image automatically).
Note: Users can access all commands from the format menu. Users can also modify images by using the Format → Picture option. Few commands are explained below:
Applying borders/frames
Step 1. Select inserted picture.
Step 2. Click on Format → Picture option. Picture dialog box will appear.
Step 3. Click on Borders Tab and set different commands for borders as per requirement.
Step 4. Click on OK button to finish.
OR
OO Writer provides on inbuilt style named Frame to apply frame to a picture, user can apply that also.
Crop Image
Step 1. Select inserted picture.
Step 2. Click on Format → Picture option. Picture dialog box will appear.
Step 3. Click on Crop Tab and set different commands as per the need.
Step 4. Click on OK button when finished.
Sometimes we need to insert artistic text in the document which is also a part of the insert and use images in document.
Using Fontwork gallery – insert and use images in document
Font work gallery allows inserting eye-catching captions and attractive text objects with a set of different styles and designs.
Steps to insert fontwork:
Step 1. Activate drawing toolbar in Writer.
Step 2. Click on fontwork icon in drawing toolbar.
Step 3. Select any fontwork and click on ok, fontwork will be inserted in document.
Step 4. Double click on fontwork to change the default text.
Step 5. Click anywhere in document when finished typing work. Then modify the fontwork text.
The last part of insert and use images in document is delete image which are no longer needed.
Delete Image – insert and use images in document
Step 1. Select image.
Step 2. Press delete key.
FAQs on Insert & Use images in document - Class 10
| 1. How can I insert an image from the internet into a MS Word document? |  |
| 2. What are Autoshapes in MS Word 2013 and how do I use them to create drawings? |  |
| 3. How can I modify an image in an OpenOffice Writer document? |  |
| 4. What file formats can I insert as images in MS Word? |  |
| 5. Can I wrap text around an image in MS Word? If yes, how? |  |


