Share & Review a Spreadsheet | Information Technology for Class 10 PDF Download
Need for Share and review spreadsheet
When we are working with MS Excel in the workplace, there are some other people who are working on the same worksheet.
In this scenario, we need to share the worksheet with multiple users on the network. Therefore these users can work on the same file from different computers connected to the network.
When they finished their work this spreadsheet needs to be reviewed for the changes done by multiple users.
For that purpose spreadsheet software like MS Excel, OO Calc provides one feature called Share and review spreadsheet.
Sharing worksheet data
As we have some shared folders in our schools to save the work done by teachers, office people and students on the network.
These shared folders have some common files on which multiple users are doing their work.
These files get locked by the user for editing when it is shared. and display a message on the screen. This happens when multiple users are working on the same file at a time. So another user can open the same file in read-only mode.
Advantages of Sharing worksheet data
Sharing worksheet data offers following advantages:
- Used by any one in the network to whom its shared
- Any user can do the changes
- Save the time and efforts
- Makes work easier and better
- Collaborate with others
- Speed up data entry process
Setting up a spreadsheet for sharing
You need to save your spreadsheet before sharing.
How to share the spreadsheet?
To share a spreadsheet follow the given steps:
Step 1: Open a saved spreadsheet for sharing.
Step 2: Click on Review –> Share workbook option from the changes group.

A share workbook dialog box will appear as displayed in the given scree shot.
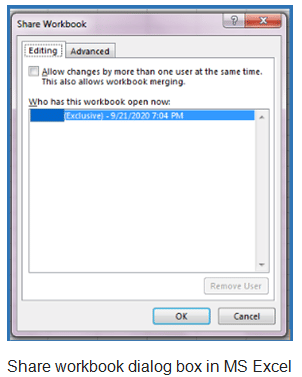
Step 3: Click on the checkbox to allow another user on the network to do the changes.
Step 4: Click on OK button.
Review the spreadsheet
After sharing the spreadsheet, you need to record desired changes. To do this MS Excel provides Track Changes feature.
Recording Changes
To record changes in spreadsheet follow these steps:
Step 1: Click on Review –> Track Changes –> Highlight Changes option from Changes group.

Step 2: It will open Highlight Changes dialog box as displayed in the below screen shot
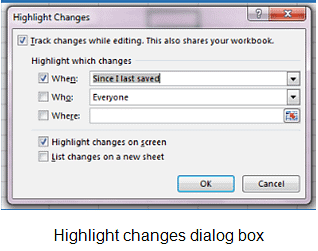
As you can see, above dialog box displays highlight changes provides following options:
- When: This option provides a time for changes done by the users. Select the appropriate option as per your need. The options are – Since I last saved (By default), All, Not yet reviewed, and Since Date…
- Who: This option displays the list of users who can do the changes. The default option is Everyone.
- Where: Here you can select the ranges or cells from the spreadsheet.
- Highlight changes on screen: This must be chacked to highlight the changes done by the user.
- List changes on a new sheet: This option can be used to list the changes on the new spreadsheet.
Step 3: Choose your options for recording desired changes and click on the OK button.
Share and Review Spreadsheet – Comments
Comments are the additional information provided by user on the changes made by him or sometimes it will be added by excel itself. The comments help another user to see the progress of work or update in the spreadsheet. So in the next section we will discuss about comments, how to add, edit and format the comments.
Add comment
To add comment follow the given steps:
Step 1: Place the cursor where you want to add a comment.
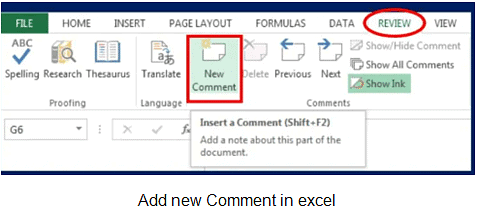
Step 2: Click Review –> New Comment option from comments group. or Press Shift + F2
Step 3: It will open the comment box with username as displayed in the following screenshot:
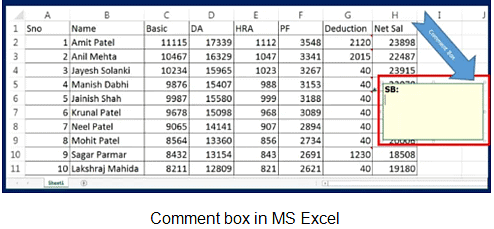
Step 4: Now type the required text for the comment in the comment box and click outside comment box when you finished typing comment text.
When the comment is added to the cell, it displays a red highlighted top right corner.
Edit comment
Step 1: Select the cell where comment is inserted.
Step 2: Click on Review –> Edit Comment option from comments group.
Step 3: Do the desired changed and click on the spreadsheet to return.
Format Comment
You can format the comment with following options:
- Fonts: You can change the fonts of the comment text.
- Font size: You can change the font size of comment.
- Bold, Italics and Underline: You can apply bold, italics and underline to the comment.
More options in comments group
Comments group has following more options in comments group:
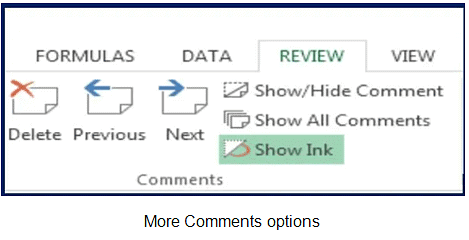
- Delete: This option deletes the selected comment(s).
- Previous: This option is used for navigation through the last comment.
- Next: This option is used for navigation through the next comment.
- Show/Hide Comment: This is toggle command to show/hide the comments.
- Show all comments: This option show all comment text on the worksheet.
- Show Ink: This option is used to show/hide the highlighter to the cell.
Review changes – Share and Review Spreadsheet
When the worksheet changed by any other user and changes are recorded, these need to be reviewed. The user can view, accept, or reject changes accordingly.
Follow these steps to view, accept or reject changes:
View the changes:
Click on Review –> Track Changes –> Highlight Changes option from changes group.
Accept/Reject Changes:
If you want to accept the changes done by another user, to do so follow these steps:
- Click on Review –> Track Changes –> Accept/Reject Changes options from changes group.
- A new dialog box appears which prompts which changes you want to accept/reject.
- Select the appropriate options like When, Who, and Where from the dialog box.
- Click on the relevant button from Accept, Reject, Accept All, Reject All button to accept/reject the changes.
- Click on the close button when you finished.
Merge and Compare sheets
This option is available in the ribbon or any tab. So you need to add it. Follow these steps to add the option.
Step 1: Click on File –> Options. Excel options dialog box appears.
Step 2: Click on Quick Access Toolbar option available in left pane.
Step 3: Select the option Commands not in the Ribbon option.
Step 4: Select Compare and Merge Workbook option.
Step 5: Click on ADD >> button.
Step 6: The Compare and Merge Workbook option is available on quick access toolbar.
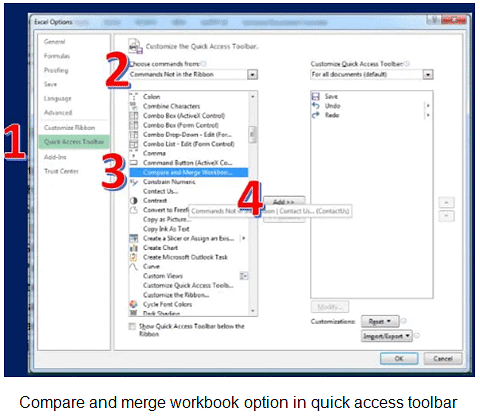
Compare and merge workbook option in quick access toolbar
Step 7: Click OK button.
Steps to do merge and compare sheets:
Steps for Compare and Merge Document:
This option works only with copied spreadsheets only. Then it will compared the changes made in the worksheet.
Step 1: Copy the shared worksheet.
Step 2: Now open original worksheet and assume that the copied worksheet should be modified.
Step 3: Click on Compare and merge workbook option.
Step 4: It will update the current worksheet.
|
4 videos|28 docs|8 tests
|


