Detailed Notes: MS-Word(Part - 3) | Computer Science - Class 5 PDF Download

Using Tabs
A Tab with reference to word processing is the jump your cursor makes from one position to another when you press the Tab key on your keyboard.
This is How the Tab Key on the Keyboard Looks Like
When you press the Tab key on your keyboard, you will see the cursor jump from left to right in your document. You can control how far the cursor jumps when you press the tab key on the keyboard. You typically set tab stop positions for things like indenting the first line of a paragraph or if you wanted text to start three or four centimeters along the line.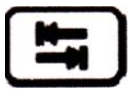
Commonly Asked Questions:
1. Identify the Tab key from the following options: 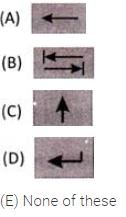
Answer: (b)
Explanation
Correct Option:
(B)  : This is This is the correct picture of the Tab key.
Incorrect Options:
(A)  : This is the Backspace key
(C)  : This is the Shift key
(D)  : This is the Enter key
2. When you press the Tab key on your keyboard, you will see the cursor jump from ____ in your document.
(A) Left to right
(B) Right to left
(C) Top to bottom
(D) None of these
(E) All of these
Answer: (a)
Explanation
Correct Option:
(A) Left to right: When you press the tab key on your keyboard, you will see the cursor jump from left to right in your document.
Incorrect Options:
(B) Right to left: This option is incorrect
(C) Top to bottom: This option is incorrect
(D) None of these: This is an invalid option
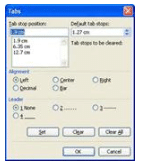
Setting Tabs
Tabs are a paragraph-formatting feature used to align text in MS Word. When you press the Tab key. Word inserts a tab character and moves the cursor or the insertion point to the tab setting, called the tab stop. You can set custom tabs or use Word's default tab settings. Tabs are set to distribute text evenly between the left and right margins. Word's default tabs are set every half-inch. These tabs are indicated at the bottom of the horizontal ruler by tiny tick marks. If you do not want to use the default tabs that are set at half-inch tabs, you have two choices. You can either change the distance between the default/existing tabs or create custom tabs. Custom tab settings are indicated on the horizontal ruler by tab markers. There are two ways to set tabs - by either using the Tabs Dialog Box or using the ruler.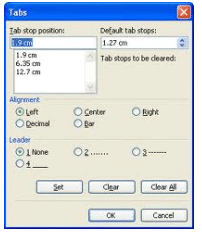
Setting tabs by using the Ruler is an easy, two-step process.
Click the Tab Alignment button on the left of the ruler to choose the type of alignment.
Click the position on the ruler to set the tab.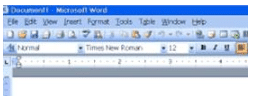
Steps to set tabs in a document by using the Tabs dialog box:
- Open Microsoft Word on your computer.
- Put the cursor in the document where you want the new tab to take place.
- Click on the Format menu.
- Click on the Tabs option in the Format menu. The Tabs dialog box appears.
- Under the Tab Stop Position, enter where you would like the tab to appear. i.e. 0.5", 1", 2" etc. The default tabs are set every 0.5".
- When you have finished making your selection, click on the OK button.
Commonly Asked Question
Word's default tabs are set at a gap of every ______.
(A) One inch
(B) Half inch
(C) Two inches
(D) none of these
(E) All of these
Answer: (B)
Correct Option:
(B) Hard copy : Word's default tabs are set at a gap of every half-inch.
Incorrect Options:
(A) One inch : This option is incorrect
(C) Two inches: This option is incorrect
(D) None of these: This option is invalid
2. The option to set Tabs is found in the_________.
(A) Format menu
(B) Insert menu
(C) Tools menu
(D) None of these
(E) All of these
Answer: (a)
Correct Option:
(A) Format menu: The option to set Tabs is found in the Format menu.
Incorrect Options:
(B) Insert menu: This option is incorrect
(C) Tools menu: This option is incorrectD) None of these: This is an invalid option
Graphics with MS-WORD
You might have heard the famous saying that a picture is worth 1000 words. Pictures make a document or report attractive and add meaning to it. Along with your text, you may want to add some pictures to your document. For example, if you are creating a project on the Solar System, you may want to include a photograph of the planets. (See Image 5.4.13)
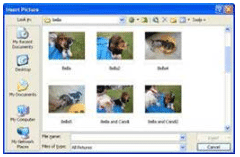
To insert a picture from a file you have already saved on your computer, perform the following steps:
- Click on the Insert menu.
- Click on the Picture option in the Insert menu.
- Select the From File option. Find the required file on the hard disk and click on the Insert button.
The picture appears on the screen. You can resize it by clicking and dragging one of the corner handles.
Commonly Asked Question
1. The option to add pictures to your document is found in the_________.
(A) Tools menu
(B) View menu
(C) Insert menu
(D) None of these
(E) All of these
Answer : (c)
Explanation
Correct Option:
(C) Insert menu: The option to add pictures to your document is found in the Insert menu.
Incorrect Options:
(A) Tools menu: This option is incorrect
(B) View menu: This option is incorrect
(D) None of these: This option is invalid
2. Once you have inserted a picture in your document, you cannot resize it. The given statement is________.
(A) True
(B) False
Answer: (b)
Explanation
Correct Option:
(B) False: Once you have inserted a picture in your document, you can resize it by clicking and dragging one of the corner handles.
Incorrect Options:
(A) True: Once you have inserted a picture in your document, you can resize it.
|
36 videos|38 docs|27 tests
|
FAQs on Detailed Notes: MS-Word(Part - 3) - Computer Science - Class 5
| 1. What are the different ways to create a table in MS-Word? |  |
| 2. How can I add or delete rows and columns in an existing table in MS-Word? | |
| 3. Can I change the formatting of a table in MS-Word after it has been created? | |
| 4. How can I merge cells in a table in MS-Word? | |
| 5. Is it possible to convert a table to text in MS-Word? | |


MCQs
,Previous Year Questions with Solutions
,ppt
,Detailed Notes: MS-Word(Part - 3) | Computer Science - Class 5
,Objective type Questions
,Extra Questions
,Important questions
,Sample Paper
,Detailed Notes: MS-Word(Part - 3) | Computer Science - Class 5
,study material
,shortcuts and tricks
,Detailed Notes: MS-Word(Part - 3) | Computer Science - Class 5
,video lectures
,mock tests for examination
,Exam
,Summary
,Viva Questions
,past year papers
,practice quizzes
,Free
,Semester Notes
;


Detailed Notes: MS-Word(Part - 3) Free PDF Download
Importance of Detailed Notes: MS-Word(Part - 3)
Detailed Notes: MS-Word(Part - 3)
Detailed Notes: MS-Word(Part - 3) Class 5 Questions
Study Detailed Notes: MS-Word(Part - 3) on the App
|
© EduRev
|
Education Revolution
|


|


