Detailed Notes: MS-Word(Part - 4) | Computer Science - Class 5 PDF Download
Drawing Tools in MS-WORD
The set of Word drawing tools is extensive, easy to use, and powerful. They enable anyone to create good quality images or designs for a multitude of practical applications. Microsoft Word offers many powerful drawing tools to let you control fill colour, line colour, line style, shadows, 3D effects, grouping, ordering, and more. The easiest way to access these features is through the drawing toolbar. Normally the drawing toolbar is at the bottom of your Word screen
If it is not activated, you can turn it on by doing the following:
- Click on the "View" menu.
- Choose the "Toolbars" option from the drop-down menu.
- Check the "Drawing" option.
The toolbar will look like the image below. We will explore the function of each of the buttons.
Function of commonly used buttons of the Drawing Toolbar  Displays a pull down menu with several drawing options
 Changes the pointer to a selection arrow
 Rotates the selected object to any degree
 Displays a pull down menu with several libraries of shapes
 Draws a line where you ctick and drag. Hold the Shift key d to make the line straight
 Inserts a line with an arrowhead where you click and drag
 Draws a rectangle where you click and drag. Hold down shift to draw a square
 Draws an oval where you click and drag. Hold down Shift to draw a circle
 Draws a text box where you click and drag
 Create text effects with Word Art
 Adds, modifies, or removes fill colour from a selected object
 Adds, modifies, or removes line colour
 Formats the selected text with the colour you click
 Changes the thickness of lines
 Selects dash style for dashed lines
 Selects arrow style, placement and shape of arrowhead
 Displays a pull down menu which offers shadow choices
 Adds 3-d effects to rectangles or ovals
Commonly Asked Questions
1. The correct sequence for activating the Drawing toolbar in Word is
(A) Format-> Toolbars->Drawing
(B) Tools-> Toolbars->Drawing
(C) View-> Toolbars->Drawing
(D) None of these
(E) All of these
Answer (C)
Correct Option:
(C) View-> Toolbars->Drawing - The correct sequence for activating Drawing toolbar in Word is View-> Toolbars->Drawing.
Incorrect Options:
(A) Format -> Toolbars-> Drawing: This option is only partially correct
(B) Tools-> Toolbars-> Drawing: This option is only partially correct
(D) None of these - This option is invalid
2. Which of the following icons is/are used to create text effects with Word Art?


(D) All of these
(E) None of these
Answer: (a)
Explanation
Correct Option:
(A)  : This is the icon for Word Art which is used to create text effects.
Incorrect Options:
(B)  : This adds' modifies, or removes line colour
(C)  : This formats the selected text with the colour you click
(D) All of these: This is an invalid option
(E) None of these: This is an invalid option
Mail Merge
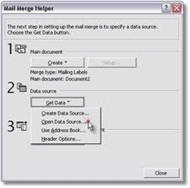
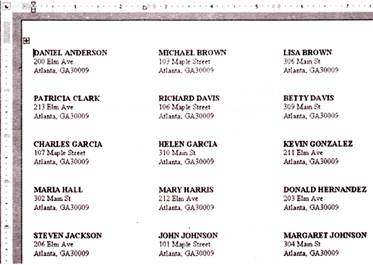
All of you may have seen some form of pre-printed stationary like letterheads, forms, address lists etc. MS Word has advanced features to create office stationary. For example, a document can get printed automatically with the company name, address and logo. This feature in MS Word is called Mail Merge. Mail merge is used for simplifying repetitive documents and tasks. Mail merge can be used for creating a large number of documents that contain identical formatting, layout, text, graphics, etc. and where only certain portions of each document varies. Mail merge is also used for generating mailing labels, envelopes, address lists, personalized training handouts, etc. In addition to hard copy mail shots (circular, leaflet, or other advertising material sent by post), it can also be used to generate multiple emails and electronic faxes. Whenever you need to assemble similar data, mail merge is a good solution. (See Image 5.4.15)

Mail merge primarily consists of two files, the Main Document and the Data Source or Data File. The Main Document contains the information that will remain the same in each record, and the Data Source contains all the variable information, in the form of fields. This is the information that will change in the Main Document when the merge is completed. When the Main Document and Data Source are merged, Microsoft Word replaces each merge field in the Main Document with the data from the respective field contained in the Data Source. The end result is a third document, a combination of the Main Document and Data Source. There is also an option to mail merge directly to the printer, fax or email
For example:
A company can use a mail merge when it wants to create a new product announcement which is being sent to the top 500 customers. In this case, the text of the letter is always the same but the name and address are different for each customer. These customer names and addresses are stored in a data source, which is a data file that contains the unique information that should be included. (See Image 5.4.16) In a data file, information is organized into columns and rows. Each column represents a category, such as first name, last name, company, or street address. Except for the first row, each row represents one complete record or set of data. The first row is called the Header row and contains the column names. To add unique information in a mail merge, you place fields in the main document. The fields correspond to the names of the columns that contain the information that you want to include.

For example:
In the product announcement, you can place fields for first name, last name, company, street address, and postal code at the top of the main document. This adds unique address information to each document when you merge. When you set up the mail merge, you can sort, filter, and arrange the information from the data file so that you use only the information that you need. For example, you can target customers who live in a certain district.
Commonly Asked Questions
Mail merge primarily consists of________.
(A) Main Document
(B) Data Source
(C) Both A and B
(D) None of these
(E) All of these
Answer: (c)
Explanation
Correct Option:
(C) Both A and B: Mail merge primarily consists of two files, the Main Document and the Data Source or Data File.
Incorrect Options:
(A) Main Document: This option is only partially correct
(B) Data Source: This option is only partially correct
(C) None of these: This option is invalid
2. Mail merge is used for generating ________.
(A) Mailing labels
(B) Envelopes
(C) Address lists
(D) All of the above
(E) None of these
Answer: (d)
Correct Option:
(D) All of the above: Mail merge is used for generating mailing labels, envelopes, address lists.
Incorrect Options:
(A) Mailing labels: This option is only partially correct
(B) Envelopes: This option is only partially correct
(C) Address lists: This option is only partially correct
|
36 videos|38 docs|27 tests
|
FAQs on Detailed Notes: MS-Word(Part - 4) - Computer Science - Class 5
| 1. What are the different ways to create a table in MS Word? |  |
| 2. How can I apply different styles to a table in MS Word? |  |
| 3. How do I merge cells in MS Word? |  |
| 4. Can I add a formula to a table in MS Word? |  |
| 5. How can I sort data in a table in MS Word? |  |


