More in Word | Computer Science - Class 5 PDF Download
Introduction:-
A paragraph in Word is any text that ends with a hard return. You can insert a hard return anytime by pressing the Enter key. Paragraph formatting lets you control the appearance. For example, you can change the alignment of text from left to center or the spacing between lines form single to double.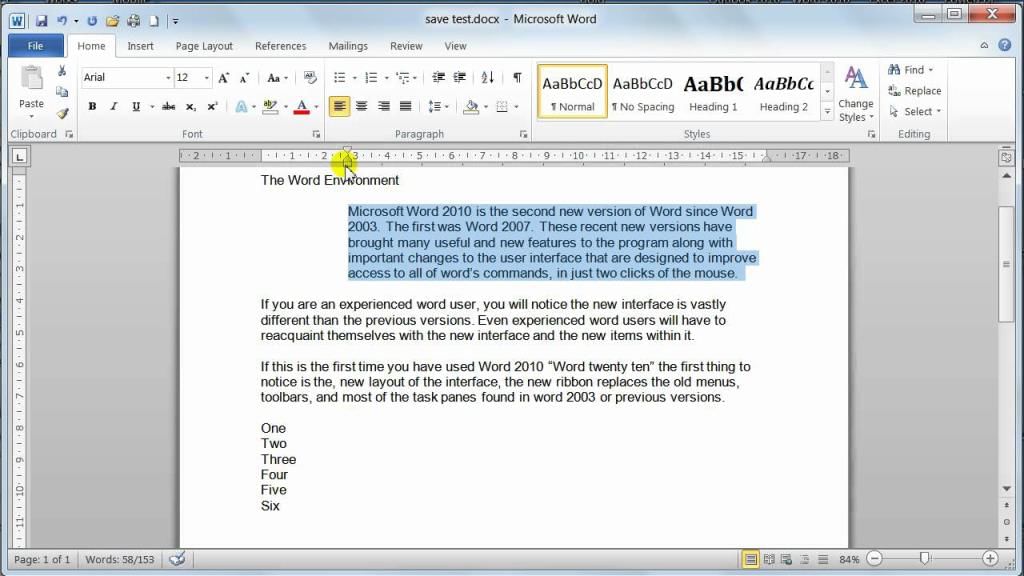
2.1 Manipulating Paragraph:-
2.1.1 Selecting:-
You can select a paragraph on one page and a sentence on a different page. you can select the paragraph by using mouse or by using the keyboard.
Select text by using the mouse:-
(i) To select an entire document, do one of the following:
- On the Home tab, in the Editing group, click Select, and then click Select All.

- Move the pointer to the left of any text until it turns into a right-pointing arrow, and then triple-click.
(ii)
To select | Do this |
Any amount of text | Click where you want to begin the selection, hold down the left mouse button, and then drag the pointer over the text that you want to select. |
A word | Double-click anywhere in the word. |
A line of text | Move the pointer to the left of the line until it changes to a right-pointing arrow, and then click. |
A sentence | Hold down CTRL, and then click anywhere in the sentence. |
A paragraph | Triple-click anywhere in the paragraph. |
Multiple paragraphs | Move the pointer to the left of the first paragraph until it changes to a right-pointing arrow, and then press and hold down the left mouse button while you drag the pointer up or down. |
A large block of text | Click at the start of the selection, scroll to the end of the selection, and then hold down SHIFT while you click where you want the selection to end. |
An entire document | Move the pointer to the left of any text until it changes to a right-pointing arrow, and then triple-click. |
Headers and footers | In Print Layout view, double-click the dimmed header or footer text. Move the pointer to the left of the header or footer until it changes to a right-pointing arrow, and then click. |
Footnotes and endnotes | Click the footnote or endnote text, move the pointer to the left of the text until it changes to a right-pointing arrow, and then click. |
A vertical block of text | Hold down ALT while you drag the pointer over the text. |
A text box or frame | Move the pointer over the border of the frame or text box until the pointer becomes a four-headed arrow, and then click. |
(iii) Select text in different places
You can select text or items in a table that are not next to each other. For example, you can select a paragraph on one page and a sentence on a different page.
1. Select some text or an item in a table.
2. Hold down CTRL while you select any additional text or item in a table that you want.
Select text by using the keyboard
Select text in the body of a document
⇒ To select an entire document, press CTRL+A.
To select | Do this |
One character to the right | Press SHIFT+RIGHT ARROW. |
One character to the left | Press SHIFT+LEFT ARROW. |
A word from its beginning to its end | Place the insertion point at the beginning of the word, and then press CTRL+SHIFT+RIGHT ARROW. |
A word from its end to its beginning | Move the pointer to the end of the word, and then press CTRL+SHIFT+LEFT ARROW. |
A line from its beginning to its end | Press HOME, and then press SHIFT+END. |
A line from its end to its beginning | Press END, and then press SHIFT+HOME. |
One line down One line up | Press END, and then press SHIFT+DOWN ARROW. Press HOME, and then press SHIFT+UP ARROW. |
A paragraph from its | Move the pointer to the beginning of the paragraph, and then press |
beginning to its end | CTRL+SHIFT+DOWN ARROW. |
A paragraph from its end to its beginning | Move the pointer to the end of the paragraph, and then press CTRL+SHIFT+UP ARROW. |
A document from its end to its beginning | Move the pointer to the end of the document, and then press CTRL+SHIFT+HOME. |
A document from its beginning to its end | Move the pointer to the beginning of the document, and then press CTRL+SHIFT+END. |
From the beginning of a window to its end | Move the pointer to the beginning of the window, and then press ALT+CTRL+SHIFT+PAGE DOWN. |
The entire document | Press CTRL+A. |
A vertical block of text | Press CTRL+SHIFT+F8, and then use the arrow keys. Press ESC to turn off the selection mode. |
The nearest character | Press F8 to turn on selection mode, and then press LEFT ARROW or RIGHT ARROW; press ESC to turn off the selection mode. |
A word, a sentence, a paragraph, or a document | Press F8 to turn on selection mode, and then press F8 once to select a word, twice to select a sentence, three times to select a paragraph, or four times to select the document. Press ESC to turn off the selection mode. |
2.1.2 Moving:-
• Moving is also known as Cut and Paste. It allows you to remove selected text from the document/paragraph and place it to different location.
To cut and paste a block of text:
• Select the text you want to move.
• Click the Cut button on the Standard toolbar. or in Keyboard Press Ctrl + X
• Place the insertion point where you want the text inserted.
• Click the Paste button.  in Keyboard Press Ctrl + V
2.1.3 Copying
Copying text can be useful if you need to duplicate words you have already typed as it saves time and effort. Follow these step-by-step instructions to copy and paste text
Step 1: Open an existing Word document or start a new document and type your text.
Step 2: To copy text, it will need to be selected or highlighted with the mouse first. When the mouse pointer is moved over a text area, the pointer will change from an arrow to a ‘text select’ or ‘I-beam’ icon.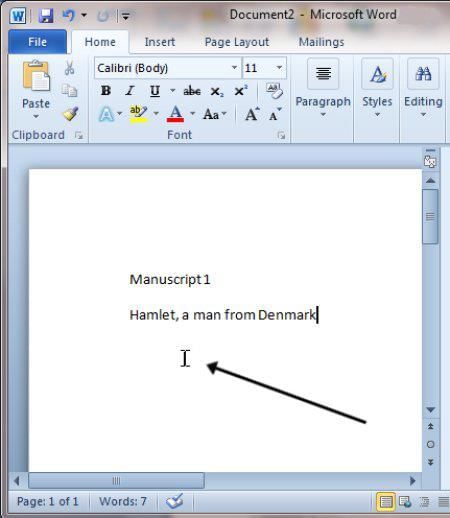
Step 3: Select your text so that it’s highlighted.
Step 4: Copy the text by clicking on the copy icon at the left-hand side of the formatting ribbon.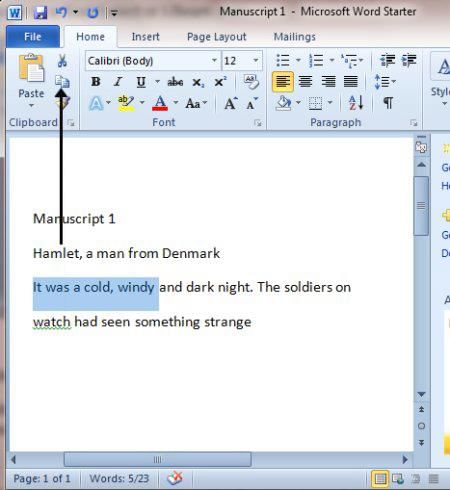
Step 5: Use the mouse to move the cursor to where you wish to paste the copied text.
Step 6: Click Paste to insert the copied text in its new place in your text.
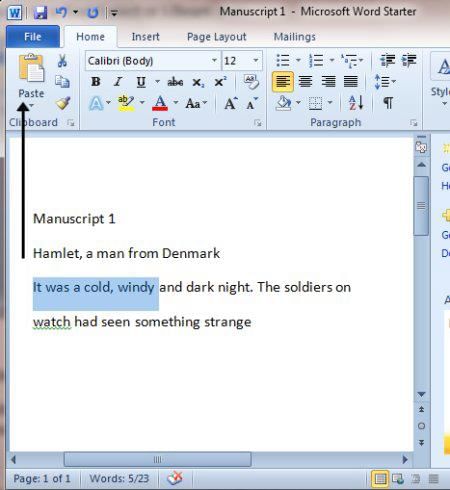
Step 8: Your text will now be duplicated in the new position in your document.
Step 9: Once text is highlighted, it’s also possible to copy and paste it using a keyboard shortcut instead of the mouse, which some people find easier.
To copy, press and hold Ctrl (the control key) on the keyboard and then press the C on the keyboard.
( Ctrl+C )
To paste, press and hold down Ctrl and then press V. ( Ctrl+V )
2.1.4 Page Layout menu
Page layout is the term used to describe how each page of your document will appear when it is printed. In Word, page layout includes elements such as the Themes, Page Setup, Page Background, Paragraph setting etc.
2.1.5 Margins Setting
Page margins are the blank space around the edges of the page (Top, Bottom, Left, and Right) in general, you can insert text and graphics in the printable area between the margins. However, you can position some items in the margins — for example, headers, footers, and page numbers.
Change or set page margins
1. On the Page Layout tab, in the Page Setup group, click Margins.
2. Click the margin type that you want. For the most common margin width, click Normal.
When you click the margin type that you want, your entire document automatically changes to the margin type that you have selected.
3. You can also specify your own margin settings. Click Margins, click Custom Margins, and then in the Top, Bottom, Left, and Right boxes, enter new values for the margins.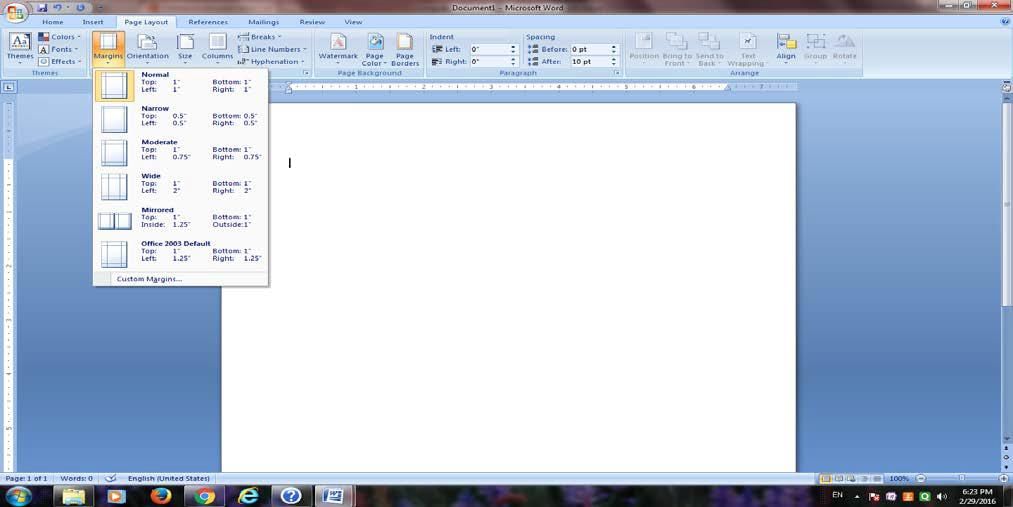
2.1.6 Orientation:-
You can choose either portrait (vertical) or landscape (horizontal) orientation for all or part of your document.
1. On the Page Layout tab, in the Page Setup group, click Orientation.
2. Click Portrait or Landscape.
2.1.7 Paper size (Legal & A4):-
Page size refers to the area of your Paper or sheet, size is the size of the paper used for printing.
Choose a page size
In the Page Setup dialog box, click the icon that represents the page size that you want. For example, click Letter 8.5 x 11".
The default paper size in Microsoft Word is 8.5 x 11 inches –the standard size (called letter)
Some more standard paper size are:-
A-4 8.27 x 11.69".
Legal 8.5 x 14".
2.1.8 Page Borders:-
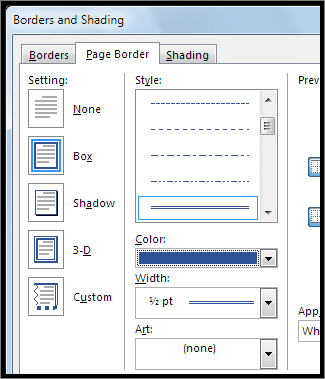
You can put a border around the page.
On the Page Layout tab, in the Page background group, click Page Borders.
In the Borders and Shading box, design your border:
a. Under Setting, choose the border style you want.
b. Under Style, click the line style you want.
c. Click the arrow under Color and choose a border color.
d. Click the arrow under Width and choose the width you want.
e. If you want a clip-art border instead, click the arrow under Art and choose a border graphic.
2.4 Indentation:-
Indentation determines the distance of the paragraph from either the left or the right margin. Within the margins, you can increase or decrease the indentation of a paragraph or group of paragraphs.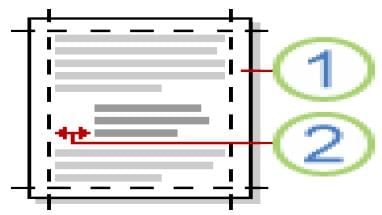
1. Click in front of the line that you want to indent.
2. On the Page Layout tab, click the Paragraph Dialog Box Launcher, and then click the Indents and Spacing tab.
2.5 Wrap Text / Positioning Image:-
Microsoft Office Word enables you to wrap text easily around pictures, shapes, and tables with any position or style that you want.
Wrap text around a picture or drawing object
1. If the picture or object is on a drawing canvas, select the canvas. If the picture or object is not on a drawing canvas, select the picture or object.
2. On the Format tab, in the Arrange group, click Position. If the Arrange group is collapsed and Position isn't visible, click the Arrange button, and then click Position.
Click the wrapping position that you want to apply.
⇒ Drag the picture or object if you want to change its position on the page. The text wrapping adjusts to the object in its new location.
3. To change how the text flows around the object, or make other changes to the wrap settings, in the Arrange group, click Text Wrapping and then click the option that looks best.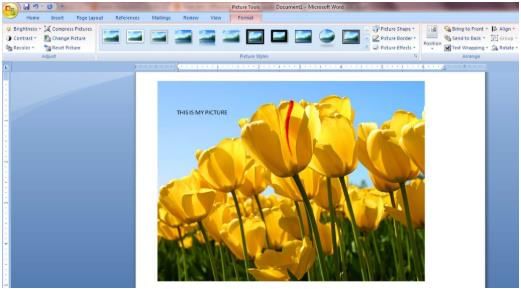
|
36 videos|38 docs|27 tests
|
FAQs on More in Word - Computer Science - Class 5
| 1. What is the Word Class 5 exam? |  |
| 2. What topics are covered in the Word Class 5 exam? |  |
| 3. How can I prepare for the Word Class 5 exam effectively? |  |
| 4. Are there any specific resources or study materials available for the Word Class 5 exam preparation? |  |
| 5. What is the duration of the Word Class 5 exam? |  |


