HTML Favicon & Tables | HTML for Junior Classes - Class 3 PDF Download
A favicon is a small image displayed next to the page title in the browser tab.
How To Add a Favicon in HTML
You can use any image you like as your favicon. You can also create your own favicon on sites like https://www.favicon.cc.
Tip: A favicon is a small image, so it should be a simple image with high contrast.
A favicon image is displayed to the left of the page title in the browser tab, like this:
To add a favicon to your website, either save your favicon image to the root directory of your webserver, or create a folder in the root directory called images, and save your favicon image in this folder. A common name for a favicon image is "favicon.ico".
Next, add a <link> element to your "index.html" file, after the <title> element, like this:
Example
<!DOCTYPE html>
<html>
<head>
<title>My Page Title</title>
<link rel="icon" type="image/x-icon" href="/images/favicon.ico">
</head>
<body>
<h1>This is a Heading</h1>
<p>This is a paragraph.</p>
</body>
</html>
Now, save the "index.html" file and reload it in your browser. Your browser tab should now display your favicon image to the left of the page title.
Favicon File Format Support
The following table shows the file format support for a favicon image:

HTML Tables
HTML tables allow web developers to arrange data into rows and columns.
Example

Define an HTML Table
A table in HTML consists of table cells inside rows and columns
Example
A simple HTML table:
<table>
<tr>
<th>Company</th>
<th>Contact</th>
<th>Country</th>
</tr>
<tr>
<td>Alfreds Futterkiste</td>
<td>Maria Anders</td>
<td>Germany</td>
</tr>
<tr>
<td>Centro comercial Moctezuma</td>
<td>Francisco Chang</td>
<td>Mexico</td>
</tr>
</table>
Table Cells
Each table cell is defined by a <td> and a </td> tag.
td stands for table data.
Everything between <td> and </td> are the content of the table cell.
Example
<table>
<tr>
<td>Emil</td>
<td>Tobias</td>
<td>Linus</td>
</tr>
</table>
Note: table data elements are the data containers of the table.
They can contain all sorts of HTML elements; text, images, lists, other tables, etc.
Table Rows
Each table row starts with a <tr> and end with a </tr> tag.
tr stands for table row.
Example
<table>
<tr>
<td>Emil</td>
<td>Tobias</td>
<td>Linus</td>
</tr>
<tr>
<td>16</td>
<td>14</td>
<td>10</td>
</tr>
</table>
You can have as many rows as you like in a table, just make sure that the number of cells are the same in each row.
Note: There are times where a row can have less or more cells than another. You will learn about that in a later chapter.
Table Headers
Sometimes you want your cells to be headers, in those cases use the <th> tag instead of the <td> tag:
Example
Let the first row be table headers:
<table>
<tr>
<th>Person 1</th>
<th>Person 2</th>
<th>Person 3</th>
</tr>
<tr>
<td>Emil</td>
<td>Tobias</td>
<td>Linus</td>
</tr>
<tr>
<td>16</td>
<td>14</td>
<td>10</td>
</tr>
</table>
By default, the text in <th> elements are bold and centered, but you can change that with CSS.
HTML Table Borders
HTML tables can have borders of different styles and shapes.
How To Add a Border
When you add a border to a table, you also add borders around each table cell:

To add a border, use the CSS border property on table, th, and td elements:
Example
table, th, td {
border: 1px solid black;
}
Collapsed Table Borders
To avoid having double borders like in the example above, set the CSS border-collapse property to collapse.
This will make the borders collapse into a single border:
Example
table, th, td {
border: 1px solid black;
border-collapse: collapse;
}
Style Table Borders
If you set a background color of each cell, and give the border a white color (the same as the document background), you get the impression of an invisible border:
Example
table, th, td {
border: 1px solid white;
border-collapse: collapse;
}
th, td {
background-color: #96D4D4;
}
Round Table Borders
With the border-radius property, the borders get rounded corners:
 Example
table, th, td {
border: 1px solid black;
border-radius: 10px;
}
Skip the border around the table by leaving out table from the css selector:
Example
th, td {
border: 1px solid black;
border-radius: 10px;
}
Dotted Table Borders
With the border-style property, you can set the appereance of the border.
The following values are allowed:
- dotted

- dashed

- solid

- double

- groove

- ridge

- inset

- outset

- none
- hidden
Example
th, td {
border-style: dotted;
}
Border Color
With the border-color property, you can set the color of the border.
Example
th, td {
border-color: #96D4D4;
}
HTML Table Sizes
HTML tables can have different sizes for each column, row or the entire table.


Use the style attribute with the width or height properties to specify the size of a table, row or column.
HTML Table Width
To set the width of a table, add the style attribute to the <table> element:
Example
Set the width of the table to 100%:
<table style="width:100%">
<tr>
<th>Firstname</th>
<th>Lastname</th>
<th>Age</th>
</tr>
<tr>
<td>Jill</td>
<td>Smith</td>
<td>50</td>
</tr>
<tr>
<td>Eve</td>
<td>Jackson</td>
<td>94</td>
</tr>
</table>
Note: Using a percentage as the size unit for a width means how wide will this element be compared to its parent element, which in this case is the <body> element.
HTML Table Column Width

To set the size of a specific column, add the style attribute on a <th> or <td> element:
Example
Set the width of the first column to 70%:
<table style="width:100%">
<tr>
<th style="width:70%">Firstname</th>
<th>Lastname</th>
<th>Age</th>
</tr>
<tr>
<td>Jill</td>
<td>Smith</td>
<td>50</td>
</tr>
<tr>
<td>Eve</td>
<td>Jackson</td>
<td>94</td>
</tr>
</table>
HTML Table Row Height
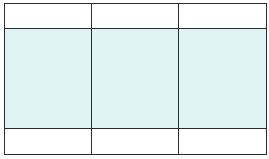
To set the height of a specific row, add the style attribute on a table row element:
Example
Set the height of the second row to 200 pixels:
<table style="width:100%">
<tr>
<th>Firstname</th>
<th>Lastname</th>
<th>Age</th>
</tr>
<tr style="height:200px">
<td>Jill</td>
<td>Smith</td>
<td>50</td>
</tr>
<tr>
<td>Eve</td>
<td>Jackson</td>
<td>94</td>
</tr>
</table>
HTML Table Headers
HTML tables can have headers for each column or row, or for many columns/rows.


HTML Table Headers
Table headers are defined with th elements, each th element represents a table cell.
Example
<table>
<tr>
<th>Firstname</th>
<th>Lastname</th>
<th>Age</th>
</tr>
<tr>
<td>Jill</td>
<td>Smith</td>
<td>50</td>
</tr>
<tr>
<td>Eve</td>
<td>Jackson</td>
<td>94</td>
</tr>
</table>
Vertical Table Headers
To use the first column as table headers, define the first cell in each row as a th element:
Example
<table>
<tr>
<th>Firstname</th>
<td>Jill</td>
<td>Eve</td>
</tr>
<tr>
<th>Lastname</th>
<td>Smith</td>
<td>Jackson</td>
</tr>
<tr>
<th>Age</th>
<td>94</td>
<td>50</td>
</tr>
</table>
Align Table Headers
By default, table headers are bold and centered:

To left-align the table headers, use the CSS text-align property:
Example
th {
text-align: left;
}
Header for Multiple Columns
You can have a header that spans over two or more columns.

To do this, use the colspan attribute on the <th> element:
Example
<table>
<tr>
<th colspan="2">Name</th>
<th>Age</th>
</tr>
<tr>
<td>Jill</td>
<td>Smith</td>
<td>50</td>
</tr>
<tr>
<td>Eve</td>
<td>Jackson</td>
<td>94</td>
</tr>
</table>
Table Caption
You can add a caption that serves as a heading for the entire table.
To add a caption to a table, use the <caption> tag:
Example
<table style="width:100%">
<caption>Monthly savings</caption>
<tr>
<th>Month</th>
<th>Savings</th>
</tr>
<tr>
<td>January</td>
<td>$100</td>
</tr>
<tr>
<td>February</td>
<td>$50</td>
</tr>
</table>
Note: The <caption> tag should be inserted immediately after the <table> tag.
HTML Table Padding & Spacing
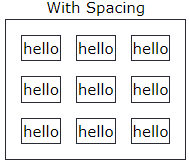
HTML tables can adjust the padding inside the cells, and also the space between the cells.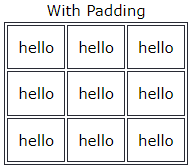
HTML Table - Cell Padding
- Cell padding is the space between the cell edges and the cell content.
- By default the padding is set to 0.
- To add padding on table cells, use the CSS padding property:
Example
th, td {
padding: 15px;
}
To add padding only above the content, use the padding-top property.
And the others sides with the padding-bottom, padding-left, and padding-right properties:
Example
th, td {
padding-top: 10px;
padding-bottom: 20px;
padding-left: 30px;
padding-right: 40px;
}
HTML Table - Cell Spacing
- Cell spacing is the space between each cell.
- By default the space is set to 2 pixels.
- To change the space between table cells, use the CSS border-spacing property on the table element:
Example
table {
border-spacing: 30px;
}
HTML Table Colspan & Rowspan
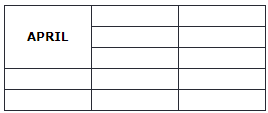
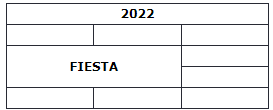
HTML tables can have cells that spans over multiple rows and/or columns.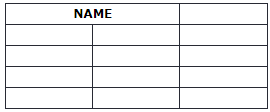
HTML Table - Colspan
To make a cell span over multiple columns, use the colspan attribute:
Example
<table>
<tr>
<th colspan="2">Name</th>
<th>Age</th>
</tr>
<tr>
<td>Jill</td>
<td>Smith</td>
<td>43</td>
</tr>
<tr>
<td>Eve</td>
<td>Jackson</td>
<td>57</td>
</tr>
</table>
Note: The value of the colspan attribute represents the number of columns to span.
HTML Table - Rowspan
To make a cell span over multiple rows, use the rowspan attribute:
Example
<table>
<tr>
<th>Name</th>
<td>Jill</td>
</tr>
<tr>
<th rowspan="2">Phone</th>
<td>555-1234</td>
</tr>
<tr>
<td>555-8745</td>
</tr>
</table>
Note: The value of the rowspan attribute represents the number of rows to span.
HTML Table Styling
Use CSS to make your tables look better.
HTML Table - Zebra Stripes
If you add a background color on every other table row, you will get a nice zebra stripes effect.

To style every other table row element, use the :nth-child(even) selector like this:
Example
tr:nth-child(even) {
background-color: #D6EEEE;
}
Note: If you use (odd) instead of (even), the styling will occur on row 1,3,5 etc. instead of 2,4,6 etc.
HTML Table - Vertical Zebra Stripes
To make vertical zebra stripes, style every other column, instead of every other row.
Set the :nth-child(even) for table data elements like this:
Example
td:nth-child(even), th:nth-child(even) {
background-color: #D6EEEE;
}
Note: Put the :nth-child() selector on both th and td elements if you want to have the styling on both headers and regular table cells.
Combine Vertical and Horizontal Zebra Stripes
You can combine the styling from the two examples above and you will have stripes on every other row and every other column.
If you use a transparent color you will get an overlapping effect.
Use an rgba() color to specify the transparency of the color:
Example
tr:nth-child(even) {
background-color: rgba(150, 212, 212, 0.4);
}
th:nth-child(even),td:nth-child(even) {
background-color: rgba(150, 212, 212, 0.4);
}
Horizontal Dividers

If you specify borders only at the bottom of each table row, you will have a table with horizontal dividers.
Add the border-bottom property to all tr elements to get horizontal dividers:
Example
tr {
border-bottom: 1px solid #ddd;
}
Hoverable Table
Use the :hover selector on tr to highlight table rows on mouse over:

Example
tr:hover {background-color: #D6EEEE;}
HTML Table Colgroup
The <colgroup> element is used to style specific columns of a table.
HTML Table Colgroup
If you want to style the two first columns of a table, use the <colgroup> and <col> elements.

The <colgroup> element should be used as a container for the column specifications.
Each group are specified with a <col> element.
The span attribute specifies how many columns that gets the style.
The style attribute specifies the style to give the columns.
Note: There is a very limited selection of legal CSS properties for colgroups.
Example
<table>
<colgroup>
<col span="2" style="background-color: #D6EEEE">
</colgroup>
<tr>
<th>MON</th>
<th>TUE</th>
<th>WED</th>
<th>THU</th>
...
Note: The <colgroup> tag must be a child of a <table> element and should be placed before any other table elements, like <thead>, <tr>, <td> etc., but after the <caption> element, if present.
Legal CSS Properties
There are only a very limited selection of CSS properties that are allowed to be used in the colgroup:
- width property
- visibility property
- background properties
- border properties
All other CSS properties will have no effect on your tables.
Multiple Col Elements
If you want to style more columns with different styles, use more <col> elements inside the <colgroup>:
Example
<table>
<colgroup>
<col span="2" style="background-color: #D6EEEE">
<col span="3" style="background-color: pink">
</colgroup>
<tr>
<th>MON</th>
<th>TUE</th>
<th>WED</th>
<th>THU</th>
...
Empty Colgroups
If you want to style columns in the middle of a table, insert a "empty" <col> element (with no styles) for the columns before:
Example
<table>
<colgroup>
<col span="3">
<col span="2" style="background-color: pink">
</colgroup>
<tr>
<th>MON</th>
<th>TUE</th>
<th>WED</th>
<th>THU</th>
...
Hide Columns
You can hide columns with the visibility: collapse property:
Example
<table>
<colgroup>
<col span="2">
<col span="3" style="visibility: collapse">
</colgroup>
<tr>
<th>MON</th>
<th>TUE</th>
<th>WED</th>
<th>THU</th>
...
|
14 videos|31 docs|24 tests
|


