Grade 2 Exam > Grade 2 Notes > Drawing (Art & Craft) > Craft Ideas: Beaded Wind Chimes
Craft Ideas: Beaded Wind Chimes | Drawing (Art & Craft) - Grade 2 PDF Download
Material Required
- Large and medium-sized beads
- Paper cup or yoghurt cup
- Drinking straws
- String
- 4 or more jingle bells (¾" or 1")
- Metal shank button or metal washer
- Poster paint or acrylic paint
- Paint brush
- Pipe cleaner
- Scissors
- Hole punch
Directions to be followed
- Recycle a used paper cup or empty yoghurt cup to make the top of your wind chimes. Clean the cup and wipe it dry. Trim the paper cup to a height of about 2 to 3 inches.

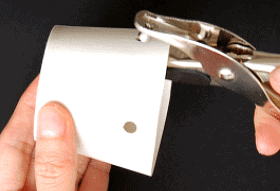
- Punch 4 or more evenly-spaced holes around the cup's mouth.
- Paint the paper cup. Use acrylic paint if the cup is glossy, otherwise you can use poster paint or tempera. Let the paint dry completely.
- Decorate the cup as you please. Paint it with patterns and other details or glue small buttons and other notions.
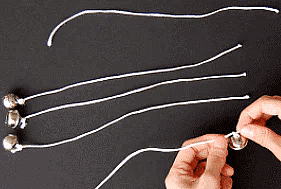
- Cut four or more strings approximately 12 inches long. The number of strings should correspond to the number of holes on the cup. Cut an extra string that is 2 inches longer than the others.

- Tie a jingle bell at the end of each string except for the longer extra string. Set this extra string aside for the wind chime's pendulum.
- Cut drinking straws into ¾ to 1-inch long pieces.
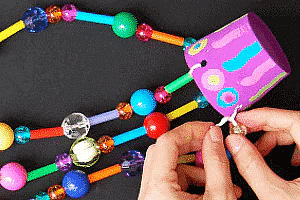
- String beads and drinking straw pieces through each string, stopping about 1 to 2 inches from the top end of the string.

- Tie the top of each beaded string to a hole on the paper cup.
- Cut a pipe cleaner in half. Take one piece and make a small loop on one end.
- Take the extra string. Tie one end to the loop on the pipe cleaner and the other end to a metal shank button or metal washer.
- Punch a small hole at the center of the paper cup.
- Insert the straight end of the pipe cleaner from inside the cup, through the center hole. Pull all the way through—the loop on the pipe cleaner serves as a stopper.
- Loop the pipe cleaner on top to make the wind chimes' handle.

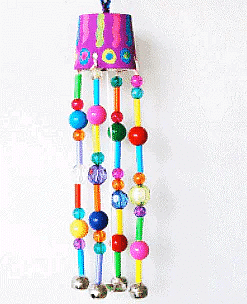
- Hang your wind chimes where it can catch a soft breeze. Check if the metal button or washer is at the same level as the jingle bells. The button or washer should be able to hit the bells when it catches a breeze. Adjust the length of the string if necessary.
The document Craft Ideas: Beaded Wind Chimes | Drawing (Art & Craft) - Grade 2 is a part of the Grade 2 Course Drawing (Art & Craft).
All you need of Grade 2 at this link: Grade 2
|
10 videos|30 docs
|
Related Searches


