Grade 2 Exam > Grade 2 Notes > Drawing (Art & Craft) > Craft Ideas: Box Cat
Craft Ideas: Box Cat

Material Required
- Small box (e.g., medicine or tea box)
- Acrylic paint, tempera, or poster paint
- Paint brush
- Wiggle eyes
- Small pompom or button
- Cotton
- String or ribbon
- Pencil
- Scissors
- White glue
- Fishing line or thin florist wire (optional)
- Glue gun (optional)
Directions to be followed
- Find a small and relatively tall box such as a medicine box or a tea box.
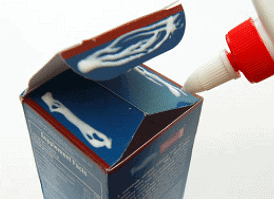
- Glue the top and bottom flaps in place using white glue or a glue gun.
- Position the box horizontally so that the widest panel is facing you. Mark the bottom outline of the cat's body by drawing 3 sides of a rectangle at the bottom of the box-the horizontal line corresponds to the cat's tummy and the vertical lines to its legs. Create an identical rectangle on the opposite side of the box.
- Turn the box so that the adjacent small panel is facing you. Repeat step 3 on this panel and its opposite panel, making sure that the top horizontal sides of your rectangles are about the same height.
- With all four panels marked with lines, you are now ready to cut the box into a cat's body. First, cut out the entire bottom panel. Then cut along the outlines on each side panel.
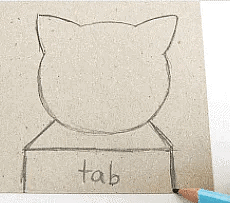
- Draw a cat's head on cardboard, heavy card stock, or on the box scraps from the previous step. Draw shoulders below the head and a rectangular tab at the bottom. You will need this tab to attach the head to the box. This tab should be as wide as the box's small side panel.
- Cut out the head. Glue its bottom tab onto the front panel of the cat's box body.
- Just like the head, you can draw the tail on cardboard, heavy card stock, or on the box scraps from the previous step. You can make it straight, curvy, or bushy.
- Cut out the tail. Glue it to the back of the cat's box body. Let the glue dry completely.
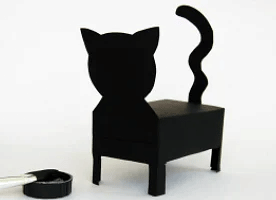
- Paint the cat using acrylic or tempera paint. Acrylic paint clings better to glossy surfaces than tempera. If using tempera or poster paint, apply it undiluted. Let the paint dry. Apply a second coat of paint as needed.
- Paint or color the inner ears. Use a color that constrasts with the rest of the cat's body.
- When the paint is dry, glue a pair of wiggle eyes. Shape some cotton into two small ovals and glue them below the eyes. To add a nose, glue a small pompom, a round bead, or a circle made of craft foam or paper between the cotton ovals. Create whiskers by cutting six short strips of fishing line or thin florist wire. Glue three strips onto each cotton oval.
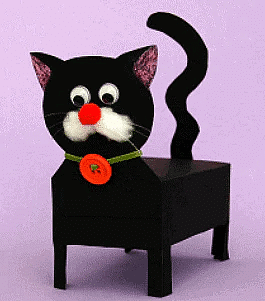
- Add a cat collar if you like. Attach a small button, a bead, or a jingle bell on a short length of yarn or string. Tie the string around your cat's neck. That's it! Your cat is ready for hours of play.
The document Craft Ideas: Box Cat is a part of the Grade 2 Course Drawing (Art & Craft).
All you need of Grade 2 at this link: Grade 2
FAQs on Craft Ideas: Box Cat
| 1. What materials do I need to make a Box Cat? |  |
Ans. To make a Box Cat, you will need a cardboard box, scissors, glue or tape, colored paper or markers, and any additional decorations you would like to add, such as googly eyes or pipe cleaners.
| 2. How do I make the body of the Box Cat? | |
Ans. To make the body of the Box Cat, start by cutting a rectangular opening on one side of the cardboard box for the cat's face. Then, cut out four equal-sized rectangles from the remaining sides of the box to create the legs. Fold these rectangles inward to make the legs stand up.
| 3. How can I decorate my Box Cat? | |
Ans. There are many ways to decorate your Box Cat. You can use colored paper or markers to draw and cut out different shapes for the cat's face, ears, and tail. You can also use googly eyes or draw the cat's features directly on the box. Additionally, you can use pipe cleaners or other materials to add whiskers or other details.
| 4. Can I make my Box Cat look like a specific breed or color? | |
Ans. Yes, you can definitely make your Box Cat resemble a specific breed or color. You can use different colored paper or markers to create the pattern and markings of your desired cat breed. For example, you can add stripes or spots to make it look like a tiger or a leopard.
| 5. How can I make the Box Cat more sturdy? | |
Ans. If you want to make your Box Cat more sturdy, you can reinforce the cardboard box by adding additional layers of cardboard or using thicker cardboard. You can also use tape or glue to secure the different parts of the cat together, ensuring that they are firmly attached.
About this Document

4.75/5 Rating

Apr 18, 2026 Last updated
Document Description: Craft Ideas: Box Cat for Grade 2 2026 is part of Drawing (Art & Craft) preparation. The notes and questions for Craft Ideas: Box Cat have been prepared according to the Grade 2 exam syllabus. Information about Craft Ideas: Box Cat covers topics like and Craft Ideas: Box Cat Example, for Grade 2 2026 Exam. Find important definitions, questions, notes, meanings, examples, exercises and tests below for Craft Ideas: Box Cat.
Introduction of Craft Ideas: Box Cat in English is available as part of our Drawing (Art & Craft) for Grade 2 & Craft Ideas: Box Cat in Hindi for Drawing (Art & Craft) course. Download more important topics related with notes, lectures and mock test series for Grade 2 Exam by signing up for free. Grade 2: Craft Ideas: Box Cat
Description
Craft Ideas: Box Cat of Drawing covers all the important topics, helping you prepare for the Grade 2 exam on EduRev. Start for free!
Information about Craft Ideas: Box Cat
In this doc you can find the meaning of Craft Ideas: Box Cat defined & explained in the simplest way possible. Besides explaining types of Craft Ideas: Box Cat theory, EduRev gives you an ample number of questions to practice Craft Ideas: Box Cat tests, examples and also practice Grade 2 tests


Related Searches
Exam, past year papers, video lectures, Extra Questions, Previous Year Questions with Solutions, pdf , MCQs, ppt, practice quizzes, Craft Ideas: Box Cat, Objective type Questions, Craft Ideas: Box Cat, Semester Notes, shortcuts and tricks, Important questions, Free, mock tests for examination, Viva Questions, Craft Ideas: Box Cat, study material, Sample Paper, Summary;