HTML Editors & Basics | HTML for Junior Classes - Class 3 PDF Download
A simple text editor is all you need to learn HTML.
Learn HTML Using Notepad or TextEdit
- Web pages can be created and modified by using professional HTML editors.
- However, for learning HTML we recommend a simple text editor like Notepad (PC) or TextEdit (Mac).
- We believe in that using a simple text editor is a good way to learn HTML.
- Follow the steps below to create your first web page with Notepad or TextEdit.
Step 1: Open Notepad (PC)
Windows 8 or later:
Open the Start Screen (the window symbol at the bottom left on your screen). Type Notepad.
Windows 7 or earlier:
Open Start > Programs > Accessories > Notepad
Step 1: Open TextEdit (Mac)
Open Finder > Applications > TextEdit
Also change some preferences to get the application to save files correctly. In Preferences > Format > choose "Plain Text"
Then under "Open and Save", check the box that says "Display HTML files as HTML code instead of formatted text".
Then open a new document to place the code.
Step 2: Write Some HTML
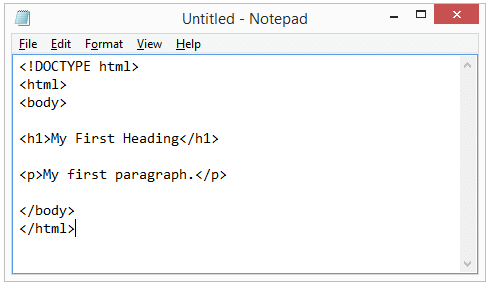
Write or copy the following HTML code into Notepad:
<!DOCTYPE html>
<html>
<body>
<h1>My First Heading</h1>
<p>My first paragraph.</p>
</body>
</html>

Step 3: Save the HTML Page
Save the file on your computer. Select File > Save as in the Notepad menu.
Name the file "index.htm" and set the encoding to UTF-8 (which is the preferred encoding for HTML files).
Tip: You can use either .htm or .html as file extension. There is no difference, it is up to you.
Step 4: View the HTML Page in Your Browser
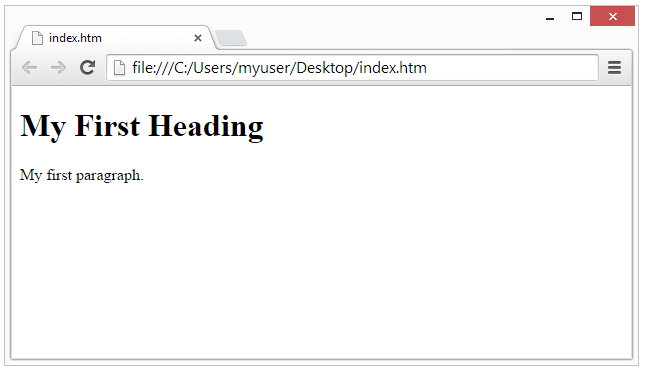
Open the saved HTML file in your favorite browser (double click on the file, or right-click - and choose "Open with").
The result will look much like this:
W3Schools Online Editor
With our free online editor, you can edit the HTML code and view the result in your browser.
It is the perfect tool when you want to test code fast. It also has color coding and the ability to save and share code with others:
Example
<!DOCTYPE html>
<html>
<head>
<title>Page Title</title>
</head>
<body>
<h1>This is a Heading</h1>
<p>This is a paragraph.</p>
</body>
</html>
HTML Documents
- All HTML documents must start with a document type declaration: <!DOCTYPE html>.
- The HTML document itself begins with <html> and ends with </html>.
- The visible part of the HTML document is between <body> and </body>.
Example
<!DOCTYPE html>
<html>
<body>
<h1>My First Heading</h1>
<p>My first paragraph.</p>
</body>
</html>
The <!DOCTYPE> Declaration
The <!DOCTYPE> declaration represents the document type, and helps browsers to display web pages correctly.
It must only appear once, at the top of the page (before any HTML tags).
The <!DOCTYPE> declaration is not case sensitive.
The <!DOCTYPE> declaration for HTML5 is:
<!DOCTYPE html>
HTML Headings
HTML headings are defined with the <h1> to <h6> tags.
<h1> defines the most important heading. <h6> defines the least important heading:
Example
<h1>This is heading 1</h1>
<h2>This is heading 2</h2>
<h3>This is heading 3</h3>
HTML Paragraphs
HTML paragraphs are defined with the <p> tag:
Example
<p>This is a paragraph.</p>
<p>This is another paragraph.</p>
HTML Links
HTML links are defined with the <a> tag:
Example
<a href="https://www.w3schools.com">This is a link</a>
The link's destination is specified in the href attribute.
Attributes are used to provide additional information about HTML elements.
You will learn more about attributes in a later chapter.
HTML Images
HTML images are defined with the <img> tag.
The source file (src), alternative text (alt), width, and height are provided as attributes:
Example
<img src="https://cn.edurev.in/3schools.jpg" alt="W3Schools.com" width="104" height="142">
How to View HTML Source?
Have you ever seen a Web page and wondered "Hey! How did they do that?"
- View HTML Source Code:
Right-click in an HTML page and select "View Page Source" (in Chrome) or "View Source" (in Edge), or similar in other browsers. This will open a window containing the HTML source code of the page. - Inspect an HTML Element:
Right-click on an element (or a blank area), and choose "Inspect" or "Inspect Element" to see what elements are made up of (you will see both the HTML and the CSS). You can also edit the HTML or CSS on-the-fly in the Elements or Styles panel that opens.
|
14 videos|31 docs|24 tests
|


