


All Exams >
Class 6 >
How to become an Expert of MS Word >
All Questions
All questions of Word XP for Class 6 Exam


In MS Word, Ctrl+S is used to ________- a)Scenarios
- b)Size
- c)Save
- d)Spelling Check
Correct answer is option 'C'. Can you explain this answer?
In MS Word, Ctrl+S is used to ________
a)
Scenarios
b)
Size
c)
Save
d)
Spelling Check
|
|
Utkarsh Joshi answered |
In MS Word, Ctrl+S is used to Save the document.
If you need to double underline a word, how will you do that?- a)Go to Format menu and then Font option. Open Underline Style and choose Double Underline
- b)From Format menu choose Font option and then from Font tab open Underline Style and select Double Underline
- c)Select the text then choose Format > Font and on Font tab, open Underline Style and choose Double Underline
- d)Click double underline tool on formatting toolbar
Correct answer is option 'C'. Can you explain this answer?
If you need to double underline a word, how will you do that?
a)
Go to Format menu and then Font option. Open Underline Style and choose Double Underline
b)
From Format menu choose Font option and then from Font tab open Underline Style and select Double Underline
c)
Select the text then choose Format > Font and on Font tab, open Underline Style and choose Double Underline
d)
Click double underline tool on formatting toolbar
|
|
Nishtha Mukherjee answered |
Menu, Font option, and then open Underline Style and select Double Underline
Which of the following helps to reduce spelling error in the document?- a)Auto Format
- b)Auto Correct
- c)Smart Tags
- d)Auto Text
Correct answer is option 'B'. Can you explain this answer?
Which of the following helps to reduce spelling error in the document?
a)
Auto Format
b)
Auto Correct
c)
Smart Tags
d)
Auto Text
|
|
Utkarsh Joshi answered |
The AutoCorrect function will quickly fix the misspelling words and punctuation mistakes. We do not have to use it intentionally, it runs automatically.
Small squares, called ________, on the selection rectangle that surrounds a graphic can be used to change the dimensions of the graphic.- a)Scroll boxes
- b)Sizing handles
- c)Status indicators
- d)Move handles
Correct answer is option 'B'. Can you explain this answer?
Small squares, called ________, on the selection rectangle that surrounds a graphic can be used to change the dimensions of the graphic.
a)
Scroll boxes
b)
Sizing handles
c)
Status indicators
d)
Move handles
|
|
Shilpa Shah answered |
Explanation:
The correct answer is option B, "Sizing handles".
Sizing handles are small squares that are found on the selection rectangle that surrounds a graphic. These handles can be used to change the dimensions or size of the graphic. They allow the user to stretch or shrink the graphic horizontally, vertically, or diagonally.
These handles are usually located on the corners and sides of the selection rectangle. By clicking and dragging on these handles, the user can resize the graphic to the desired dimensions. For example, if the user wants to make the graphic larger, they can click and drag one of the sizing handles away from the center of the graphic. If the user wants to make the graphic smaller, they can click and drag one of the sizing handles towards the center of the graphic.
Benefits of sizing handles:
- Easy resizing: Sizing handles provide a simple and intuitive way to resize graphics. By clicking and dragging on the handles, users can quickly adjust the size of the graphic to fit their needs.
- Precision: Sizing handles allow for precise resizing. Users can carefully drag the handles to resize the graphic to specific dimensions, ensuring that it fits perfectly within a document or layout.
- Uniform resizing: Sizing handles maintain the aspect ratio of the graphic while resizing. This means that the width and height of the graphic are adjusted proportionally, preventing distortion or stretching of the image.
- Visual feedback: When a user clicks and drags on a sizing handle, they can see the graphic being resized in real-time. This provides visual feedback and helps the user determine the optimal size for the graphic.
In conclusion, sizing handles are small squares on the selection rectangle of a graphic that allow users to change the dimensions of the graphic easily and precisely. They provide an intuitive and visual way to resize graphics while maintaining aspect ratio.
Ctrl + J is used to- a)Align Justify
- b)Insert Hyperlink
- c)Search
- d)Print
Correct answer is option 'A'. Can you explain this answer?
Ctrl + J is used to
a)
Align Justify
b)
Insert Hyperlink
c)
Search
d)
Print
|
|
Utkarsh Joshi answered |
Ctrl+J aligns the selected text or line to justify the screen.
Ctrl + S is used to- a)Save Document with different name
- b)Save Document with same name
- c)Save Document and Close Word Application
- d)Save Document and Print whole Pages
Correct answer is option 'B'. Can you explain this answer?
Ctrl + S is used to
a)
Save Document with different name
b)
Save Document with same name
c)
Save Document and Close Word Application
d)
Save Document and Print whole Pages
|
|
Utkarsh Joshi answered |
Ctrl + S is used to Save Document with same name.
Which of the following do you use to change margins?- a)Formatting toolbar
- b)Page setup dialog box
- c)Standard toolbar
- d)Paragraph dialog box
Correct answer is option 'B'. Can you explain this answer?
Which of the following do you use to change margins?
a)
Formatting toolbar
b)
Page setup dialog box
c)
Standard toolbar
d)
Paragraph dialog box
|
|
Jay Goyal answered |
To change margins in a document, you would use the Page Setup dialog box.
Explanation:
The Page Setup dialog box allows you to adjust various settings related to the layout of your document, including margins. To access the Page Setup dialog box, you can usually go to the File menu and select Page Setup or look for it in the Page Layout tab. Once you are in the Page Setup dialog box, you can adjust the margins by changing the values in the Margins section. You can also choose to apply the changes to the whole document or just the current section.
Some other important things to note about changing margins:
- Margins refer to the empty space around the edges of a document.
- Margins can affect how much text fits on a page and how the document looks overall.
- Different types of documents may require different margin settings.
- You may need to adjust other settings, such as page orientation or paper size, in conjunction with margins to get the desired layout.
Which of the following is not available on the Ruler of MS Word screen?- a)Tab stop box
- b)Left Indent
- c)Right Indent
- d)Center Indent
Correct answer is option 'D'. Can you explain this answer?
Which of the following is not available on the Ruler of MS Word screen?
a)
Tab stop box
b)
Left Indent
c)
Right Indent
d)
Center Indent
|
|
Utkarsh Joshi answered |
Center Indent is not available on the Ruler of MS Word screen.
Insert Date, Format Page Number, and Insert AutoText are buttons on the ________ toolbar.- a)Formatting
- b)Header and Footer
- c)Standard
- d)Edit
Correct answer is option 'B'. Can you explain this answer?
Insert Date, Format Page Number, and Insert AutoText are buttons on the ________ toolbar.
a)
Formatting
b)
Header and Footer
c)
Standard
d)
Edit
|
|
Pallavi Roy answered |
Header and Footer Toolbar
The Header and Footer toolbar is a toolbar in Microsoft Word that is used to add and edit headers and footers in a document. It contains a number of buttons that allow users to perform various tasks related to headers and footers. The buttons on this toolbar include:
1. Insert Date: This button is used to insert the current date into the header or footer of a document. It is particularly useful for documents that need to be updated regularly.
2. Format Page Number: This button is used to format page numbers in a document. Users can choose from a range of options, including numbering style, starting number, and number format.
3. Insert AutoText: This button is used to insert predefined blocks of text into a document. AutoText can be used to insert frequently used text, such as addresses or legal disclaimers.
The Header and Footer toolbar is an important tool for creating professional-looking documents in Microsoft Word. It allows users to easily add and edit headers and footers, which are important for providing context and organization to a document. By using the buttons on this toolbar, users can quickly format page numbers, insert dates, and insert predefined blocks of text, saving time and ensuring consistency across documents.
How can you apply exactly the same formatting you did to another text?- a)Copy the text and paste in new location. Then type the new text again
- b)Copy the text and click on Paste Special tool on new place
- c)Select the text then click on Format Painter and select the new text
- d)All of above
Correct answer is option 'C'. Can you explain this answer?
How can you apply exactly the same formatting you did to another text?
a)
Copy the text and paste in new location. Then type the new text again
b)
Copy the text and click on Paste Special tool on new place
c)
Select the text then click on Format Painter and select the new text
d)
All of above
|
|
Debolina Shah answered |
Explanation:
Format Painter:
- The Format Painter tool in Microsoft Word allows you to copy formatting from one piece of text to another.
- To apply the same formatting to another text using Format Painter, first, select the text that has the desired formatting.
- Then, click on the Format Painter button in the toolbar. This button typically looks like a paintbrush icon.
- After clicking on the Format Painter button, the cursor will change to a paintbrush icon.
- Now, select the text where you want to apply the same formatting. The selected text will now have the same formatting as the original text.
- You can continue to apply the same formatting to multiple pieces of text by double-clicking on the Format Painter button to lock it in.
By using the Format Painter tool, you can quickly and easily apply the same formatting to multiple texts without having to manually format each one individually.
In Word 2007 the Zoom is placed on- a)View tab
- b)Home tab
- c)Status bar
- d)A & C both
Correct answer is option 'D'. Can you explain this answer?
In Word 2007 the Zoom is placed on
a)
View tab
b)
Home tab
c)
Status bar
d)
A & C both
|
|
Dishani Pillai answered |
View tab and Status bar in Word 2007
View tab:
In Word 2007, the Zoom feature can be found on the View tab. The View tab is located at the top of the Word window along with other tabs like Home, Insert, Page Layout, etc. When you click on the View tab, you will see different options related to the view of your document such as Print Layout, Full Screen Reading, Web Layout, etc. The Zoom option is located within the Zoom group on the View tab.
Status bar:
The Zoom feature can also be accessed through the Status bar in Word 2007. The Status bar is located at the bottom of the Word window and displays information about the document, such as page number, word count, zoom level, etc. To change the zoom level using the Status bar, you can click on the zoom percentage displayed on the Status bar and select the desired zoom level from the drop-down menu.
A & C both:
Therefore, the correct answer to the question is option 'D', which states that the Zoom feature in Word 2007 can be accessed through both the View tab and the Status bar. This allows users to easily adjust the zoom level of their document based on their preferences and requirements.
The other Col# are inactive when you've select 3 columns. How will you activate those boxes?- a)Double click on spacing box
- b)Double click on inactive Col#
- c)Remove mark from Line between checkbox
- d)Remove mark from Equal Column Width check box
Correct answer is option 'D'. Can you explain this answer?
The other Col# are inactive when you've select 3 columns. How will you activate those boxes?
a)
Double click on spacing box
b)
Double click on inactive Col#
c)
Remove mark from Line between checkbox
d)
Remove mark from Equal Column Width check box
|
|
Dishani Pillai answered |
Explanation:
Removing mark from Equal Column Width check box:
- When you select 3 columns in a document or spreadsheet, the other columns become inactive by default.
- To activate those inactive columns, you need to remove the mark from the "Equal Column Width" checkbox.
- This checkbox is usually located in the formatting or layout options of the software you are using.
- By unchecking this box, you allow the columns to have individual widths instead of being forced to have equal widths.
- This action will enable you to make changes and edits to all columns in your document or spreadsheet.
By following these steps, you can activate the inactive columns and continue working on your document or spreadsheet effectively.
The key F12 opens a- a)Save As dialog box
- b)Open dialog box
- c)Save dialog box
- d)Close dialog box
Correct answer is option 'A'. Can you explain this answer?
The key F12 opens a
a)
Save As dialog box
b)
Open dialog box
c)
Save dialog box
d)
Close dialog box
|
|
Anjali Sharma answered |
Explanation:
Save As dialog box:
When you press the key F12, it opens the Save As dialog box in various software applications. This dialog box allows you to save the current file with a new name, location, or file format.
Open dialog box:
The Open dialog box is typically opened using the key combination Ctrl+O or through the File menu in software applications. It allows you to select a file to open from your computer or network.
Save dialog box:
The Save dialog box is usually opened using the key combination Ctrl+S or through the File menu in software applications. It allows you to save the current file with its existing name and location or choose a new location for saving.
Close dialog box:
The Close dialog box is not a standard dialog box that opens with the key F12. Closing a dialog box is usually done by clicking on the "X" button in the top right corner of the dialog box, pressing the Esc key, or selecting a close option within the dialog box.
In conclusion, the key F12 opens the Save As dialog box in most software applications, allowing you to save the current file with a new name, location, or file format.
What is placed to the left of horizontal scroll bar- a)Tab stop buttons
- b)View buttons
- c)Split buttons
- d)Indicators
Correct answer is option 'B'. Can you explain this answer?
What is placed to the left of horizontal scroll bar
a)
Tab stop buttons
b)
View buttons
c)
Split buttons
d)
Indicators
|
|
Utkarsh Joshi answered |
View buttons is placed to the left of horizontal scroll bar.
In Word, the default alignment for paragraphs is ________.- a)Left-aligned, or flush margins at the left edge and uneven edges at the right edge
- b)Centered, or equidistant from both the left edge and the right edge
- c)Right-aligned, or flush margins at the right edge and uneven edges at the left edge
- d)Justified, or flush margins at both the left and right edges
Correct answer is option 'A'. Can you explain this answer?
In Word, the default alignment for paragraphs is ________.
a)
Left-aligned, or flush margins at the left edge and uneven edges at the right edge
b)
Centered, or equidistant from both the left edge and the right edge
c)
Right-aligned, or flush margins at the right edge and uneven edges at the left edge
d)
Justified, or flush margins at both the left and right edges
|
|
Utkarsh Joshi answered |
In Word, the default alignment for paragraphs is left-aligned, or flush margins at the left edge and uneven edges at the right edge.
In order to email a Word document from within MS Word- a)Office button > Send to > Mail Recipient
- b)Save the file as an email attachment
- c)Start Outlook and attach the file while open in Word
- d)This is an impossible operation
Correct answer is option 'A'. Can you explain this answer?
In order to email a Word document from within MS Word
a)
Office button > Send to > Mail Recipient
b)
Save the file as an email attachment
c)
Start Outlook and attach the file while open in Word
d)
This is an impossible operation
|
|
Utkarsh Joshi answered |
Office button > Send to > Mail Recipient in word 2007
How can you remove tab stop markers from ruler?- a)Double click the tab marker and choose Clear All
- b)Drag the tab stop marker out of the ruler
- c)Right click the tab stop marker and choose remove
- d)All of above
Correct answer is option 'B'. Can you explain this answer?
How can you remove tab stop markers from ruler?
a)
Double click the tab marker and choose Clear All
b)
Drag the tab stop marker out of the ruler
c)
Right click the tab stop marker and choose remove
d)
All of above
|
|
Anisha Iyer answered |
Removing Tab Stop Markers from Ruler
There are several ways to remove tab stop markers from the ruler in Microsoft Word. Here are the different methods:
1. Double click the tab marker and choose Clear All
- This method removes all tab stops in the document, which may not be desirable if you only want to remove a specific tab stop.
2. Drag the tab stop marker out of the ruler
- This method allows you to remove a specific tab stop by clicking and dragging the marker off the ruler.
3. Right click the tab stop marker and choose remove
- This method also allows you to remove a specific tab stop by right-clicking on the marker and selecting "remove".
4. All of the above
- This option is technically correct as all three methods can be used to remove tab stop markers from the ruler.
In summary, the easiest and most precise way to remove a specific tab stop marker from the ruler is to simply click and drag it out of the ruler.
Which of the following commands should you always use before submitting a document to others?- a)Find command
- b)Replace command
- c)Spelling and Grammar
- d)Thesaurus
Correct answer is option 'C'. Can you explain this answer?
Which of the following commands should you always use before submitting a document to others?
a)
Find command
b)
Replace command
c)
Spelling and Grammar
d)
Thesaurus
|
|
Raghav Dasgupta answered |
Before submitting a document to others, it is important to ensure that it is error-free and well-written. This can be achieved by using various tools and commands in word processing software. Among the given options, the command that should always be used before submitting a document to others is the "Spelling and Grammar" command.
1. Spelling and Grammar check:
- Before submitting a document, it is crucial to check for spelling and grammar errors. Spelling mistakes and grammatical errors can make the document difficult to read and understand, which can negatively impact the overall impression of the document.
- The "Spelling and Grammar" command in word processing software helps to identify and correct errors in spelling, grammar, punctuation, and sentence structure.
- It highlights the errors and provides suggestions for corrections, allowing the writer to make necessary changes and improve the quality of the document.
- By using this command, the writer can ensure that the document is free from common mistakes and is more professional and polished.
2. Importance of using the Spelling and Grammar check:
- Using the "Spelling and Grammar" command is important because it helps to catch errors that might have been overlooked during the writing process.
- It ensures that the document is coherent, clear, and error-free, which enhances its readability and credibility.
- By using this command, the writer can avoid embarrassing mistakes, such as typos, misspellings, and grammatical errors, which can undermine the overall message and impact of the document.
- It also helps to maintain consistent language usage and style throughout the document.
- Additionally, the spelling and grammar check can assist non-native English speakers or those who struggle with language proficiency in identifying and correcting errors.
In summary, the "Spelling and Grammar" command should always be used before submitting a document to others. It helps to identify and correct spelling, grammar, punctuation, and sentence structure errors, ensuring that the document is error-free, coherent, and professional.
When typing in Preeti font all the Ukars turn to something else? What's the cause?- a)Autotext
- b)Autocorrect
- c)Speller
- d)Preeti font does not work with Word
Correct answer is option 'B'. Can you explain this answer?
When typing in Preeti font all the Ukars turn to something else? What's the cause?
a)
Autotext
b)
Autocorrect
c)
Speller
d)
Preeti font does not work with Word
|
|
Nishanth Majumdar answered |
Explanation:
When typing in Preeti font, all the Ukars turn to something else because of the autocorrect feature in Microsoft Word. Autocorrect is a built-in feature in Microsoft Word that automatically corrects spelling and grammar mistakes as you type. However, this feature may cause the Ukars to turn into something else when typing in Preeti font.
Autocorrect works by comparing the words you type with a built-in dictionary. If it detects a spelling mistake or a grammatical error, it replaces the word with the correct spelling or grammar. However, the dictionary used by autocorrect does not include all the characters and symbols used in different fonts, including the Preeti font.
Therefore, when typing in Preeti font, autocorrect may not recognize the Ukars and replace them with something else, resulting in the change of the original text. This can be frustrating, especially if you are typing in a language that uses the Ukars frequently.
To avoid this issue, you can turn off the autocorrect feature in Microsoft Word or add the Ukars to the dictionary used by autocorrect. Alternatively, you can use a different font that is compatible with autocorrect or use a different word processing software that does not have this issue.
In summary, the cause of the Ukars turning into something else when typing in Preeti font is the autocorrect feature in Microsoft Word. To avoid this issue, you can turn off autocorrect, add the Ukars to the dictionary, use a different font, or use a different word processing software.
To select a block of text, click at the beginning of the selection, scroll to the end of the selection, position the mouse pointer at the end of the selection, hold down the ________ key, and then click or drag through the text.- a)Ctrl
- b)Alt
- c)Shift
- d)Tab
Correct answer is option 'C'. Can you explain this answer?
To select a block of text, click at the beginning of the selection, scroll to the end of the selection, position the mouse pointer at the end of the selection, hold down the ________ key, and then click or drag through the text.
a)
Ctrl
b)
Alt
c)
Shift
d)
Tab
|
|
Utkarsh Joshi answered |
To select a block of text, click at the beginning of the selection, scroll to the end of the selection, position the mouse pointer at the end of the selection, hold down the Shift key, and then click or drag through the text.
What is the shortcut-key for manual line break?- a)CTRL + Enter
- b)Alt + Enter
- c)Shift + Enter
- d)Space + Enter
Correct answer is option 'C'. Can you explain this answer?
What is the shortcut-key for manual line break?
a)
CTRL + Enter
b)
Alt + Enter
c)
Shift + Enter
d)
Space + Enter
|
|
Utkarsh Joshi answered |
Shift + Enter is the shortcut-key for manual line break.
Press ________ to create a line break, which advances the insertion point to the beginning of the next physical line - ignoring any paragraph formatting instructions.- a)Shift + enter
- b)Ctrl + enter
- c)Shift + tab
- d)Ctrl + tab
Correct answer is option 'A'. Can you explain this answer?
Press ________ to create a line break, which advances the insertion point to the beginning of the next physical line - ignoring any paragraph formatting instructions.
a)
Shift + enter
b)
Ctrl + enter
c)
Shift + tab
d)
Ctrl + tab
|
|
Varun Jain answered |
Creating a Line Break in Microsoft Word
A line break is used to create a new line within a paragraph without starting a new paragraph. In Microsoft Word, you can create a line break by pressing the Shift + Enter keys. Here's how to do it:
1. Place your cursor where you want the line break to occur.
2. Press the Shift + Enter keys.
3. The cursor will move to the beginning of the next line without starting a new paragraph.
Why Use Shift + Enter Instead of Enter?
When you press the Enter key in Microsoft Word, it creates a new paragraph with a new line and adds extra space between the previous paragraph and the new one. This is useful when you want to create a new paragraph, but not when you want to create a new line within a paragraph.
Using Shift + Enter, on the other hand, creates a line break without adding extra space between the lines. This is useful when you want to create a list or add a line break in a heading or title.
Conclusion
Pressing Shift + Enter in Microsoft Word creates a line break that moves the cursor to the beginning of the next physical line without starting a new paragraph. This is useful when you want to create a new line within a paragraph without adding extra space between the lines.
To use your keyboard instead of the mouse to select tools on the ribbon, you display the KeyTips by pressing the ________ key.- a)Alt
- b)Ctrl
- c)Shift + Enter
- d)Alt + Enter
Correct answer is option 'A'. Can you explain this answer?
To use your keyboard instead of the mouse to select tools on the ribbon, you display the KeyTips by pressing the ________ key.
a)
Alt
b)
Ctrl
c)
Shift + Enter
d)
Alt + Enter
|
|
Utkarsh Joshi answered |
By pressing the ALT key on your keyboard, We should see that it has brought up a highlighted letter beside each of the menu choices. Now press the corresponding letter to the menu we want, and it will open further, again showing a highlighted letter for each submenu item. Press that letter on our keyboard and it will take us to that item. If we want to go back one menu level just press the escape key.
When Word flags a possible spelling or grammar error, it also changes the mark on the Spelling and Grammar Status icon to a ________.- a)Green X
- b)Green check mark
- c)Red X
- d)Red check mark
Correct answer is option 'C'. Can you explain this answer?
When Word flags a possible spelling or grammar error, it also changes the mark on the Spelling and Grammar Status icon to a ________.
a)
Green X
b)
Green check mark
c)
Red X
d)
Red check mark
|
|
Utkarsh Joshi answered |
If we typed a word not in the dictionary (misspelled or proper name), a wavy red line appears. Word flags a possible error and changes the Status icon to a red X.
It is possible to ________ a data source before performing a merge.- a)Create
- b)Modify
- c)Sort
- d)All of the above
Correct answer is option 'D'. Can you explain this answer?
It is possible to ________ a data source before performing a merge.
a)
Create
b)
Modify
c)
Sort
d)
All of the above
|
|
Utkarsh Joshi answered |
It is possible to create, modify and sort a data source before performing a merge.
If you will be displaying or printing your document on another computer, you'll want to make sure and select the ________ option under the 'Save' tab.- a)Embed Fonts
- b)Embed True Type Fonts
- c)Save True Type Fonts
- d)Save Fonts
Correct answer is option 'A'. Can you explain this answer?
If you will be displaying or printing your document on another computer, you'll want to make sure and select the ________ option under the 'Save' tab.
a)
Embed Fonts
b)
Embed True Type Fonts
c)
Save True Type Fonts
d)
Save Fonts
|
|
Nilanjan Unni answered |
Answer:
If you will be displaying or printing your document on another computer, it is important to ensure that the fonts you have used in your document are available on that computer as well. Otherwise, the document may not display or print correctly, as the computer will substitute different fonts for the ones you used.
To address this issue, you need to select the Embed Fonts option under the Save tab when saving your document. This will embed the fonts used in your document within the file itself, ensuring that they are available and preserved when the document is opened on another computer.
Let's understand the options provided in the question and why the correct answer is option 'A' - Embed Fonts:
a) Embed Fonts: This option embeds the fonts used in the document within the file itself. When the document is opened on another computer, the fonts will be available and the document will be displayed or printed correctly.
b) Embed True Type Fonts: This option is similar to option 'A', as it also embeds the TrueType fonts used in the document within the file. However, since the correct answer is option 'A', it implies that the document may not necessarily use TrueType fonts, and therefore this option is not the correct choice.
c) Save True Type Fonts: This option saves the TrueType fonts used in the document separately from the file. When the document is opened on another computer, the fonts will need to be installed on that computer separately to correctly display or print the document. Since this option does not embed the fonts within the file, it is not the correct choice.
d) Save Fonts: This option saves the fonts used in the document separately from the file, similar to option 'C'. Again, since this option does not embed the fonts within the file, it is not the correct choice.
In conclusion, the correct answer is option 'A' - Embed Fonts. This ensures that the fonts used in the document are embedded within the file itself, allowing for proper display and printing on another computer.
Which key should be pressed to start a new paragraph in MS-Word?- a)Down Cursor Key
- b)Enter Key
- c)Shift + Enter
- d)Ctrl + Enter
Correct answer is option 'B'. Can you explain this answer?
Which key should be pressed to start a new paragraph in MS-Word?
a)
Down Cursor Key
b)
Enter Key
c)
Shift + Enter
d)
Ctrl + Enter
|
|
Utkarsh Joshi answered |
In Microsoft Word the default action when pressing the Enter key is to create a new paragraph, and not move to the next line.
Ctrl + I is used to- a)Italic
- b)Left Indent
- c)Save Document
- d)Close Document
Correct answer is option 'A'. Can you explain this answer?
Ctrl + I is used to
a)
Italic
b)
Left Indent
c)
Save Document
d)
Close Document
|
|
Sanskriti Sen answered |
Explanation:
Keyboard Shortcut:
- Ctrl + I is a keyboard shortcut used to italicize text in many text editing programs.
Function:
- When you press Ctrl + I, the selected text will be displayed in italics.
Usage:
- This shortcut is commonly used in word processing software and text editors to format text for emphasis or to denote titles, foreign words, or other special text.
Benefits:
- It can help make text stand out or provide visual cues to the reader.
- Italicized text is often used for book titles, scientific names, and other types of specialized text.
Remember:
- It is important to use italics appropriately and sparingly to maintain readability and visual appeal in your document.
Which of the following is not one of the three 'Mail Merge Helper' steps?- a)Merge the two files
- b)Create the main document
- c)Set the mailing list parameters
- d)Create the data source
Correct answer is option 'C'. Can you explain this answer?
Which of the following is not one of the three 'Mail Merge Helper' steps?
a)
Merge the two files
b)
Create the main document
c)
Set the mailing list parameters
d)
Create the data source
|
|
Puja Chopra answered |
Explanation:
Mail Merge is a feature in Microsoft Word that allows you to create personalized letters, envelopes, labels, and other documents by combining a main document with a data source. The Mail Merge Helper provides a step-by-step guide to assist you in completing the mail merge process.
The three main steps in the Mail Merge Helper are as follows:
1. Create the main document: In this step, you design the layout and content of your document, such as a letter or label. You can insert placeholders, called merge fields, where you want personalized information from the data source to appear. This step is essential in setting up the structure of your merged document.
2. Create the data source: In this step, you prepare the data source that contains the recipient information you want to merge into the main document. The data source can be an Excel spreadsheet, a Word table, or an Outlook contacts list. You can also create a new data source or use an existing one. This step is crucial in ensuring that the correct recipient information is merged into the main document.
3. Merge the two files: In this step, you merge the main document with the data source to create personalized documents for each recipient. Word replaces the merge fields in the main document with the corresponding information from the data source. You can preview the merged documents, make any necessary adjustments, and then complete the merge to generate the final documents.
Answer: The option 'C' - "Set the mailing list parameters" is not one of the three Mail Merge Helper steps. While setting the mailing list parameters is an important aspect of the mail merge process, it is not specifically listed as one of the steps in the Mail Merge Helper. Setting the mailing list parameters typically involves selecting the data source, specifying filters or sorting options, and previewing the data. This step helps you customize the merging process according to your specific requirements. However, it is not included as one of the three main steps in the Mail Merge Helper.
A word field may consist of an optional field instruction called a(n) ________- a)Sub document
- b)Symbol
- c)Signal
- d)Switch
Correct answer is option 'D'. Can you explain this answer?
A word field may consist of an optional field instruction called a(n) ________
a)
Sub document
b)
Symbol
c)
Signal
d)
Switch
|
|
Utkarsh Joshi answered |
A word field may consist of an optional field instruction called a Switch.
What is the shortcut key to display field codes?- a)Alt + F9
- b)Ctrl + F9
- c)Shift + F9
- d)Space + F9
Correct answer is option 'A'. Can you explain this answer?
What is the shortcut key to display field codes?
a)
Alt + F9
b)
Ctrl + F9
c)
Shift + F9
d)
Space + F9
|
|
Swara Chakraborty answered |
Shortcut Key to Display Field Codes:
The shortcut key to display field codes in Microsoft Word is Alt + F9 (option A).
Explanation:
Field codes are used in Microsoft Word to create dynamic content such as page numbers, dates, and cross-references. By default, Word displays the results of field codes rather than the actual codes themselves. However, sometimes it is necessary to view the field codes for troubleshooting or customization purposes.
To display field codes, follow these steps:
1. Place the cursor anywhere within the document.
2. Press the Alt + F9 keys simultaneously.
Benefits of Displaying Field Codes:
Displaying field codes can be helpful in various situations such as:
1. Troubleshooting: When a field is not displaying the expected result, viewing the field code can provide insights into the issue. It allows you to check if the code is correctly formatted or if any errors are present.
2. Customization: Displaying field codes allows you to modify or customize the codes according to your specific requirements. You can edit the codes directly to change the formatting, add additional parameters, or apply different options.
3. Learning: Viewing field codes can be beneficial for learning purposes. It helps users understand how different types of fields are constructed and how they interact with the document content.
4. Automation: Field codes are often used to automate repetitive tasks in Word. By displaying the field codes, you can ensure that the codes are set up correctly and are working as intended.
In conclusion, the shortcut key Alt + F9 is used to display field codes in Microsoft Word. This feature is useful for troubleshooting, customization, learning, and automation purposes.
The ________ is a short horizontal line indicating the conclusion of a document.- a)Insertion point
- b)End mark
- c)Status indicator
- d)Scroll box
Correct answer is option 'B'. Can you explain this answer?
The ________ is a short horizontal line indicating the conclusion of a document.
a)
Insertion point
b)
End mark
c)
Status indicator
d)
Scroll box
|
|
Utkarsh Joshi answered |
An end mark is often a small circle or square or horizontal line or other graphic image that indicates the end of an article. An easy method of creating an end mark in any word processor or program is to insert a symbol at the end.
Word has Web authoring tools allow you to incorporate ________ on Web pages.- a)Bullets
- b)Hyperlinks
- c)Sounds
- d)All of the above
Correct answer is option 'D'. Can you explain this answer?
Word has Web authoring tools allow you to incorporate ________ on Web pages.
a)
Bullets
b)
Hyperlinks
c)
Sounds
d)
All of the above
|
|
Utkarsh Joshi answered |
Word has Web authoring tools allow you to incorporate Bullets, Hyperlinks, Sound on Web pages.
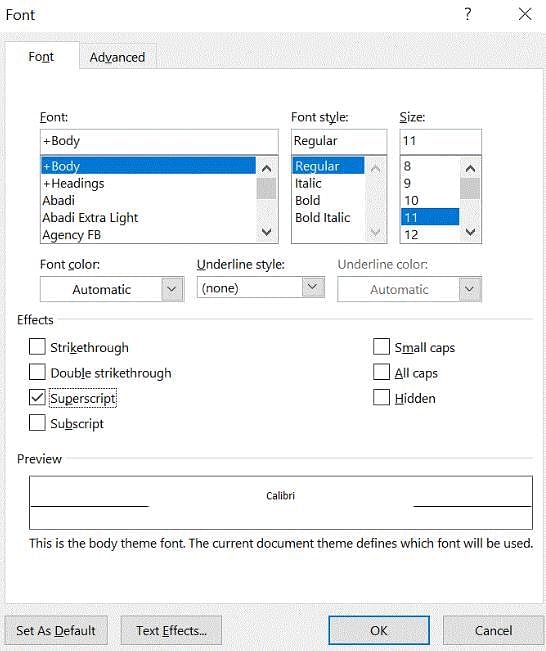
Which of the following is not a font style?- a)Bold
- b)Italics
- c)Regular
- d)Superscript
Correct answer is option 'D'. Can you explain this answer?
Which of the following is not a font style?
a)
Bold
b)
Italics
c)
Regular
d)
Superscript
|
|
Utkarsh Joshi answered |
A superscript is a character, symbol or number set slightly above the normal line of text. It is always smaller than the usual font and is typically found in mathematical or scientific formulas. it is effects to the font.
A screen element of MS Word that is usually located below the title bar that provides categorized options is- a)Menu Bar
- b)Tool Bar
- c)Status Bar
- d)All of the above
Correct answer is option 'A'. Can you explain this answer?
A screen element of MS Word that is usually located below the title bar that provides categorized options is
a)
Menu Bar
b)
Tool Bar
c)
Status Bar
d)
All of the above
|
|
Utkarsh Joshi answered |
A screen element of MS Word 2003 and earlier version that is usually located below the title bar that provides categorized options is Menu Bar.
Essential business letter elements include the ________.- a)Date line and inside address
- b)Message
- c)Signature block
- d)all of the above
Correct answer is option 'D'. Can you explain this answer?
Essential business letter elements include the ________.
a)
Date line and inside address
b)
Message
c)
Signature block
d)
all of the above
|
|
Utkarsh Joshi answered |
Essential business letter elements include the all of the above options.
Ctrl + W is used to- a)Save and Print the Document
- b)Save and Close Word Application
- c)Save and Close document
- d)Without Save, Close Document
Correct answer is option 'C'. Can you explain this answer?
Ctrl + W is used to
a)
Save and Print the Document
b)
Save and Close Word Application
c)
Save and Close document
d)
Without Save, Close Document
|
|
Utkarsh Joshi answered |
Ctrl + W is used to Save and Close document.
Ctrl + M is used to- a)New Document
- b)Close Document
- c)Right Indent
- d)Left Indent
Correct answer is option 'D'. Can you explain this answer?
Ctrl + M is used to
a)
New Document
b)
Close Document
c)
Right Indent
d)
Left Indent
|
|
Utkarsh Joshi answered |
CTRL + M is used to Indent a paragraph from the left.
Chapter doubts & questions for Word XP - How to become an Expert of MS Word 2025 is part of Class 6 exam preparation. The chapters have been prepared according to the Class 6 exam syllabus. The Chapter doubts & questions, notes, tests & MCQs are made for Class 6 2025 Exam. Find important definitions, questions, notes, meanings, examples, exercises, MCQs and online tests here.
Chapter doubts & questions of Word XP - How to become an Expert of MS Word in English & Hindi are available as part of Class 6 exam.
Download more important topics, notes, lectures and mock test series for Class 6 Exam by signing up for free.
How to become an Expert of MS Word
30 videos|49 docs|8 tests
|
|
© EduRev
|
Education Revolution
|


|


Signup on EduRev and stay on top of your study goals
10M+ students crushing their study goals daily