TreeView in Android with Example


TreeView in Android with Example
Last Updated : 22 Aug, 2022If you are looking for new UI designs to represent huge data, then there are so many ways to represent this type of data. You can use pie charts, graphs, and many more view types to implement these views. For displaying such huge data then we can prefer using a TreeView. TreeView is similar to that of a tree in which it has a parent node and inside that parent node, you can create multiple nodes according to requirement. In this example, we can take a look at creating a TreeView in your Android application. Now we will move towards the implementation of Tree View. We are going to implement this project using both Java and Kotlin Programming Language for Android.
Java and Kotlin Programming Language for Android. \\n \\n\\nIntroduction to TreeView
- TreeView is a UI component used to represent hierarchical data in a tree-like structure.
- It consists of parent nodes and child nodes that can be expanded or collapsed.
- TreeView is beneficial for displaying large sets of data in a structured and organized manner.
Implementation of TreeView in Android
Using Java
- To implement a TreeView in Android using Java, you need to create a parent node and add child nodes to it.
- Each node can have its own set of child nodes, forming a hierarchical structure.
- Example:
- Parent Node: "Fruits"
- Child Nodes: "Apple", "Banana", "Orange"
Using Kotlin
- Implementing a TreeView in Android using Kotlin follows a similar approach to Java.
- Kotlin provides concise syntax and powerful features for Android app development.
- Example:
- Parent Node: "Countries"
- Child Nodes: "USA", "Canada", "India"
Advantages of Using TreeView
- TreeView helps in organizing and visualizing complex data structures effectively.
- It improves user experience by presenting information in a structured format.
- TreeView enables easy navigation through hierarchical data.
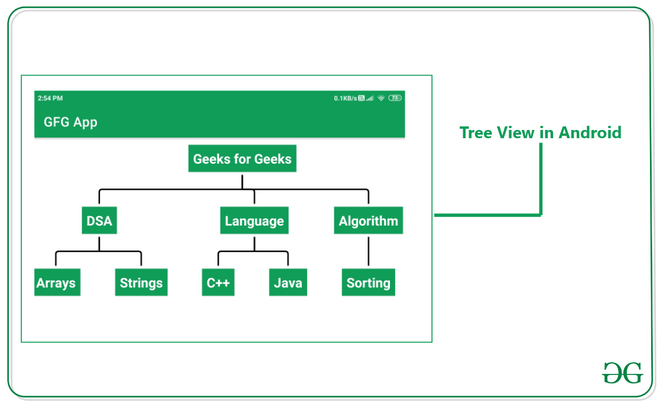
What is TreeView and How it looks?
TreeView is a method of displaying data in a tree-like structure, making it simpler for users to grasp the data organization within an application. The visual representation of a TreeView can be understood through the following image:
Step By Step Implementation
Step 1: Create a New Project in Android Studio
To initiate a new project in Android Studio, you can follow the steps outlined below. This process is detailed in both Java and Kotlin for Android:
How to Create/Start a New Project in Android StudioStep 2: Adding Dependency to the build.gradle File
In the Module build.gradle file, insert the specified dependency and then synchronize the project by clicking on the 'Sync Now' button:
build.gradleSync NowStep 3: Working with the XML Files
Proceed to the activity_main.xml file, which defines the project's user interface. Below is the code snippet for the activity_main.xml file, with explanatory comments included to aid comprehension:
activity_main.xml fileactivity_main.xmlCreate a new XML file
Once the TreeView is integrated, generate a new XML file for the node to be displayed within the TreeView structure. To create this file, navigate to app > res > layout, right-click, select New > Layout Resource file, assign a name (e.g., tree_view_node), and create the file. Subsequently, input the provided code into the newly created file, as demonstrated below:
Creating Layout Resource File
- Create a new Layout Resource file named tree_view_node as tree_view_node.xml.
- Define the layout structure in XML format.
- Use RelativeLayout as the root layout element.
- Include a TextView element with specific attributes like id, layout_width, layout_height, margin, background, padding, text, textColor, textSize, and textStyle.
XML Code for Layout Resource File
"wrap_content" TextView"@id/idTvnode"android:layout_margin="5dp"android:background="@color/purple_500"android:padding="8dp"android:text="@string/my_node"android:textColor="@color/white"android:textSize="20sp"android:textStyle="bold"Step 4: Working with the Java/Kotlin Files
- Create a new class named View Holder to manage nodes in the Tree View.
- The class is referred to as ViewHolder.
- Implement necessary functionalities within the ViewHolder class.
ViewHolder File
- JavaKotlin
Java and Kotlin Programming
- Java
- Kotlin
Implementing ViewHolder Class
The ViewHolder class is used in Android development to hold references to the views that will be displayed in a RecyclerView. It helps in improving performance by recycling views.
- Importing necessary classes like View and TextView
- Creating the ViewHolder class with a constructor to initialize the TextView
Code Snippet for ViewHolder Class in Java
import android.view.View; import android.widget.TextView; public class ViewHolder { TextView textView; ViewHolder(View view) { textView = view.findViewById(R.id.idTvnode); } }
Code Snippet for ViewHolder Class in Kotlin
import android.view.View import android.widget.TextView class ViewHolder internal constructor(view: View) { var textView: TextView init { textView = view.findViewById(R.id.idTvnode) } }
Implementing TreeView in Android MainActivity
The TreeView is a UI component that displays hierarchical data in a tree-like structure. It is commonly used to represent data relationships in a visually appealing way.
MainActivity Setup
In the MainActivity file, we set up the TreeView and create a hierarchical structure to display data effectively.
Code Snippet for MainActivity
// MainActivity code snippet here
Understanding the MainActivity Class in Android Development
- The MainActivity class in Android development serves as the entry point for an application, responsible for initializing and setting up the user interface.
- It extends the AppCompatActivity class, providing compatibility support for older versions of Android.
Creating the TreeView Structure
- To create a tree structure in Android, we use classes like BaseTreeAdapter, TreeNode, and TreeView.
- TreeView is a UI component that displays hierarchical data in a tree-like structure.
- BaseTreeAdapter is used to adapt the data to the tree structure, defining how the data is displayed.
Populating the TreeView with Nodes
- Nodes represent elements within the tree structure, with each node potentially having child nodes.
- Nodes like 'Geeks for Geeks', 'DSA', 'Algorithm', and 'Language' serve as parent nodes.
- Child nodes, such as 'Arrays', 'Strings', 'C', and 'Java', are attached to their respective parent nodes.
- Nodes are interconnected to represent the hierarchical relationships between different elements.
Setting up the Adapter and Root Node
- An adapter is used to link the data to the TreeView and define how the data is presented.
- The root node acts as the starting point of the tree structure, with all other nodes branching out from it.
- The setRootNode() method assigns the root node to the adapter, establishing the entire tree structure.
Displaying Data in the TreeView
- The onBindViewHolder() method is crucial for populating each node with the relevant data.
- Text views within each node are updated with the corresponding information using setText().
- This ensures that the tree structure accurately represents the underlying data hierarchy.
Enhancing User Interaction
- TreeView components allow users to interact with the hierarchical data, expanding and collapsing nodes as needed.
- By tapping on nodes, users can navigate through different levels of the tree structure.
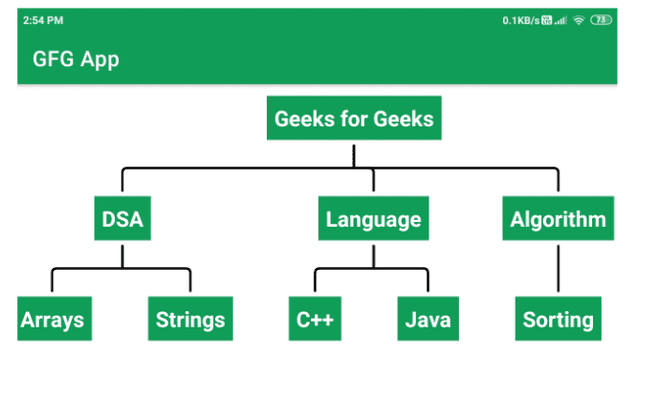
Output:
Please Login to comment...
LoginLike| Summary of Complex Information |
|---|
Main Concepts
|
Organization and Presentation
|
