How to create a Face Detection Android App using Machine Learning KIT on Firebase


How to create a Face Detection Android App using Machine Learning KIT on Firebase
Last Updated: 25 Apr, 2023Pre-requisites:
- Firebase Machine Learning kit
- Adding Firebase to Android App
Firebase ML KIT simplifies machine learning by offering pre-trained models usable in iOS and Android apps. Let's utilize ML Kit's Face Detection API to identify faces in photos. By the end of this guide, we will have an app capable of recognizing faces in images and displaying related information like smiles or closed eyes with a user-friendly interface.
Approach
Step 1: Create a New Project
- Open a new project in Android Studio and name it accordingly.
- Opt for an empty activity for this project.
- Choose a minimum SDK of 23 or higher.
- Utilize JAVA as the programming language.
- Keep all settings default except the mentioned ones.
- Click on FINISH to proceed.
Step 2: Connect with ML KIT on Firebase
- Log in or register on Firebase.
- In the Firebase console, create a new project or select an existing one.
- Name the project as per your preference.
- Access Firebase ML in the Docs section and choose 'recognize text' under Vision.
- Review the outlined steps for clarity.
- Return to Android Studio.
- Navigate to Tools -> Firebase -> Analytics -> Connect with Firebase -> Select your project -> Click Connect. (This links your app to Firebase)
Step 3: Custom Assets and Gradle
- Customize assets and Gradle files as needed for your project.
Enhancing the GUI
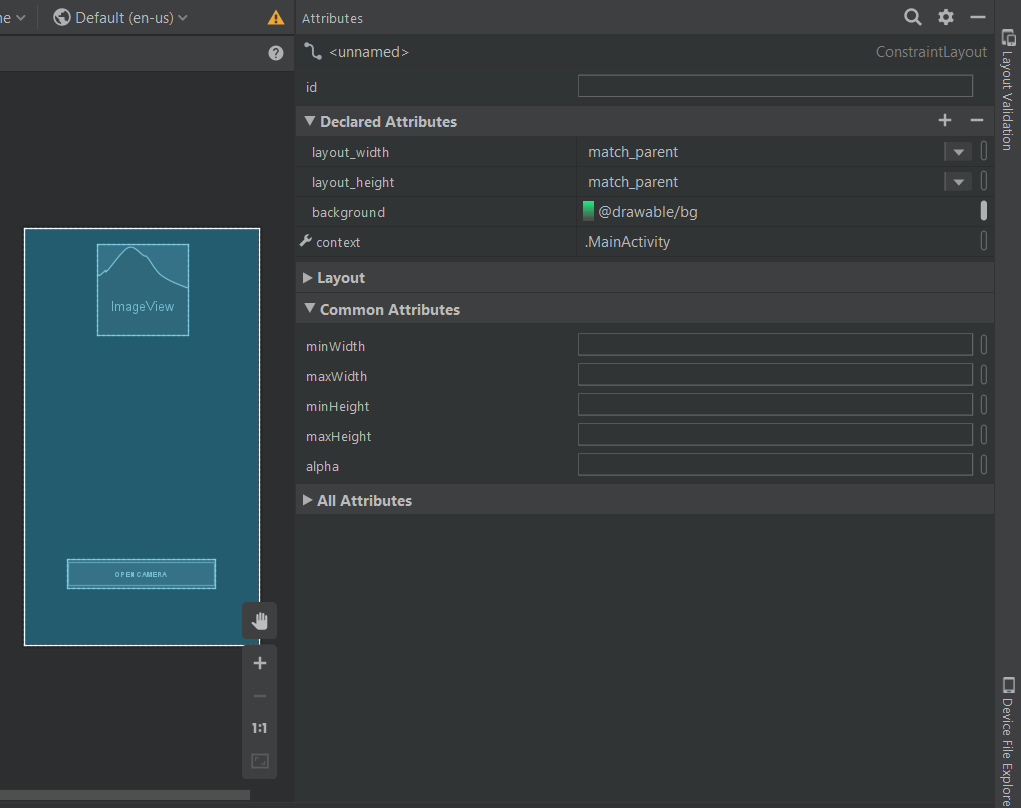
- Choose an image of .png format and add it in the res folder to set it as the background of the main .xml file. Alternatively, set a background color by customizing it under Declared Attributes in the design view of the layout.
Declared Attributes
Including ML Kit Dependencies
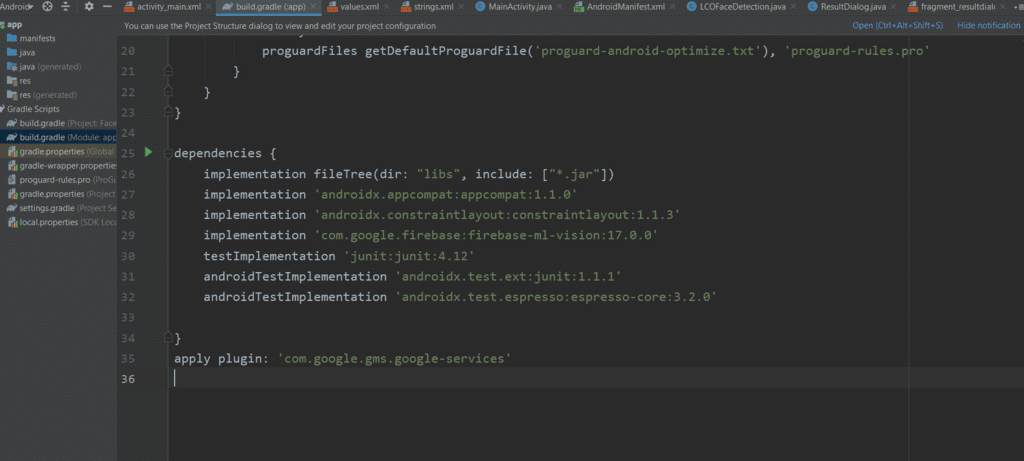
- To include the ML Kit dependencies, navigate to Gradle Script -> build.gradle(Module:app) and add the following implementation:
implementation 'com.google.firebase:firebase-ml-vision:17.0.0'
Applying the Plugin
- Copy the provided text and paste it at the end of the app-level Gradle file, outside all brackets.
apply plugin: 'com.google.gms.google-services'
Modifying build.gradle (project)
- Go to build.gradle (project) and insert the specified text in the 'dependencies' classpath, as illustrated in the accompanying image.
Setting up Dependencies
- Open the build.gradle (project) file.
- Copy the specified text and add it to the 'dependencies' classpath section.
- Ensure the classpath includes 'com.google.gms:google-services:4.2.0'.
- Refer to the image below for a visual guide.

Syncing Changes
- Click on 'Sync Now' to synchronize the modifications.
Designing the User Interface (UI)
- Below presents the fundamental XML code snippet for creating a basic layout.
- Include a button to facilitate the camera functionality.
UI Customization Steps
- Now the UI will look like this.
Layout Resource File Creation
- Now go to layout -> new -> layout resource file -> Name: fragment_resultdialog.xml. This file has been created to customize the output screen, which will display a dialog box called Result Dialog box with a text view called Result Text with all the attributes of the detected image. Below is the XML file for the XML file created.
 |
XML File Structure
- layout -> new -> layout resource file -> Name: fragment_resultdialog.xml.
<?xml version="1.0" encoding="UTF-8"?> <androidx.constraintlayout.widget.ConstraintLayout android:layout_height="match_parent" android:layout_width="match_parent" xmlns:tools="http://schemas.android.com/tools" xmlns:app="http://schemas.android.com/apk/res-auto" xmlns:android="http://schemas.android.com/apk/res/android"> <ScrollView android:layout_width="wrap_content" android:layout_height="wrap_content" app:layout_constraintBottom_toBottomOf="parent" app:layout_constraintStart_toStartOf="parent" app:layout_constraintTop_toTopOf="parent"> <RelativeLayout android:id="@ id/relativeLayout" android:layout_width="match_parent" android:layout_height="wrap_content" android:layout_marginStart="20dp" android:layout_marginEnd="20dp" app:layout_constraintEnd_toEndOf="parent" app:layout_constraintStart_toStartOf="parent" app:layout_constraintTop_toTopOf="parent"> <TextView android:id="@ id/result_text_view" android:layout_width="match_parent" android:layout_height="wrap_content" android:gravity="center" android:text="LCOFaceDetection" android:textColor="#000000" android:textSize="18sp" app:layout_constraintEnd_toEndOf="parent" app:layout_constraintStart_toStartOf="parent" app:layout_constraintTop_toTopOf="parent"/> <Button android:id="@ id/result_ok_button" android:layout_width="wrap_content" android:layout_height="wrap_content" android:layout_below="@id/result_text_view" android:layout_centerInParent="true" android:layout_marginTop="20dp" android:layout_marginBottom="5dp" android:background="#75DA8B" android:padding="16dp" android:text="ok" app:layout_constraintEnd_toEndOf="parent" app:layout_constraintStart_toStartOf="parent" app:layout_constraintTop_toBottomOf="@ id/result_text_view"/> </RelativeLayout> </ScrollView> </androidx.constraintlayout.widget.ConstraintLayout> ScrollViewapp:layout_constraintTop_toTopOfRelativeLayout"@ id/relativeLayout"android:layout_marginStart"20dp"android:layout_marginEnd<!--text view to display the result textafter reading an image-->TextView"@ id/result_text_view"android:gravity"center""LCOFaceDetection"android:textColorandroid:textSize"18sp"<!--a button with text 'ok' written on it-->"@ id/result_ok_button"android:layout_below"@id/result_text_view"android:layout_centerInParent"true"android:layout_marginTop"5dp""#75DA8B""ok"app:layout_constraintTop_toBottomOfStep 5: Firebase App Initializer
- Create a new Java class named LCOFaceDetection.java with a superclass of Application(android.app.Application). Below is an example source code for the Java class:
import android.app.Application;import com.google.firebase.FirebaseApp;public class LCOFaceDetection extends Application {public final static String RESULT_TEXT = "RESULT_TEXT";public final static String RESULT_DIALOG = "RESULT_DIALOG";// Initializing our Firebase@Overridepublic void onCreate() {super.onCreate();FirebaseApp.initializeApp(this);}}
Step 6: Inflating the Result Dialog Box
- Create a new Java class named ResultDialog.java with a superclass of DialogFragment. This class corresponds to the fragment_resultdialog.xml file. Below is an example code snippet for the Java file:
Creating Result Dialog in Java
- Create a new Java class named ResultDialog.java with DialogFragment as its superclass.
- The class is associated with the XML layout file fragment_resultdialog.xml.
Java Code for ResultDialog Class
- The ResultDialog.java class extends DialogFragment and handles the result dialog functionality.
- It includes elements like buttons and text views for user interaction.
- The onCreateView method inflates the layout of the result dialog.
- Result text is retrieved and displayed in the text view.
- An onClick listener is implemented for the dismiss button.
Java Code Snippet
import android.os.Bundle;import android.view.LayoutInflater;import android.view.View;import android.view.ViewGroup;import android.widget.Button;import android.widget.TextView;import androidx.annotation.NonNull;import androidx.annotation.Nullable;import androidx.fragment.app.DialogFragment;public class ResultDialog extends DialogFragment {Button okBtn;TextView resultTextView;@Nullablepublic View onCreateView(@NonNull LayoutInflater inflater, @Nullable ViewGroup container, @Nullable Bundle savedInstanceState) {View view = inflater.inflate(R.layout.fragment_resultdialog, container, false);String resultText = "";okBtn = view.findViewById(R.id.result_ok_button);resultTextView = view.findViewById(R.id.result_text_view);Bundle bundle = getArguments();resultText = bundle.getString(LCOFaceDetection.RESULT_TEXT);resultTextView.setText(resultText);okBtn.setOnClickListener(new View.OnClickListener() {public void onClick(View v) {dismiss();}});return view;}}Step 7: Open Camera on a Real Device and Enabling Face Detection
- Example code for the main Java file:
- Utilizes FirebaseVision and FirebaseVisionFaceDetector classes.
- List of settings configurable in the face detection model:
Setting Description Performance mode Choose between FAST (default) or ACCURATE to prioritize speed or accuracy in face detection. Detect landmarks Determine whether to identify facial landmarks like eyes, ears, nose, and more. Options include NO_LANDMARKS (default) or ALL_LANDMARKS. Detect contours Indicate if contours of facial features should be detected, limited to the most prominent face in the image. Choices are NO_CONTOURS (default) or ALL_CONTOURS. Classify faces Decide whether to categorize faces, such as identifying expressions like "smiling" or "eyes open." Choose between NO_CLASSIFICATIONS (default) or ALL_CLASSIFICATIONS. Minimum face size Set the minimum size of faces to detect, relative to the image. Default value is 0.1f.
Face Tracking and Detection
Face Tracking
Enable face tracking to assign IDs to faces for tracking across multiple images.
Face Tracking Limitation
When contour detection is active, only one face is detected, rendering face tracking ineffective.
Recommendation
Avoid enabling both contour detection and face tracking for improved detection accuracy and speed.
Face Detection Implementation
Utilize Firebase ML Vision for face detection in Android applications.
Configuring Face Detection
Customize face detection model settings using FirebaseVisionFaceDetectorOptions.
Face Detection Process
Process captured images to identify facial features like smiles and eye openness.
Result Handling
Display detection results in a dialog box, including attributes of recognized faces.
Android Application Integration
Integrate Firebase ML Vision functionalities into Android apps for advanced image processing.
Code Implementation
Below is a summarized version of the code implementation:
Import necessary libraries and classes for ML Vision and Android functionalities.
Initialize Firebase in the main activity for ML Vision setup.
Implement camera functionality to capture images for face detection.
Configure face detection model options for accurate detection.
Process captured images to detect faces and extract facial attributes.
Handle success and failure scenarios of face detection operations.
Additional Resources
- Refer to Firebase ML documentation for in-depth analysis and code samples on text recognition.
| /*package whatever do not write package name here*/ | androidx.appcompat.app.AppCompatActivity; | android.content.Intent; | android.graphics.Bitmap; |
| android.provider.MediaStore; | android.widget.Toast; | com.google.android.gms.tasks.OnFailureListener; | com.google.android.gms.tasks.OnSuccessListener; |
| com.google.firebase.ml.vision.FirebaseVision; | com.google.firebase.ml.vision.common.FirebaseVisionImage; | com.google.firebase.ml.vision.common.FirebaseVisionPoint; | com.google.firebase.ml.vision.face.FirebaseVisionFace; |
| com.google.firebase.ml.vision.face.FirebaseVisionFaceDetector; | com.google.firebase.ml.vision.face.FirebaseVisionFaceDetectorOptions; | com.google.firebase.ml.vision.face.FirebaseVisionFaceLandmark; | java.util.List; |
Output
- Video Player
- 00:00
- 00:11
- Use Up/Down Arrow keys to increase or decrease volume.
- Please Login to comment...
- Login
- Like
